Positioning people on your slp system, Backrest position, Step 3 - head support – Oakworks Side Lying Positioning System User Manual
Page 4: Step 1 - attaching the strap, Step 2 - setting up the backrest, Step 4 - positioning your client
POSITIONING PEOPLE ON YOUR SLP SYSTEM
Install an adjustable face rest in the two loops provided
in the Torso Cushion, and adjust the face rest to support
the clients head comfortably. Reversing the face rest cres-
cent pad to offer cervical support is best. If your face rest
does not have 8” on center dowels that fit in the loops,
just insert them between the torso and leg cushions. You
may also use a pillow between the face rest crescent pad
and the client.
BACKREST POSITION
If you anticipate that you might want to use this feature, you must first
install the strap system on the table. Do this before the client gets on. On Oakworks tables, it can be installed easily
while the client is on the table due to the additional space between the two table halves.
Additional items required-
You will also need an adjustable face rest to be used as a head support and a firm leg bolster.
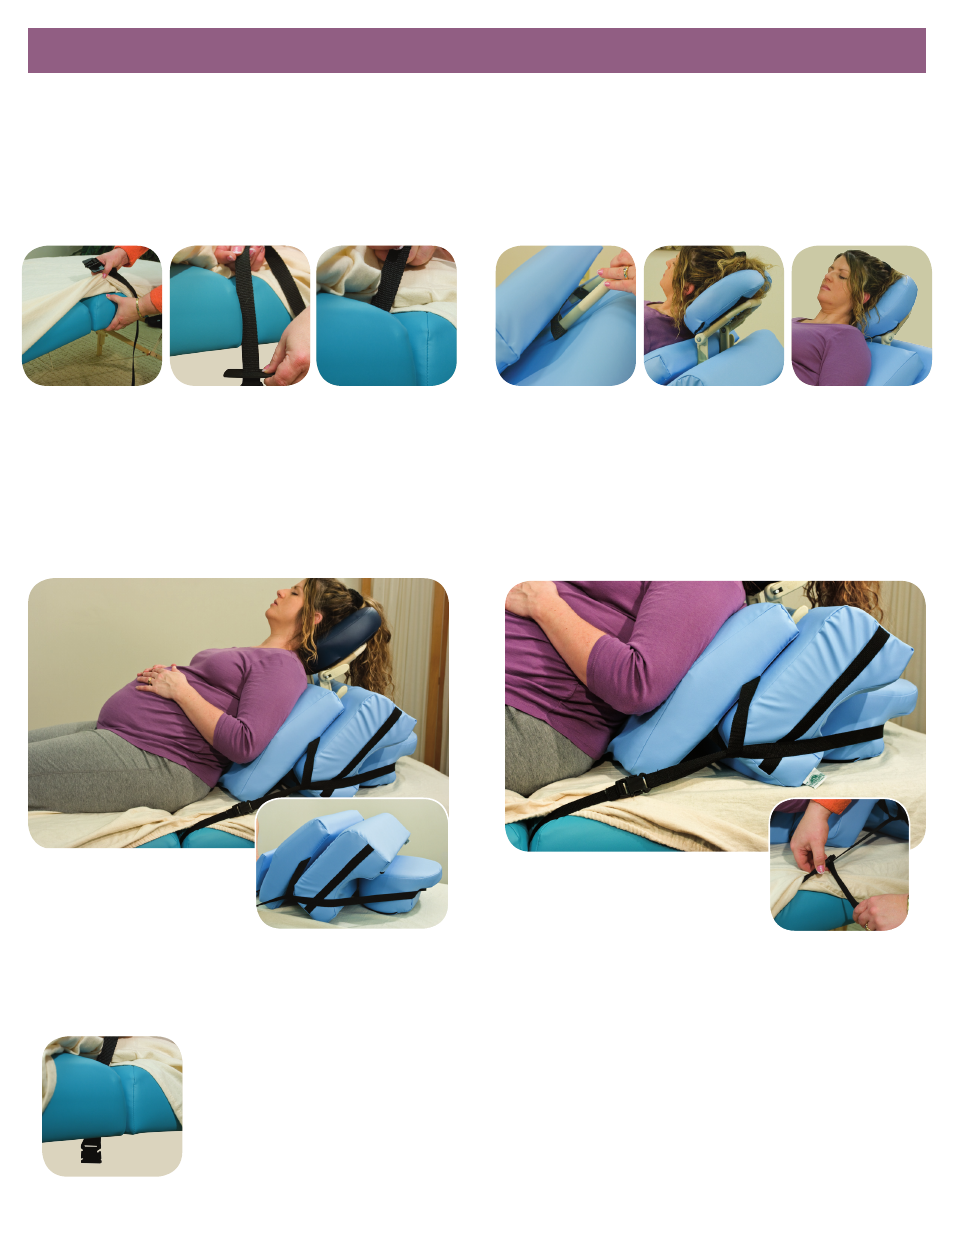
STEP 3 - HEAD SUPPORT:
Before your client gets on the table, lift your table a
little to create a gap between the two table halves. Slide
the long strap in from the side of the table and pull
up. Make sure that the rectangular retainer is pulled up
against the bottom of the frame for security. Repeat this
step on the other side with the shorter strap. When you
level out the table, the webbing will stay in place for later use.
STEP 1 - ATTACHING THE STRAP:
Have your client slide back against
the pads and compress them a little.
Use the adjuster wedge for lumbar
support if needed. Shortening the
strap creates a more upright
position. Add a bolster under the knees.
After they lean back, check the following points of client
alignment, and adapt as needed:
• Is the lumbar spine fully supported?
• Is the entire spine aligned, including the upper torso
and neck?
• For pregnant women: Is the entire torso supported
from hip joint to head at a minimum of 35º from the
table top?
Place the Torso Cushion as
shown on the table, followed
by the Leg Cushion (draped
with a king size pillow case).
Slide the long strap through handles on the Torso Cushion
and leg bolster, catching to the cutout of the Head Rest as
shown. Then attach the buckle to the short strap on the
other side of the table. The strap will be looped around
the torso, leg and head cushions; adjust as needed.
STEP 2 - SETTING UP THE BACKREST:
CAUTION:
Be sure that the strap
comes out over the table
half from the gap between
the table as shown.
STEP 4 - POSITIONING YOUR CLIENT:
page 3 www.oakworks.com