Apply the decals finishing the model, Join the control surfaces – Great Planes Ultra Sport 40 Plus Kit - GPMA0390 User Manual
Page 48
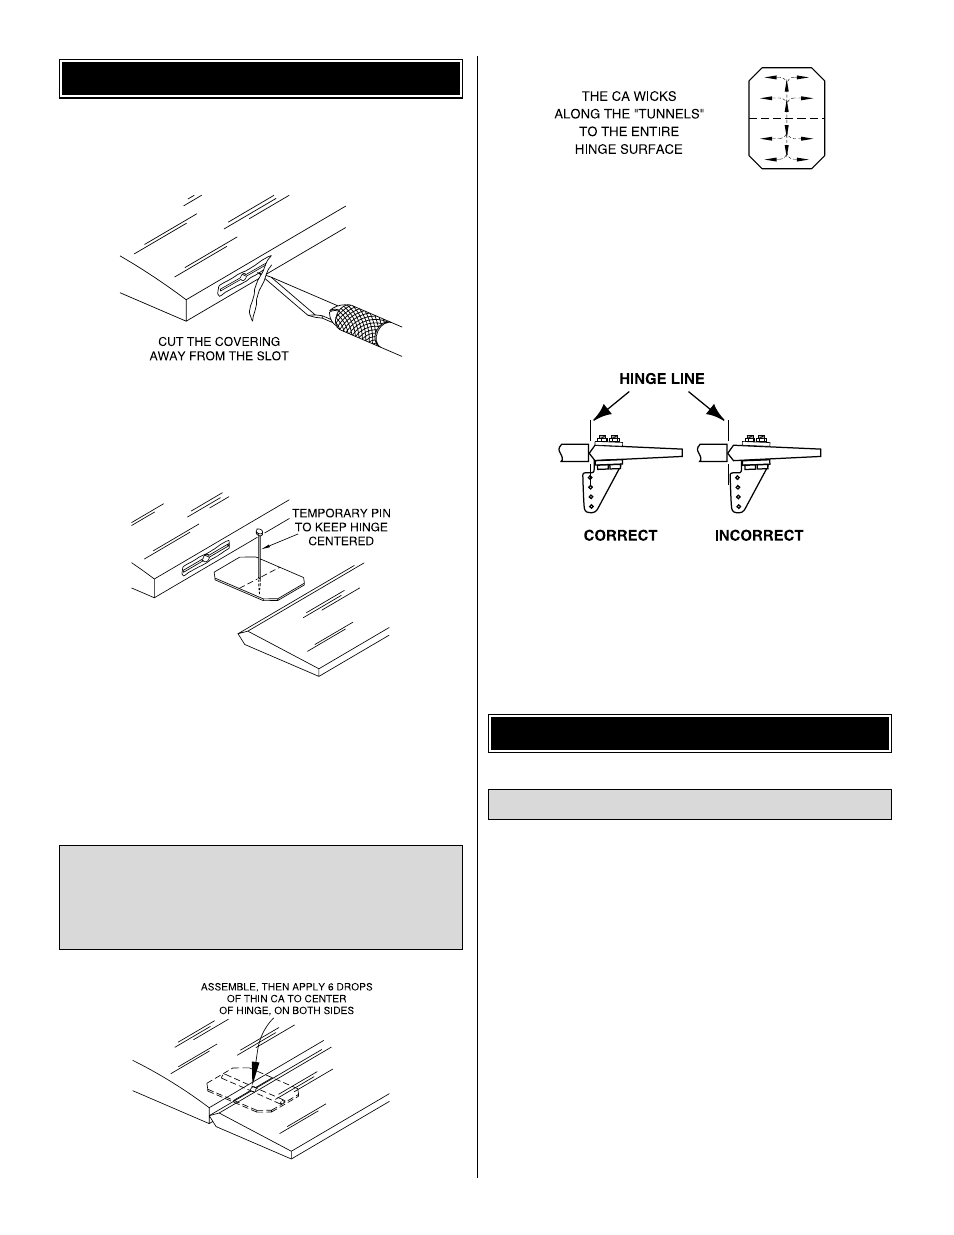
Now that the control surfaces are covered, you can
permanently install the hinges into the control surfaces.
❏
1. Start with the stab and elevators. Remove a small strip
of covering from the hinge slots.
❏
2. Fit the hinges in the stab and elevator (without glue).
❏
3. Join the elevators to the stab with the hinges. If the
hinges do not remain centered as you join the elevators to
the stab, remove the stab and insert a pin in the center of
the hinge to keep them centered. Make sure there is
approximately a 1/64" [.5mm] gap between the elevators
and the stab so you do not glue them together.
❏
4. Add six drops of thin CA to the center of the hinges on
both the top and bottom. The holes you drilled in the hinge
slot will wick the CA into the entire hinge surface. Use a
paper towel to absorb excess CA from the hinge gap before
it cures.
❏
5. Use the same hinging method to join the rudder to the
fin and the ailerons to the wing.
❏
6. Reinstall the pushrods you disconnected before
covering and mount the control horns to the ailerons,
elevator and rudder. Reinstall any hardware and other
components you may not already have in place such as the
fuel valve, fuel lines, servos, on/off switch, etc. Make sure
you install silicone clevis retainers on all nylon clevises.
1. Use scissors or a sharp hobby knife to cut the decals from
the sheet.
2. Be certain the model is clean and free from oily
fingerprints and dust. Prepare a dishpan or small bucket
with a mixture of liquid dish soap and warm water-about one
teaspoon of soap per gallon of water. Submerse the decal in
the soap and water and peel off the paper backing. Note:
Even though the decals have a “sticky-back” and are not the
water transfer type, submersing them in soap & water allows
accurate positioning and reduces air bubbles underneath.
3. Position decal on the model where desired. Holding the
decal down, use a paper towel to wipe most of the water away.
4. Use a piece of soft balsa or something similar to
squeegee remaining water from under the decal. Apply the
rest of the decals the same way.
Apply the Decals
FINISHING THE MODEL
Do not use CA accelerator on any of the hinges and do
not glue the hinges with anything but thin CA. Do not
attempt to glue one half of the hinge at a time. The hinges
will not be properly secured and could come out while the
model is in flight.
JOIN THE CONTROL SURFACES
48