Painting install the stab & fin covering sequence – Great Planes Ultra Sport 40 Plus Kit - GPMA0390 User Manual
Page 47
❏
6. If you want to duplicate the trim scheme pictured on
the box you will need the following rolls of Top Flite
MonoKote:
1 Roll of Metallic Plum – TOPQ0403
1 Roll of Red – TOPQ0201
1 Roll of Yellow – TOPQ0203
2 Rolls of White – TOPQ0204
Fuselage
❏
1. Tail
junctions strips as described previously
❏
2. Stab tops, then bottoms
❏
3. Fin right, then left side
❏
4. Fuse bottom aft, then front
❏
5. Fuse sides
❏
6. Turtle deck (may be done in one or two pieces)
❏
7. Front deck (aft of cowl)
Wing
❏
1. Hidden areas and corners such as the trailing edge
on the flap and aileron area
❏
2. Belly pan sides and belly pan
❏
3. Bottom of one, then the other half of the wing
❏
4. Top of one, then the other half of the wing
Control Surfaces and Details
❏
1. Ends, bottoms, then tops of elevators, ailerons and flaps
❏
2. One, then the other side of the rudder
Once you have the stab, fin and fuselage covered you can
permanently install the stab and fin to the fuselage.
❏
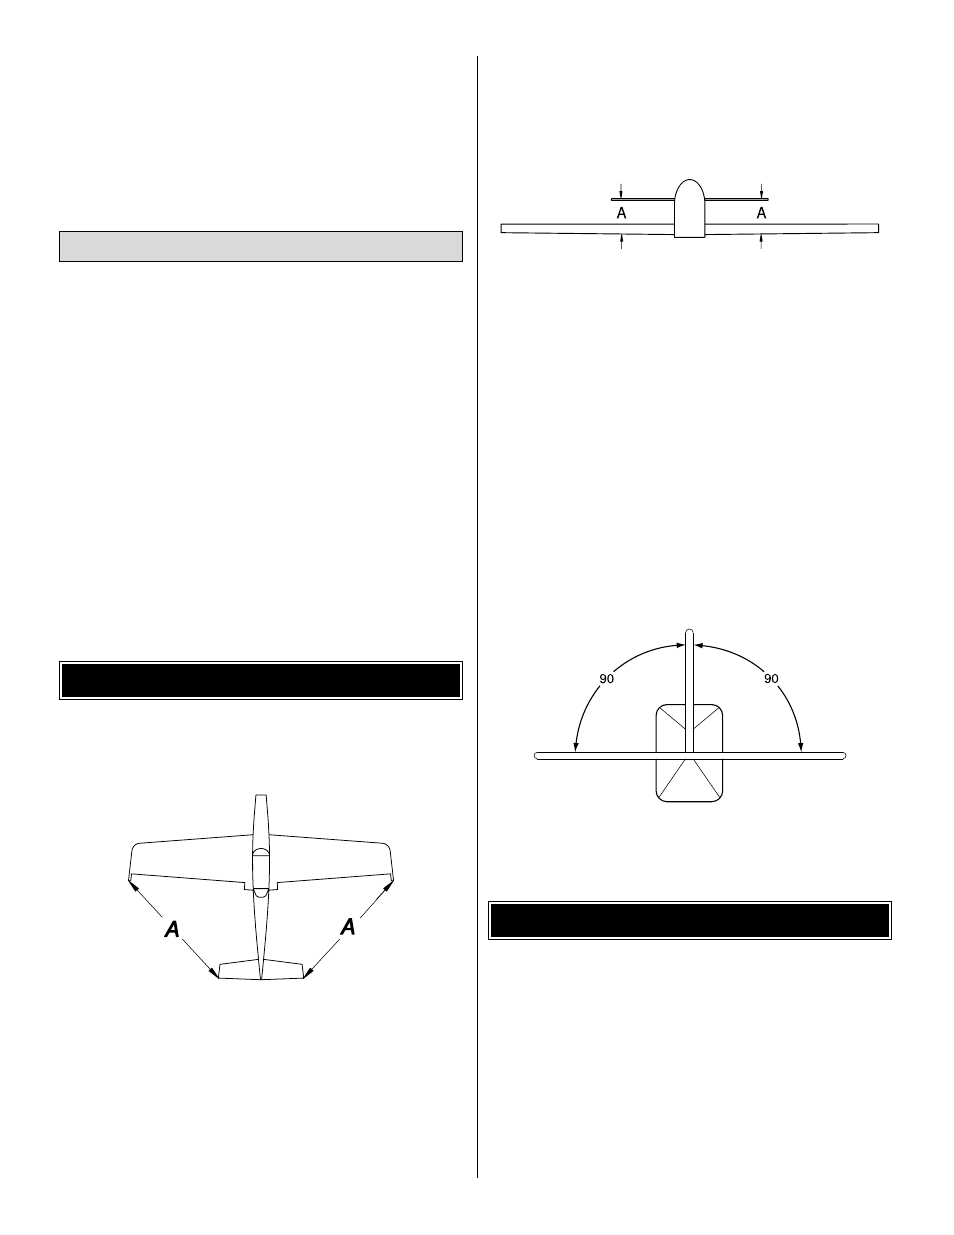
1. Mount the wing to the fuselage. Then, insert the stab
into the slots in the fuselage. Measure the distance from the
tip of the stab to the tip of the wing on the right side of the
fuselage. Measure the same point on the left side of the
fuselage. Adjust the stab until both sides measure the same.
❏
2. If you covered the center-section of the stab, draw the
outline of the fuselage on the stab with a felt-tip marker.
Then, cut away the covering in the center-section so that
you can achieve a good glue joint between the balsa stab
center-section and the stab base on the fuselage. When
cutting the covering away be careful not to cut the balsa
wood. Cutting the balsa wood can weaken the structure!
Use the Expert Tip on page 46 for cutting the MonoKote.
❏
3. Stand five to ten feet behind the model and view the
stab and wing. If the stab and wing align with each other,
proceed to the next step. If the stab and wing do not align,
place a weight on the "high" side of the stab to bring it into
alignment. If too much weight is required, remove the stab
and sand the "high" side of the slot in the fuse where the
stab fits until the stab aligns with the wing.
❏
4. Glue the stab to the fuselage with 6-minute epoxy,
checking the distance from the stab to the wing before the
glue cures.
❏
5. After the glue has cured on the stab, insert the fin into
the slots in the fuselage. Mark the outline of the fuselage
onto both sides of the fin. Remove the fin and cut the
covering, being careful not to cut into the balsa wood
structure.
❏
6. Be sure the fin is 90 degrees to the stab. Then, glue the
fin to the fuselage with 6-minute epoxy.
At this stage all of your plastic pieces should have the
seams filled with Bondo or putty. If you haven’t already done
so, wet sand the plastic parts with 400-grit wet-or-dry
sandpaper so the paint will adhere. Spray the cowling with
at least one coat of Top Flite LustreKote
®
primer. Wet sand
the plastic parts between coats with 400-grit sandpaper.
Use Great Planes 1/8" [3.2mm] EZ-Mask Flexible Masking
Tape (GPMR1000) for masking sharp lines. A Top Flite Tack
Cloth (TOPR2185) is useful to remove dust before you
paint. Top Flite LustreKote paint gives a matching finish to
your MonoKote finish.
PAINTING
INSTALL THE STAB & FIN
Covering Sequence
47