Great Planes Reactor .46 EP/GP 3D ARF - GPMA1021 User Manual
Page 14
❏
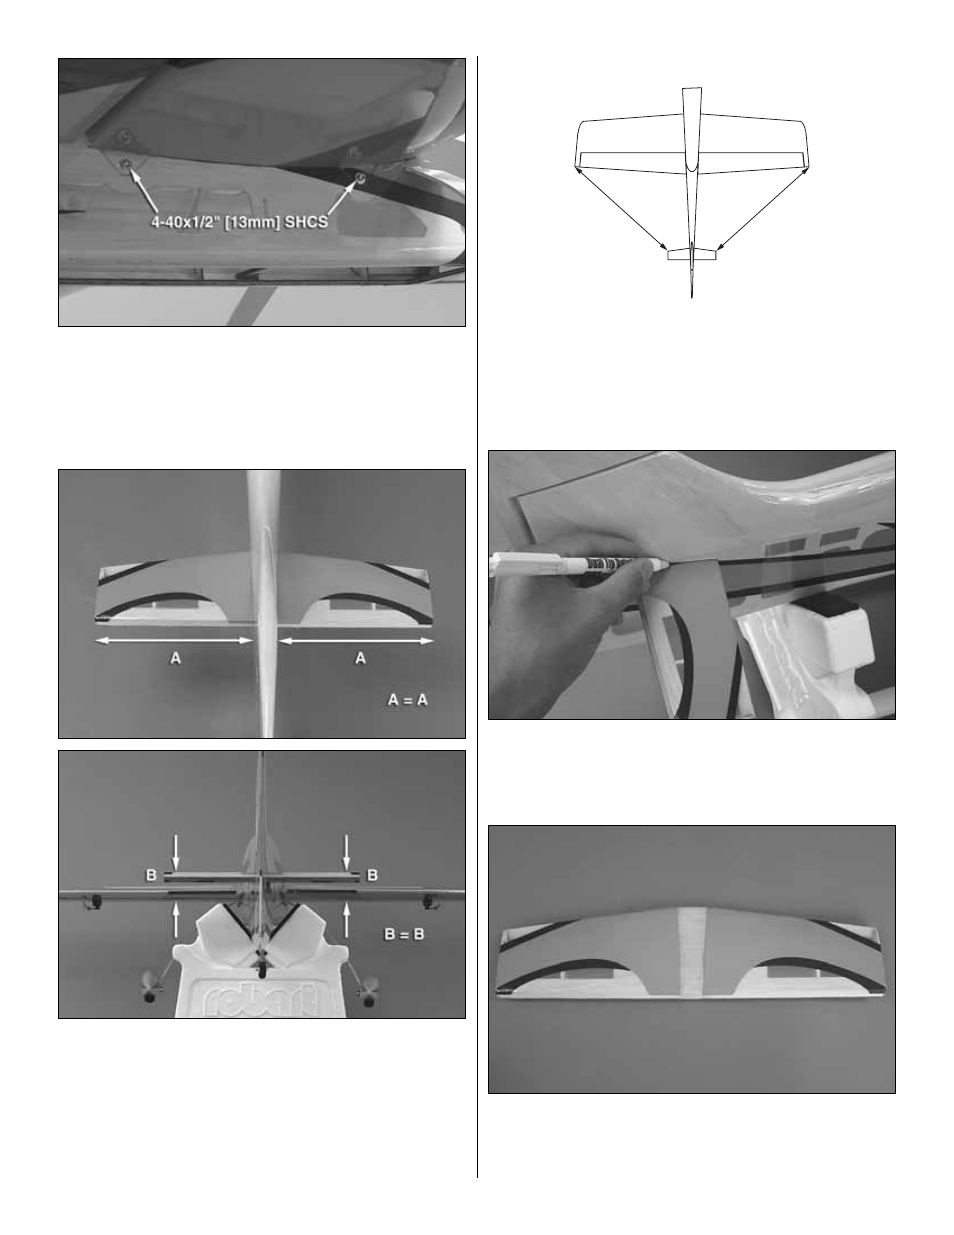
5. Secure the wings to the fuse using four 4-40 x 1/2"
[13mm] SHCS and four #4 flat washers.
❏
6. Test fit the stabilizer in the fuselage. Center the stab left
and right in the fuselage. Stand back several feet behind the
model and check to be sure the stab is parallel to the wing.
Adjust the stab saddle as needed until the stab and wing are
parallel. Weight can be added to one side of the stabilizer to
bring the stab parallel to the wing. When the stab is glued in
place permanently, the same amount of weight should be
added while the glue hardens.
❏
7. Measure the distance from the tip of each wing to the
tip of the stab. Adjust the stab until the distance from the tip
of the stab to the tip of the wing is equal on both sides.
❏
8. Use a felt tip marker to mark the outline of the fuselage
onto the top and bottom of the stab.
❏
9. Remove the stab from the fuse. Use a sharp #11 hobby
knife or use the following Expert Tip to cut the covering
1/16" [1.6mm] inside of the lines you marked. Use care to
cut only in the covering and not into the wood.
C
C
C = C
14
- Avistar Elite .46 ARF - GPMA1005 (36 pages)
- Avistar Elite .46 RTF - GPMA1605 (20 pages)
- Big Stik 40 ARF MonoKote - GPMA1220 (24 pages)
- Cessna 182 Skylane 40 ARF - GPMA1228 (28 pages)
- Cherokee GP/EP ARF - GPMA1033 (28 pages)
- Christen Eagle 46 ARF - GPMA1431 (36 pages)
- Cirrus SR22 .46-55 ARF - GPMA1363 (32 pages)
- Citabria EP ARF - GPMA1127 (20 pages)
- Curtis P-6E Hawk EP Biplane ARF - GPMA1164 (24 pages)
- Dirty Birdy .60 ARF - GPMA1975 (44 pages)
- Easy Sport 40 ARF MonoKote - GPMA1036 (24 pages)
- Edge 540T EP ARF - GPMA1572 (24 pages)
- ElectroStik EP ARF - GPMA1574 (20 pages)
- ElectroStik EP RxR - GPMA7500 (16 pages)
- Escapade .61 GP/EP ARF - GPMA1201 (28 pages)
- Escapade EP/GP ARF - GPMA1200 (28 pages)
- Escapade MX 30cc ARF - GPMA1210 (32 pages)
- Escapade MX GP/EP ARF - GPMA1202 (24 pages)
- Evader EDF Sport Jet EP ARF - GPMA1800 (24 pages)
- Extra 300SP EP ARF - GPMA1188 (24 pages)
- Extra 300SP Performance Series ARF - GPMA1022 (28 pages)
- Extra 330SC EP ARF - GPMA1129 (20 pages)
- F1 Rocket Evo GP/EP ARF - GPMA1030 (28 pages)
- F-16 Falcon EDF ARF - GPMA1801 (24 pages)
- F-20 Tigershark Electric Ducted Fan ARF - GPMA1875 (16 pages)
- F-86 Sabre Micro EDF TxR - GPMA1771 (12 pages)
- Factor 3D ARF - GPMA1552 (20 pages)
- Fling ARF - GPMA1060 (16 pages)
- Fling DL ARF - GPMA1070 (16 pages)
- FlyLite EP Slow Flyer ARF - GPMA1107 (24 pages)
- Giant Big Stik ARF - GPMA1224 (32 pages)
- Giant Citabria 30cc/EP ARF - GPMA1435 (44 pages)
- Giant Revolver ARF - GPMA1425 (32 pages)
- Giant Super Sportster ARF - GPMA1044 (32 pages)
- Goldberg Super Chipmunk EP ARF - GPMA1928 (20 pages)
- Kunai 1.4M EP ARF - GPMA1815 (16 pages)
- Lanier RC Stinger II - GPMA1010 (24 pages)
- Matt Chapman Eagle 580 46/EP ARF - GPMA1281 (32 pages)
- Mister Mulligan EP ARF - GPMA1485 (32 pages)
- P-51 Mustang GP/EP ARF - GPMA1205 (24 pages)
- P-51 Mustang Sport Fighter .46 EP ARF - GPMA1208 (28 pages)
- PBY Catalina ARF - GPMA1154 (20 pages)
- Phazer EDF ARF - GPMA1802 (24 pages)
- Pluma 3D Bipe ARF ARF - GPMA1130 (24 pages)
- Proud Bird ARF - GPMA1260 (28 pages)