D.a.p. (direct access preset), Accessing the d.a.p. presets, Cd operation – Alpine 7909 User Manual
Page 14: Load, Note, Installation location, Cd operation 4 - 1 6, Operation, Installation
Attention! The text in this document has been recognized automatically. To view the original document, you can use the "Original mode".
OPERATION
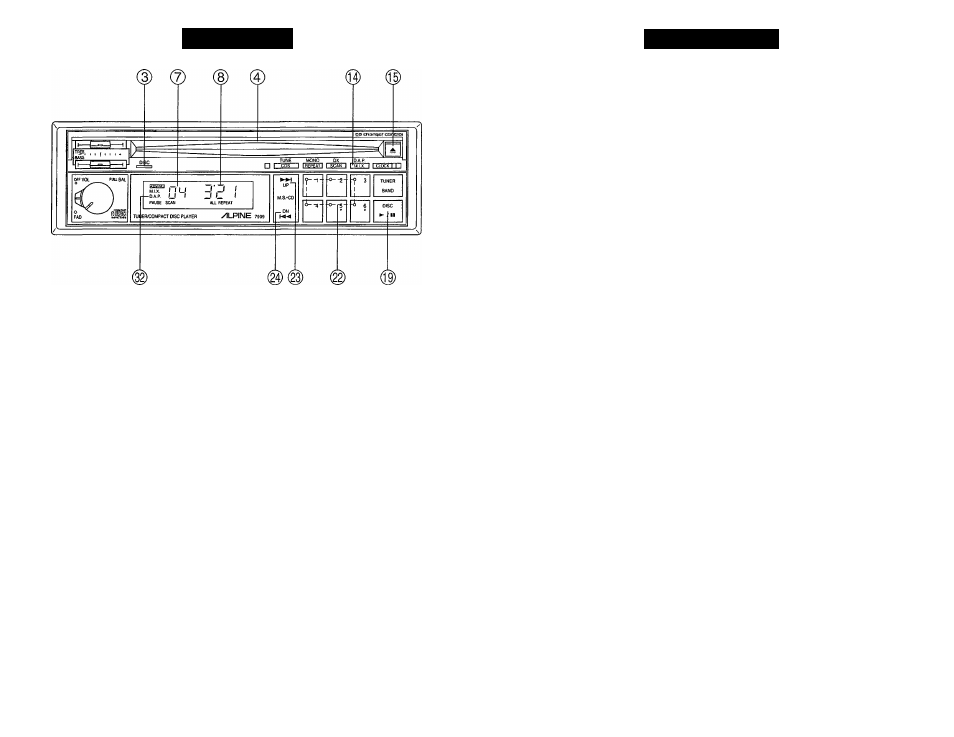
D.A.P. (Direct Access Preset)
This feature allows the storage of FM and AM presets on the same band. Press the
D.A.P. button ® to light up the D.A.P. indicator To program stations into the
D.A.P. band, follow steps 1 - 3 as described in the Manual Memory Preset section on
page 13.
Accessing the D.A.P. Presets
1. Press the D.A.P. button @. The D.A.P. indicator ® will illuminate in the display.
2. Press one of the Preset buttons ® and the indicator in that button will light.
3. The frequency of the station placed in the selected D.A.P. location will appear in
the display.
If the unit is not in the CD mode, press the DISC button ®.
Load
1. Insert a disc into the Disc Slot @. When the disc is halfway in, the power loading
system will pull the disc in and guide it into the play position.
2. If the disc is left at least halfway in, press the DISC button ® or press the disc
edge lightly to move it forward. "LOAd" will show in the display ® while loading.
3. When the unit is in the CD mode, the Digital Display shows "00 O'OO" for a second
while the data on the disc is read.
4. When a disc is loaded while the unit is in the tuner mode, it will automatically
switch to the CD mode.
14
INSTALLATION
1. The bracket stopper is already mounted. (Fig. 1)
2. Slide mounting sleeve from main unit.
Slide the mounting sleeve into the dashboard. (Fig. 2)
3. Connect each input lead coming from an amplifier or equalizer to the correspond
ing output lead coming from the left rear of the 7909.
Connect all other leads of the 7909 according to details described in the CON
NECTIONS section.
4. When the unit is in place, push the tip of the locking pins up to the horizontal
position using a screwdriver. Now the unit is locked in.
5. Snap the front template on around the front end of the unit.
NOTE:
Reinforce the head unit with the metal mounting strap supplied. Secure the ground
lead of the unit to a clean metal spot using a screw (★) already attached to the car
chassis.
For the screw marked ★★, use an appropriate screw for the chosen mounting
location.
•
To remove your unit, first remove the front trimplate. (Lift the top part carefully
with a flat screwdriver for easy removal). Insert the pair of keys provided all the
way into the grooves on each side of the unit and pull the unit out. (Fig. 3)
•
Should now be securely, your unit should be secure in place. If you wish to re
enforce the installation, use the metal mounting strap supplied and follow the
procedures shown in Fig. 4.
Installation Location
The 7909 is designed for in-dash mounting. For optimum performance, make sure
the player will not be exposed to:
1. Direct sun and heat
2. High humidity
3. Excessive dust
4. Excessive vibrations.
IMPORTANT
Please record the serial number of your unit in the space provided on the back
cover of this manual and keep it as a permanent record. The serial number plate
is located on the bottom of the unit.
19