Local/distance (dx) seek sensitivity for fm and am, Manual tuning, Connections – Alpine 7909 User Manual
Page 12: Connections & 21, Operaildn
Attention! The text in this document has been recognized automatically. To view the original document, you can use the "Original mode".
OPERAIldN
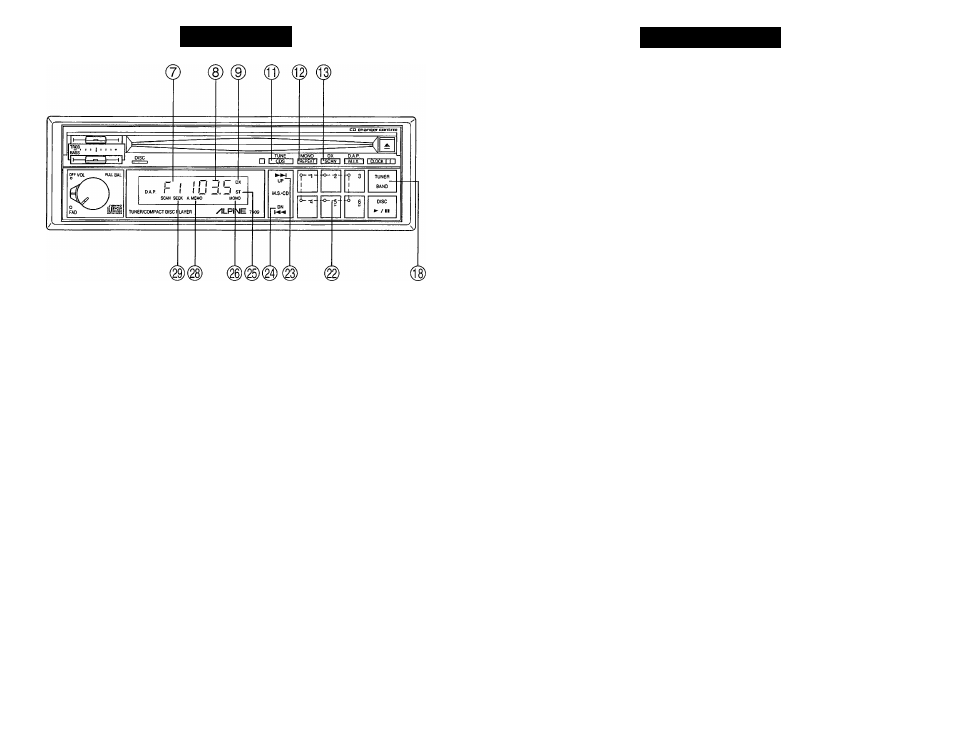
Local/Distance (DX) Seek Sensitivity for FM and AM
You can select the radio SEEK sensitivity (local or distance (DX)) by pressing the DX
button In the distance mode, with DX indication (D, the radio tunes in both strong
and weak stations (all stations from A to M in the illustration). In the local mode, with
no DX indication (D, the radio tunes in only strong stations (stations C, F, H and L in
the illustration).
q
Station Frequencies
FM Stereo/Monaural Switching
You can select the Stereo/Monaural - the Auto Switching or Monaural mode for FM
receiving by pressing the MONO button ®. In the Auto Switching mode, you can
receive stereo broadcasting in Stereo, and monaural broadcasting in MONO. The
STereo @ or MONO indicator shows your reception mode. In the Monaural only
mode, you will always receive the broadcast in monaural even if the broadcast is
stereo. The Monaural only mode quiets the noisy stereo signal of weaker broadcasts.
The STereo indicator will not appear while the Monaural only mode is selected.
Manual Tuning
1
,
2.
Press the TUNE button QJ/ until the SEEK and A. MEMO
pear in the display.
To select the tuning band, press the BAND button
shows your selection.
indicators disap-
The Band indicator ®
12
CONNECTIONS
This unit is designed for 12-volt DC negative ground operation. Check to be sure that
your vehicle has this type of system before connecting the power cable.
•
Front Output RCA Connectors (Labeled LINE OUT FRONT)
RED is Right and WHITE is Left.
•
Rear Output RCA Connectors (Labeled LINE OUT REAR)
RED is Right and WHITE is Left.
•
Input DIN Connector
Connect this DIN connector to the DIN connector of the CHA-S604 or CHM-S601
CD changer.
Note: CHA-S604 is connected by using CD Shuttle DIN/RCA Adaptor (4913).
•
Input RCA Connectors (Labeled TO CHANGER)
RED is Right and WHITE is Left.
Note: CHA-S604 is connected by using CD Shuttle DIN/RCA Adaptor (4913).
•
Antenna Receptacle
•
Input RCA Connectors (Labeled LINE IN)
•
Dimmer Control Lead (WHITE/BLUE)
This lead is for connection to a rheostat such as the dashboard light dimmer in your
vehicle. Applying (+)12V to this lead causes the maximum dimming. Varying the
voltage controls the brightness of the display. This allows you to dim the unit's
display with the dashboard lights.
•
Power Antenna Lead (BLUE)
When used with a power antenna, connect to the -i-B terminal of the power antenna.
•
Main Power Connector 0
Connect to the Power Wiring Harness.
•
Power Wiring Harness
Connect the BLUE/WHITE, RED, and YELLOW leads as described below.
•
Remote Turn-On Lead (BLUE/WHITE)
Connect this lead to the remote turn-on lead of your amplifier or signal processor.
•
Switched Power Lead (Ignition) (RED)
Connect this lead to an open terminal on the vehicle's fuse box or another unused
power source which provides (+)12V only when the ignition is turned on or in the
accessory position.
CAUTION: You must be very careful when connecting wires to the vehicle's electrical
system. Be sure you do not interface leads that are being used for factory
components in the vehicle (like an on-board computer). When making
connections at the fuse box, make sure there is an appropriate value fuse
on the circuit you plan to use. Failure to do so may result in damage to the
unit and/or the vehicle.
•
Battery Lead (YELLOW)
Connect this lead to the positive (+) terminal of the vehicle's battery.
•
Ground Lead (BLACK)
Connect this lead to a good chassis ground on the vehicle. Make sure the connec
tion is made to bare metal and is securely fastened using the sheet metal screw
provided.
•
Battery Power Supply Extension Lead for Audio Only
•
Ground Lead for Audio Only
21