Attach ascent module, Finishing your rocket 1. cut wood dowels, Landing foot assembly 4. leg assembly – Estes 2110 - Outlander User Manual
Page 3: Prepare hinge assembly, Decal placement
10
3
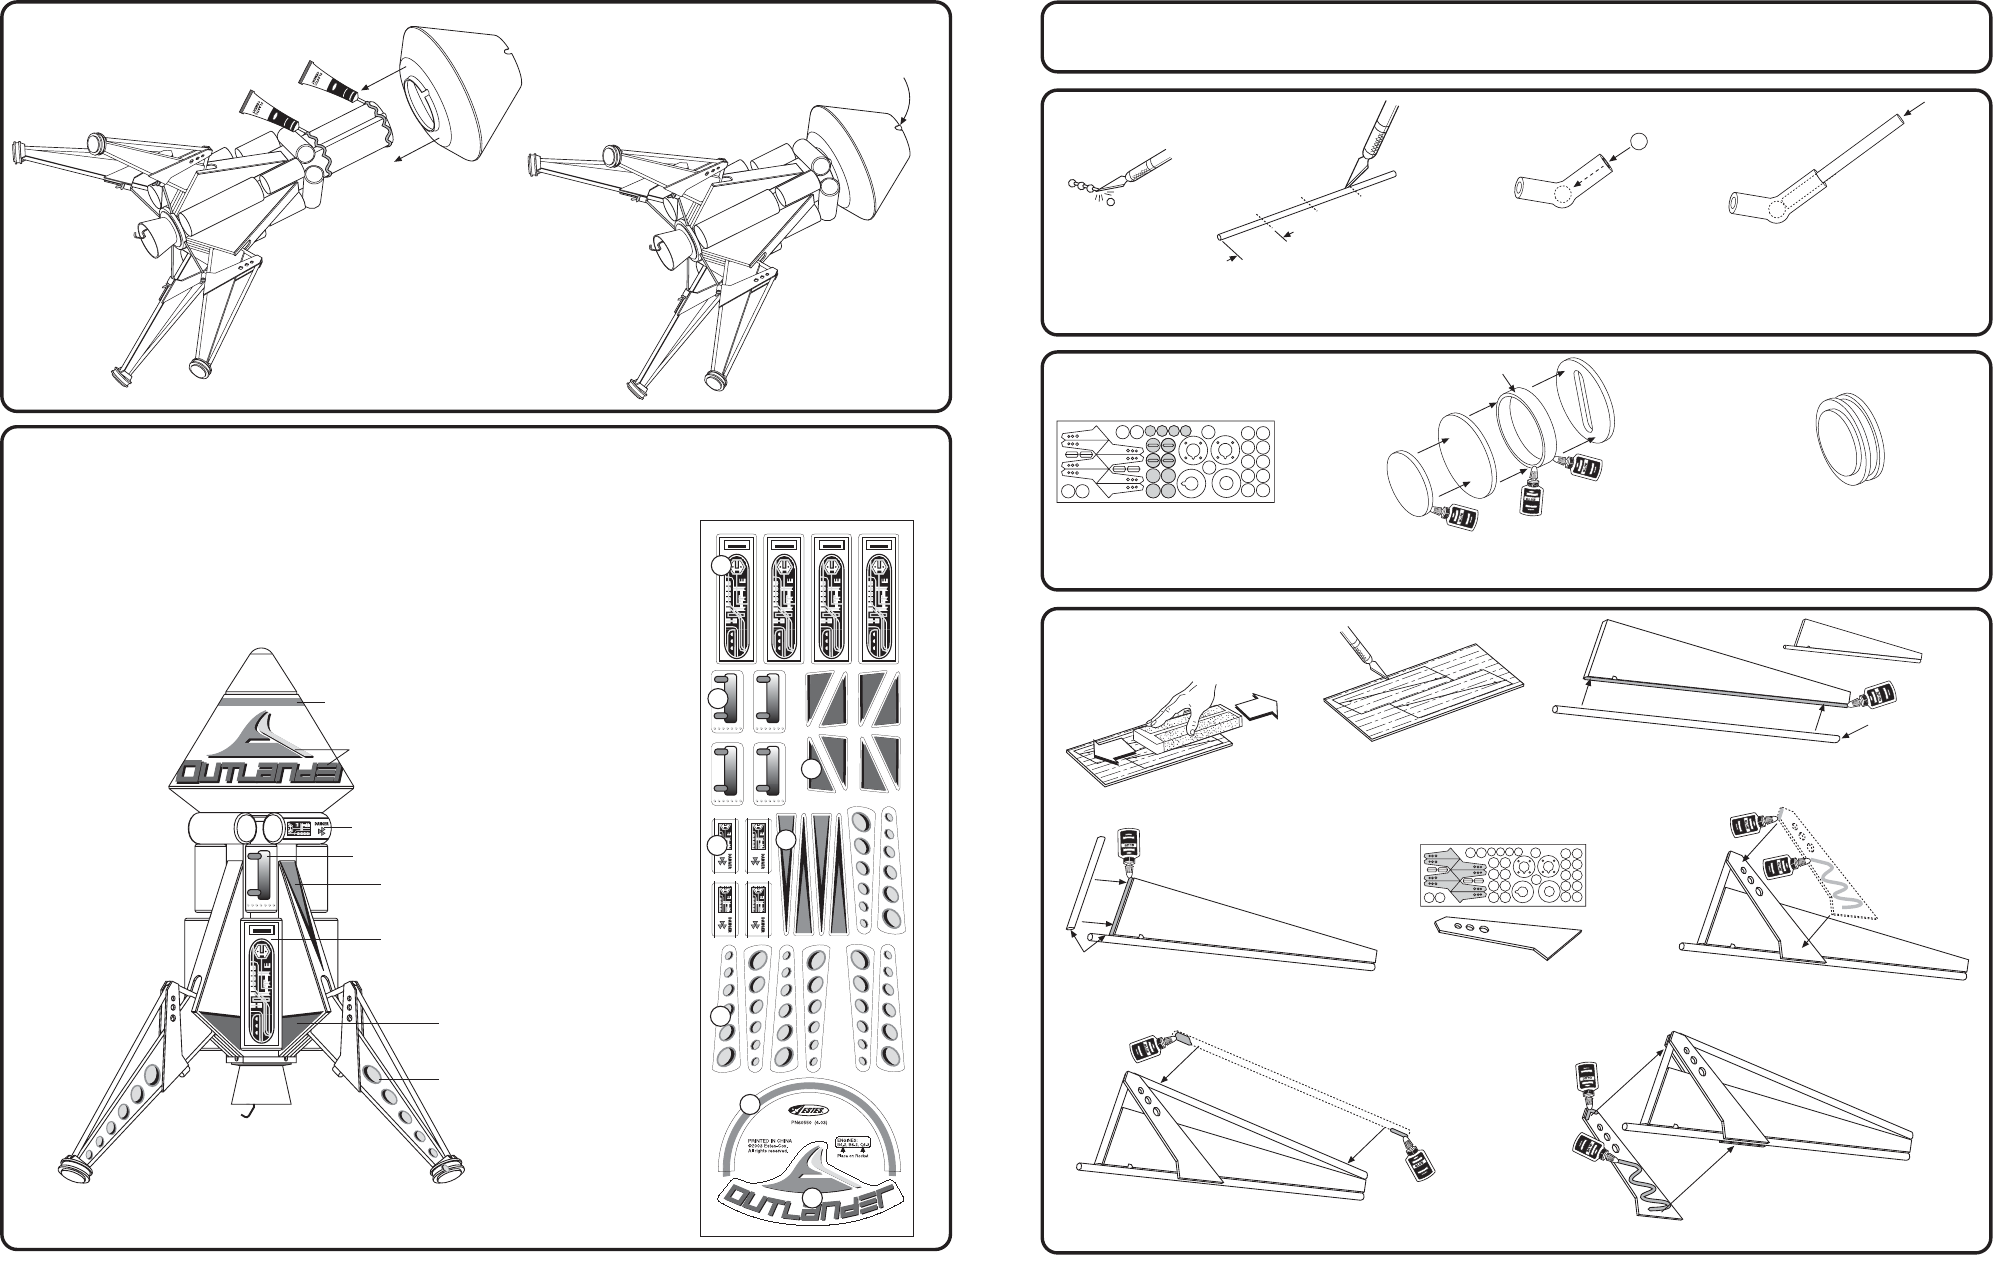
20. ATTACH ASCENT MODULE
A. Apply plastic
cement to
body tube.
B. Align launch lug with
hole and slide Ascent
Module over body tube.
TOP OF ASCENT
MODULE SHOULD
BE FLUSH WITH TOP
OF LAUNCH LUG
FINISHING YOUR ROCKET
1. CUT WOOD DOWELS
1" (25 m
m)
3. LANDING FOOT ASSEMBLY
4. LEG ASSEMBLY
(Four needed for assembly)
(Four needed for assembly)
(Four needed for assembly)
2. PREPARE HINGE ASSEMBLY
Refer to the Wooden Dowel Cutting Guide and carefully cut all the dowels needed for the leg assemblies. Lightly sand ends smooth.
…Continued Page 4
B. Cut Silicone Hinge
Tube into four equal
pieces of 1" (25.4 mm).
A. Separate plastic
Hinge Balls (4)
from strand.
C. Insert a hinge ball half
way into each of the
four Silicon Hinge
Tubes.
D. Collect four 1 3/4" (4.4 cm) wood dowels
(Section "D" of template). Insert one into
each hinge until it touches hinge ball.
A. Remove die-cut discs shown in gray
from card. Remove the outside nubs
with sandpaper.
B. Glue the discs and yellow Foot Pad
Ring together as shown.
C. Repeat for other three. Let dry.
COMPLETED FOOT PAD
A. Sand smooth the die-cut balsa sheet.
B. Carefully remove the die-cut pieces
using a modeling knife.
C. Collect the four 6 3/4" (17.1 cm) dowels (Section "C" of
template). Match the angled cut to the foot end. Glue as
shown. Repeat for all four legs and let dry.
ANGLE CUT
FOOT
TOP
D. Collect the four 2 3/16" (8.1 cm) dowels with angle cuts
at both ends (Section "A" of template). Glue as shown.
Make sure angles match. Repeat for all four legs. Let dry.
MATCH ANGLE
E. Remove Support Struts
from die-cut card. Sand
the nubs smooth.
F. Glue Support Strut to assembly as
shown. Make sure strut is flush with
ends of dowel. Repeat for all four
legs. Let dry.
G. Collect the four 5 5/8" (14.3 cm) dowels (section "B" of template).
Glue as shown. Make sure dowel is flush with end of leg and
butts up to end of top dowel. Repeat for all four legs. Let dry.
H. Glue remaining struts to opposite sides
for all four leg assemblies. Let dry.
If you have chosen not to paint your parts before final assembly, now you can sand, prime and paint. The easiest way to get good results is to
spray paint the entire rocket all one color. You may also paint the Ascent Module a different color than the body. When completely dry, proceed
to decal placement.
If you have already painted your parts prior to assembly, proceed to decal placement.
DECAL PLACEMENT
Remove decals from backing one at a time and refer to the drawing below or to the
picture on the front of the package.
A
B
C
D
E
F
H
G
A (wrap)
B
C (four)
D (four)
E (four)
F (four)
G (eight-right and left)
H (eight-right and left)
YELLOW FOOT
PAD RING