Selection of installation, Knockout procedure, How to remove the front panel – Carrier XPOWER 38VYX080 User Manual
Page 5: Air purge, Electrical cabling, Installation place
GB - 4
38VYX050/38VYX080
Knockout procedure
• The indoor/outdoor connecting pipes can be connected to 4
directions. Take off the knockout part of the pipe cover in which
pipes or wires pass through the base plate.
• As shown in the figure, do not remove the pipe cover from the
cabinet so that the knockout hole can be easily punched.
To knock out, punch the 3 connected parts with a screwdriver and
remove the pipe cover by hand.
• After marking the knockout hole, remove the burr and mount the
attached protective bush and guard material for pass-through part
in order to protect pipes and wires.
• After connecting the pipes, be sure to mount the pipe cover. The
pipe cover is easily mounted by cutting off the slit at the lower part
of the cover.
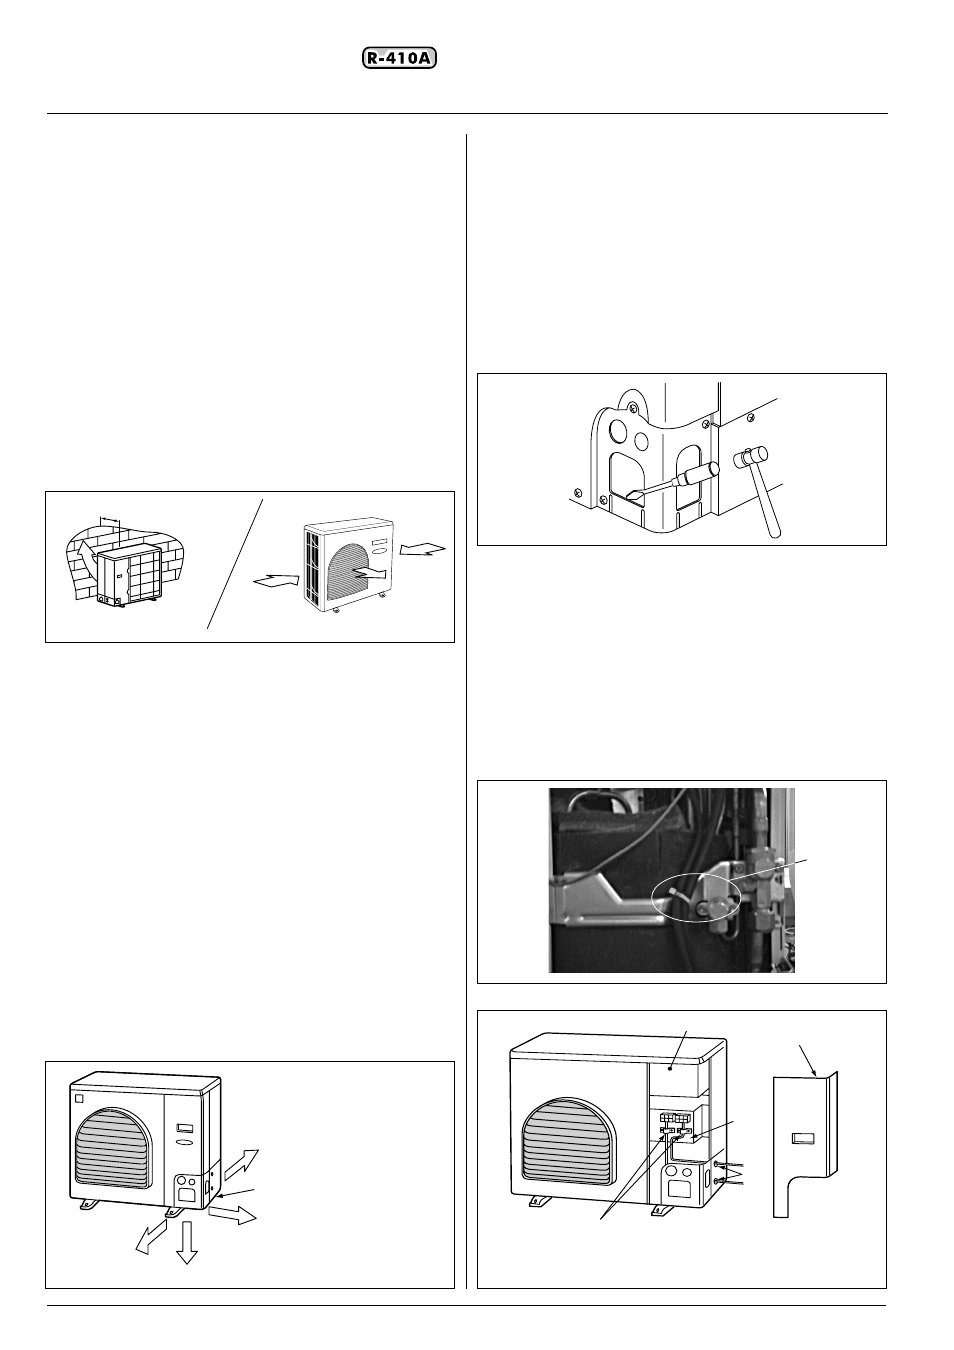
How to remove the front panel
1. Remove screws of the front panel.
2. Pull the front panel downward.
Removing the front panel, the electric parts appear at the front side.
•
The power supply cables can be inserted into the pipe holes.
Enlarge the pipe holes if they are too small.
•
Be sure to fix the power cable and indoor/outdoor connecting
cable with bundling band sold on the market so that they do not
make contact with the compressor and the hot pipes.
To ensure good tensile strength, the electric cables must be
fastened using the cable-holder on the plate.
Air purge
• For air purge, use a vacuum pump.
• Do not use refrigerant charged in the outdoor unit for air purge.
(The refrigerant for air purge is not contained in the outdoor unit.)
Electrical cabling
• Be sure to fix the power cables and indoor/outdoor connecting
cables with clamps so that they do not contact with the cabinet,
etc.
Installation Place
• A place which provides a specified space around the outdoor unit.
• A place where the operation noise and discharged air are not
given to your neighbors.
• A place that is not exposed to a strong wind.
• A place that does not block a passage.
• When the outdoor unit is installed in an elevated position, be sure
to secure its feet.
• There must be sufficient space for carrying in the unit.
• A place where the drain water does not make any problem.
• If the unit is installed in areas where heavy snowfalls may occur, it
is necessary to raise its level at least 200 mm above the usual
snow level.
CAUTION:
• Install the outdoor unit at a place where discharge air is not blocked.
• When an outdoor unit is installed in a place that is always exposed
to a strong wind like a coast or on a high storey of a building,
secure a normal fan operation by using a duct or a wind shield
• When installing the outdoor unit in a place that is constantly
exposed to a strong wind such as the upper stairs or rooftop of a
building, apply the windproof measures referring to the following
examples.
• Install the unit so that its discharge port faces the wall of the
building. Keep a distance 500 mm or more between the unit and
the wall surface.
• Supposing the wind direction during the operation season of the
air conditioner, install the unit so that the discharge port is set at
right angle to the wind direction.
• Installation in the following places may result in some troubles. Do
not install the unit in such places below.
•
A place full of machine oil.
•
A place full of sulphuric gas.
•
A place where high-frequency radio waves are likely to be
generated as from audio equipment, welders, and medical
equipment.
Selection of installation
ቢ
ቦ
ብ
ቤ
ቢ
Strong wind
ቢ
500
38VYX 080
Cover knockout for pipe connection
ቢ
Rear direction
ባ
Pipe cover
ቤ
Side direction
ብ
Down direction
ቦ
Front direction
ቢ
ባ
ቤ
ብ
ቦ
ባ
ቢ
Electric parts box
ባ
Fixing plate
ቤ
Piping hole
ብ
Cable-holder for electric cables
ቦ
Front panel
ቢ
Strip
ቢ