Crosman 1701P User Manual
Page 2
2
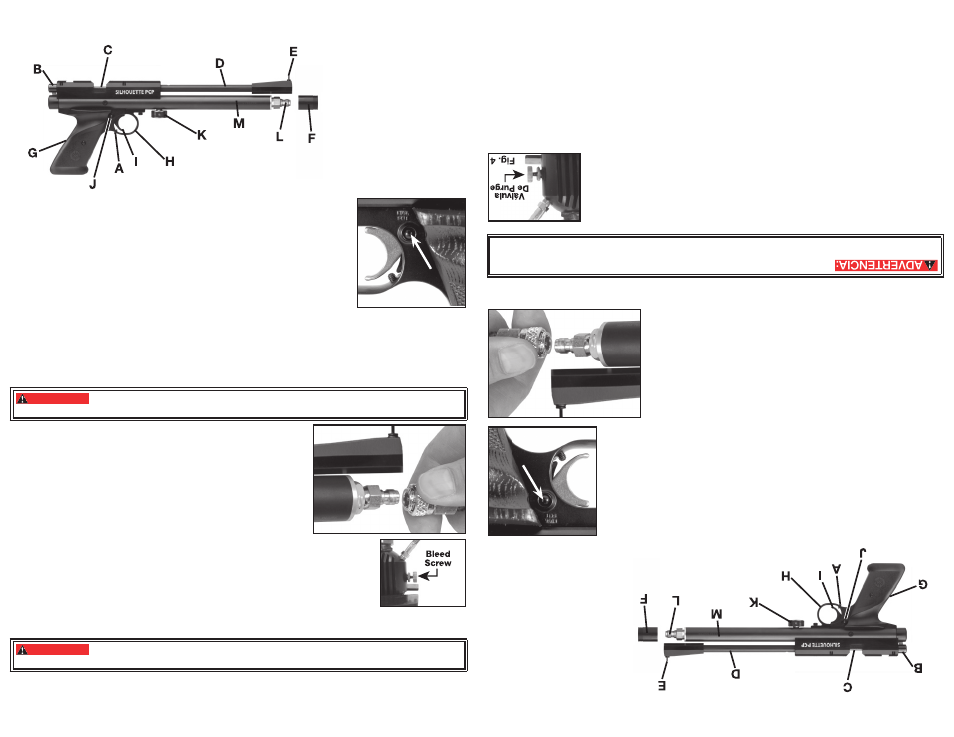
1. Learning the Parts of your New Airgun
Learning the names and parts of your new airgun helps you understand your owner’s manual.
A. Trigger Over travel screw
B. Bolt handle
C. Breech
D. Barrel
E. Muzzle
F. Protective cap
G. Grip
H. Trigger guard
I. Trigger
J. Safety
K. Pressure gauge
L. Fill nipple
M. Pressure Reservoir
2. Operating the Safety
A. To Put the Air Pistol “ON SAFE:”
• Locate the safety directly in back of the trigger.
• Push the safety from the left side all the way in (Fig. 2). The safety is not “ON
SAFE” unless it is pushed all the way in and the RED ring around the left side
of the safety is NOT showing.
Like all mechanical devices, an air pistol safety can fail. Even when the safety is
“ON SAFE”, you should continue to handle the air pistol safely.
NEVER point the air pistol at any person. NEVER point the air pistol at anything
you do not intend to shoot
B.To Take the Air Pistol “OFF SAFE”:
• Push the safety from the right side all the way in.
• The air pistol is ready to fi re when “OFF SAFE”. When you can see the RED line on the left side of the
safety, the air pistol is “OFF SAFE” and can be fi red.
3. Pressurizing the Airgun
WARNING:
Use only compressed air in this airgun. Use no other gasses—including oxygen,
which can cause a fi re or explosion that may result in serious injury or death.
A. Pressurizing (Filling) the Airgun with a Hand Pump
• Be sure to wear eye protection.
• Make sure the airgun is unloaded and not cocked. (See section 4
for instructions on unloading and un-cocking.)
• Read all instructions with your hand pump so you are familiar with
its operation. Use only a pump designed for fi lling a pre-charged
airgun and outfi tted with a Foster #12FS or #12FSS quick discon-
nect fi tting. Do not use a standard air compressor or bicycle pump.
• Put the airgun “ON SAFE” (see section 2A) and point in a SAFE
DIRECTION.
• Pull off the protective cap that covers the fi ll nipple on the airgun.
• Connect the quick-disconnect fi tting on the hand pump hose to the
fi ll nipple (fi g. 3.) by
º Pulling back and holding the knurled ring
º Connecting the fi tting over the fi ll nipple.
º Releasing the knurled ring and push it forward to lock the fi tting on to the fi ll
nipple.
• Make certain the bleed valve on the hand pump is fully closed (tighten in a clock-
wise direction) (fi g.4).
• Start pumping and continue until the gauge needles on your pump and on the air-
gun are between 2500 psi and 3000 psi depending on your desired tune. DO NOT fi ll the air gun to more
than 3000 psi (207 bar). See “Overfi ll” information (section 3C).
WARNING:
Disconnecting the fi ll hose from the airgun without bleeding the air fi rst may result in
injury from hose whip as a result of pressure in the fi ll hose.
• Open the bleed screw on the pump base rapidly in a counter-clockwise direction to COMPLETELY bleed
the hose. You must bleed the fi ll hose COMPLETELY to avoid hose whip from pressure in the fi ll hose.
• Disconnect the pump from the fi ll nipple on the gun
Fig. 2
PUSH
SAFE
Fig. 3
Fig. 3
Fig. 4
2
1. Descripción de las piezas de su nueva pistola de aire
Aprender los nombr
es y las piezas de su nueva pistola de aire lo ayudará a compr
ender el manual del usuario.
A. To
rnillo de exceso de
recorrido del gatillo
B. Palanca del cerr
ojo
C. Recámara
D. Cañón
E. Boca
F . T
apón protector
G. Cacha
H. Guar
damonte
I. Gatillo
J. Segur
o
K. Manómetr
o de presión
L. Boquilla de llenado
M. Depósito de pr
esión
2. Operación del seguro
A. Para activar el seguro de la pistola de air
e comprimido (“ON SAFE”):
• Busque el segur
o que se encuentra detrás del gatillo.
• Empuje el segur
o desde el lado izquierdo intr
oduciéndolo por completo (Fig.
2). El seguro no se encuentra activado (“ON SAFE”) a menos que se haya
empujado completamente hacia adentro y que NO se vea el anillo ROJO que
está alrededor del lado izquier
do del seguro.
Como todos los dispositivos mecánicos, el seguro de una pistola de air
e com-
primido puede fallar. Aun cuando el segur
o esté activado (“ON SAFE”), debe
seguir manipulando con cautela la pistola de aire.
NUNCA apunte la pistola de aire comprimido hacia una persona.
NUNCA apunte la pistola de aire comprimido hacia un objeto al que no
desee disparar.
B. Para desactivar el seguro de la pistola de air
e comprimido
(“OFF SAFE”):
• Empuje el segur
o desde el lado derecho intr
oduciéndolo por
completo.
• La pistola de air
e está lista para disparar cuando el seguro se
encuentra desactivado (“OFF SAFE”). Si ve la línea ROJA del lado
izquierdo del segur
o, signifi ca que el segur
o de la pistola de aire
se encuentra desactivado (“OFF SAFE”) y, por lo tanto, puede
dispararse.
3. Presurización de la pistola de air
e
En esta pistola de aire debe usar solamente air
e comprimido. No use otro tipo
de gases, incluido oxígeno, ya que pueden causar un incendio o explosión, situaciones que pueden
provocar lesiones graves o la muerte.
A. Presurización (llenado) de la pistola de air
e con bomba manual
• No olvide usar una pr
otección ocular adecuada.
• Asegúr
ese de que la pistola de aire se encuentr
e descargada y desmontada.
(Para obtener instrucciones sobre cómo descargar o desmontar la pistola, con-
sulte la sección 4).
• Lea todas las instrucciones de su bomba manual de modo de familiarizarse con
su funcionamiento. Use únicamente una bomba diseñada para llenar pistolas de
aire pr
ecargadas y diseñadas con un accesorio de desconexión rápida Foster
#12FS o #12FSS. No use un compresor de air
e estándar ni una bomba para infl ar
bicicletas.
• Active el segur
o de la pistola de aire (“ON SAFE”) (consulte la sección 2A) y
apunte en una DIRECCIÓN SEGURA.
• Retir
e el tapón protector que cubr
e la boquilla de llenado de la pistola de aire.
• Conecte el accesorio de desconexión rápida de la manguera de la bomba manual en la boquilla de
llenado (Fig. 3) realizando lo siguiente
• Tirando y sosteniendo el anillo moleteado.
• Conectando el accesorio a la boquilla de llenado.
• Soltando el anillo moleteado y empujándolo hasta trabar el accesorio en la boquilla de llenado.
• Asegúr
ese de que la válvula de purga de la bomba manual se encuentre totalmente cerrada (ajústela
girándola en sentido horario) (Fig. 4).
Fig. 2
PUSH
SAFE
Fig
. 3
Fig. 3