Advertencia – Crosman BP2263 User Manual
Page 6
8. Removing a Jammed Pellet
A jammed pellet is usually the result of trying to fire the airgun when the pressure is too low. Before firing the
airgun make certain there is sufficient pressure for proper operation, by making sure the gauge needle is
pointing to the area between 1000 and 3000 psi.
WARNING:
In this procedure you will put a cleaning rod down the barrel of a charged
airgun. It is extremely important that while you are doing this the airgun be “ON SAFE”, the
bolt remains in open position and that your finger be kept away from the trigger. Failure to
follow this warning may result in serious injury or death.
Point the airgun in a SAFE DIRECTION.
•
Put the airgun “ON SAFE” (see section 2A.)
•
Open the bolt by pushing the bolt handle up and
•
pulling it all the way back until you hear two clicks.
With the bolt in the rearward position insert a
•
ramrod of the proper size into the barrel (start at
the muzzle). (fig 8) The barrel could be damaged if the proper sized cleaning rod is not used.
NOTE: The bolt must be cocked and open for the jammed pellet to clear the breech when it is pushed out
by the ram rod.
Using the ramrod push the pellet into the pellet loading port (forward of the bolt), remove and discard
•
the pellet. Do not reuse that pellet.
Point the airgun in a SAFE DIRECTION, close the action take “OFF SAFE” and fire.
•
Put the airgun “ON SAFE” (see section 2A.)
•
If you are not able to unjam your airgun by following this procedure, take no further action. Crosman
•
Corporation or an Authorized Service Station will unjam your airgun. (no cost during the warranty period)
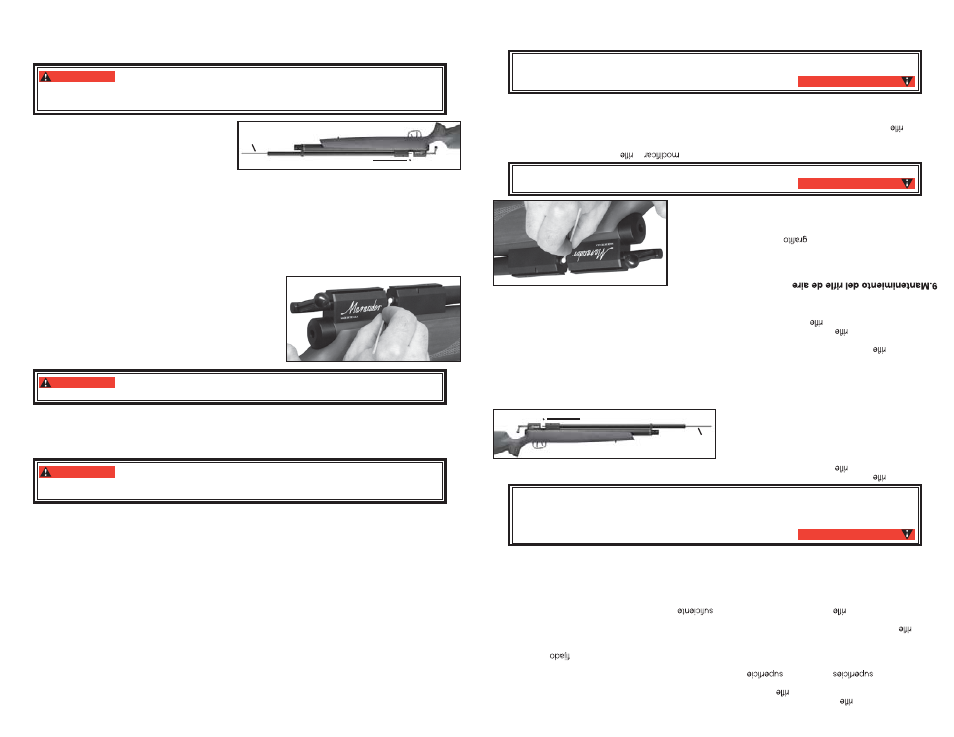
9. Maintaining Your Airgun
Apply Crosman silicone chamber oil (part number RMCOIL) on
the barrel o-ring every 3 months or 500 shots. Apply with a cot-
ton swab as shown in figure 9.
Apply a moly graphite EP grease to the sliding bolt mechanism
every 3 months or 500 shots.
Keep all petroleum-based lubricants away from the fill nipple.
They MUST NOT be introduced into the high pressure reservoir.
WARNING:
Use of petroleum-based lubricants in this area could result in an explosion
resulting in personal injury.
DO NOT MODIFY OR ALTER YOUR AIRGUN. Attempts to modify the airgun in any way inconsistent with
this manual may make your airgun unsafe to use, cause serious injury or death, and will void the warranty.
If you drop your airgun, visually check to see that it works properly before you use it again. If anything
seems changed, like a shorter or weaker trigger pull, this may mean worn out or broken parts. Call Cros-
man customer service for assistance before using your airgun again.
WARNING:
Do not attempt to repair the airgun or to disassemble to correct an over fill
or valve lock. Parts can fly from the airgun at dangerous speeds when it is disassembled
while pressurized.
10. Advanced Tuning Techniques
A. Adjusting the Trigger
The Marauder trigger assembly can be adjusted and customized but unless you are experienced in making
such adjustments, Crosman recommends that these adjustments to factory settings be made only by a
qualified gunsmith after reading all instructions. Adjusting the trigger assembly can result in a light trigger
pull, decreased sear engagement that could make the gun more susceptible to discharge when dropped or
jarred, or a non-functioning safety. Make only the adjustments identified in this manual.
NOTE: these adjustment features are for advanced shooters. Most shooters can use the settings
provided during manufacturing of the gun and should not need to make modifications.
The match grade trigger on your pellet air rifle is a two stage, fully adjustable unit. It has been factory
•
set to an efficient setting that will suit most hunting and target uses. If you, as the owner, wish to alter
the factory settings you should do so only after reading the following instructions carefully.
Put the air rifle “ON SAFE”, remove the clip and keep the airgun pointed in a SAFE DIRECTION.
•
Depressurize the airgun (see section 4)
Remove the stock screw (Fig 12) (using a 3/16” Allen wrench to separate the stock from the action.
•
Do not remove the trigger guard screws as the trigger guard should remain with the stock.
8
Rod
Pellet
9
7. A
punta
r y
d
isparar c
on
seg
uri
dad
• S
iem
pre
apun
te
el
de
ai
re
en
una
DIRECCI
ÓN
SE
GUR
A.
• S
iga
la
s instruc
cio
nes
pa
ra
llenar
el
de
ai
re
(secci
ón
3A
o
3B
) y
ca
rga
r lo
s di
ábo
los
(se
cci
ón
5A
y
5B).
• Ust
ed
y la
s dem
ás
personas
deb
en
siem
pre
us
ar anteoj
os
de
tiro
pa
ra
prot
ege
r s
us
ojo
s.
• N
o disp
are
a
dur
as
o a
la
de
l a
gua
. E
l di
ábo
lo
puede
rebot
ar y
go
lpea
r a
algu
ien
o
alg
o q
ue
usted
no te
nía
inten
ció
n d
e to
car
.
• E
lija
si
em
pre
su
bl
anc
o c
on
cuidad
o. E
s mej
or dispar
ar c
ont
ra
dian
as
de
papel
qu
e s
e hay
an
a
un
respal
do
seg
uro
. Deb
e c
olg
ars
e un
a m
anta
gruesa
detrás del
res
pald
o para
ev
itar
re
bot
es
en
cas
o d
e que
no
at
ine
al
respald
o.
• S
u
de
ai
re
está
diseña
do
para
tir
o a
l bl
anc
o y
es
ad
ecua
do
para
usar
se
bajo
te
cho
o
al a
ire
lib
re.
Re
cue
rde
siem
pre
co
loc
ar su
bl
anc
o c
on
cuid
ado
. PIENSE
en
lo
que puede go
lpe
ar s
i n
o at
ina
al
bla
nco
.
• Ant
es
de
disparar
el
de
ai
re,
ase
gúr
ese
de
qu
e h
ay
pr
esió
n pa
ra
su
operaci
ón
cor
rect
a. L
a a
guja
del
medi
dor deb
e es
tar
apun
tando
a
un á
rea
en
tre
100
0 y
30
00 psi
en el
med
ido
r.
8. Extracc
ión
de
un d
iábo
lo
ato
rado
Un
diábo
lo
atasc
ado
es ha
bitu
alm
ent
e re
sul
tad
o d
e lo
s in
tent
os
de
disp
ara
r e
l ri
fle de
ai
re
con
la
pre
sió
n
dem
asi
ado
ba
ja.
Antes
de d
isp
ara
r e
l ri
fle
de
aire
, a
segú
res
e d
e q
ue
hay
sufi
cie
nte
pr
esi
ón
para
su
ope
rac
ión
cor
rec
ta, c
erc
ior
ánd
ose
de
qu
e la
ag
uja
de
l m
edi
dor
esté
apun
tan
do
a la
zo
na e
ntre
10
00
y 3
000
ps
i.
En este procedimiento meterá una baqueta por el cañón de un
rifle de aire car
gado. Es en extremo importante que mientras esté haciendo esto el rifle de
aire tenga el segu
ro activado (“ON SAFE”), que el cerr
ojo permanezca en posición abierta
y que mantenga el dedo apartado del gatillo. No respetar esta advertencia podría causar
lesiones graves o la muerte.
ADVERTENCIA:
• Apun
te
el
de
ai
re
en
una
DIRECCI
ÓN
SE
GUR
A.
• Acti
ve
el seg
uro
de
l
de
ai
re
(“O
N SAFE”
).
(ve
a la
S
ecc
ión
2A
).
• Ab
ra
el c
err
ojo
em
pujando
el
m
ang
o d
e és
te
haci
a
arriba y
tir
ando de
él c
om
ple
tamen
te
hac
ia atr
ás
has
ta
que
escuche
do
s cl
ics.
• C
on
el c
err
ojo
en
la
posici
ón
más
trase
ra
ins
erte
un
a
baquet
a de
l tam
año
adec
uad
o e
n e
l c
añón
(e
mpe
-
zando
por
la boc
a). S
e p
ued
e d
añar
el cañ
ón s
i n
o
se
usa una baqueta de limp
iez
a d
el tam
año
co
rre
cto
(fig. 8
).
NO
TA:
El
ce
rro
jo
debe
es
tar
am
art
illa
do
y a
bie
rto
pa
ra
que
el d
iáb
olo
at
asc
ado
sa
lga
de
la
re
cáma
ra
al
empu
jarl
o c
on
la
baqu
eta
.
• C
on
la
baquet
a, empu
je
el di
ábo
lo
al puer
to
de
car
ga
de
diábol
os
(fren
te
del
ce
rro
jo)
, qu
ite
y
desec
he
el di
ábo
lo.
No
vuel
va
a ut
iliz
ar ese
diáb
olo
.
• Apun
te
el
de
ai
re
en
una
DIRECCI
ÓN
SE
GUR
A, cie
rre
la
ac
ció
n, desact
ive
el
seg
uro
(pónga
lo
en
“OFF
SAFE”) y
dis
par
e.
• Acti
ve
el seg
uro
de
l
de
ai
re
(“O
N SAFE”
). (v
ea
la
Secci
ón
2A).
• S
i n
o pue
de
desatascar
el
de
ai
re
siguiendo
es
te
pro
cedi
mient
o, n
o em
pren
da
ningu
na
otr
a a
cci
ón.
C
ros
man
Corpora
tio
n o
una Est
aci
ón
de s
erv
ici
o autorizad
a le d
esatas
cará
n el ri
fle.
(esto
no
tien
e c
osto
durante
el perío
do
de
garantí
a)
• P
ong
a a
cei
te
de
recá
mar
a d
e s
ilic
ona
C
ros
man
(n
úm
ero
de
pi
eza
RM
CO
IL)
en
la
junt
a tó
ric
a d
el c
añón
ca
da
3 m
eses
o
cad
a 5
00
dispar
os. A
plíqu
elo
co
n u
na
torund
a d
e a
lgo
dón
co
mo
se m
uest
ra
en la fi
gur
a 9
.
• Apliq
ue
una
gra
sa
EP
de
mo
ly
al
m
eca
nism
o d
el c
err
ojo
deslizante
ca
da 3
mes
es
o 5
00 t
iro
s.
• Manten
ga
todos
lo
s lubr
icant
es
con
ba
se
de
petróleo
ap
artad
os
del
nip
le d
e ll
ena
do. N
O DEBE
N in
tro
duc
irse en el d
epó
sito
de
alta
pr
esió
n.
El uso de lubricantes con base de petróleo en esta área podría
dar como resultado una explosión que pr
ovoque lesiones personales.
ADVERTENCIA:
• N
O MODIFIQ
UE
NI A
LTE
RE
EL
RIFLE
D
E AIR
E. L
os
intent
os
de
el
de
ai
re
de
cua
lquie
r for
ma
que
no
esté
indi
cad
a e
n est
e m
anua
l pu
ede
n h
ace
r que
el
rifle
de
aire no sea
se
gur
o p
ara
usarse
, o
cas
ion
ar g
rav
es
lesio
nes
o
la mu
ert
e, y
anu
lar
la
garantí
a.
• S
i s
u
de
ai
re
se
cae
, re
vis
e v
isual
men
te
que
fu
nci
one
co
rre
ctam
ent
e ant
es
de
volv
erlo
a
usar
. S
i p
are
ce
que
cualqu
ier
cosa
ha
ca
mbi
ado
, c
om
o q
ue
el g
atil
lo
est
é m
ás
suav
e o
m
ás
dur
o, p
ued
e s
er indic
aci
ón de pi
eza
s
desga
sta
das o
ro
tas
. Lla
me
a serv
ici
o a
l cl
ient
e de
C
ros
man par
a obt
ene
r a
yuda
ant
es
de
vol
ver
a usar
el rifl
e d
e
aire
.
No intente reparar el rifle de air
e ni desarmarlo para corregir
un llenado excesivo o un bloqueo de válvula. Pueden salir piezas volando del rifle de aire a
velocidades peligrosas si se desarma estando pr
esurizado.
ADVERTENCIA:
8
Baqueta
Diá
bol
o
9
6
6