Crosman BP2263 User Manual
Page 4
B. Pressurizing (Filling) the Airgun with a High Pressure Tank
The Marauder may be filled from a high pressure tank (bottle) like the Benjamin HPB3K. Use the Crosman
FAH002 Universal Fill Adapter with this option. Scuba tanks can also be utilized for the task. For scuba
tanks use the Crosman FAH003 Scuba Yoke Adapter.
Be sure to wear eye protection
•
Make sure the airgun is unloaded and not cocked.
•
(See section 6 for instructions on unloading and un-cocking.)
Read all instructions with your tank so you are familiar with its operation.
•
Put the airgun “ON SAFE” (see section 2A).
•
Point the airgun in a SAFE DIRECTION.
•
Remove the cap that covers the fill nipple on the airgun.
•
Connect the quick-disconnect fitting on the adaptor’s hose to the fill nipple (fig. 3).
•
Slowly open the valve on your tank and start filling the gun SLOWLY. Filling too quickly will cause heat
•
buildup that can affect accuracy of the fill pressure.
Watch the gauges on the airgun and your tank (if equipped) until the desired pressure is
•
reached (2000-3000 psi)
DO NOT fill the airgun to more than 3000 psi. See “Overfill” information in section 3C.
•
Turn the valve on your tank off when the desired fill pressure is reached.
•
BLEED the fill hose COMPLETELY to avoid hose whip from pressure in the fill hose
•
Disconnect the tank’s fill hose from the fill nipple on the airgun.
•
Replace the cap over the fill nipple and tighten. Always keep the fill nipple capped to eliminate the pos-
•
sibility of dirt entering the check valve.
TIP: If your airgun is being filled from completely empty (zero pressure) the tension of the hammer pressing
against the valve may keep the valve open which will cause air to leak down the barrel. This is most likely
to happen with a gun tuned for a high fill pressures, where the hammer spring preload is adjusted to a high
rate. In the event this occurs try cocking the bolt and leaving it in the rear (fully open) position to eliminate
the force on the valve allowing it to close. Always make certain the airgun is not loaded and there is not a
pellet in the chamber.
C. Filling with CO
2
Refer to instruction manual included in FAH001 or FAH002 Fill Adapters. Read all instructions and warnings
included with the adaptor prior to use.
Over filling beyond the “as tuned” best fill pressure does not improve performance. It will actually lessen
•
performance and may cause the valve to lock. For instance a gun tuned for best performance at 2,000
psi may partially valve lock at 3000 psi. If you discover that the airgun has been over filled, try to dry fire
the airgun (cock and shoot with no pellet loaded) in a SAFE DIRECTION until pressure on your airgun
drops to 3,000 psi or less depending on where your gun’s tuned best fill pressure is.
If the airgun will not discharge air with each shot, the valve may be completely pressure locked and will
•
require use of the degassing tool included with your airgun. Follow the instructions included with the
degassing tool to fully or partially depressurize the airgun.
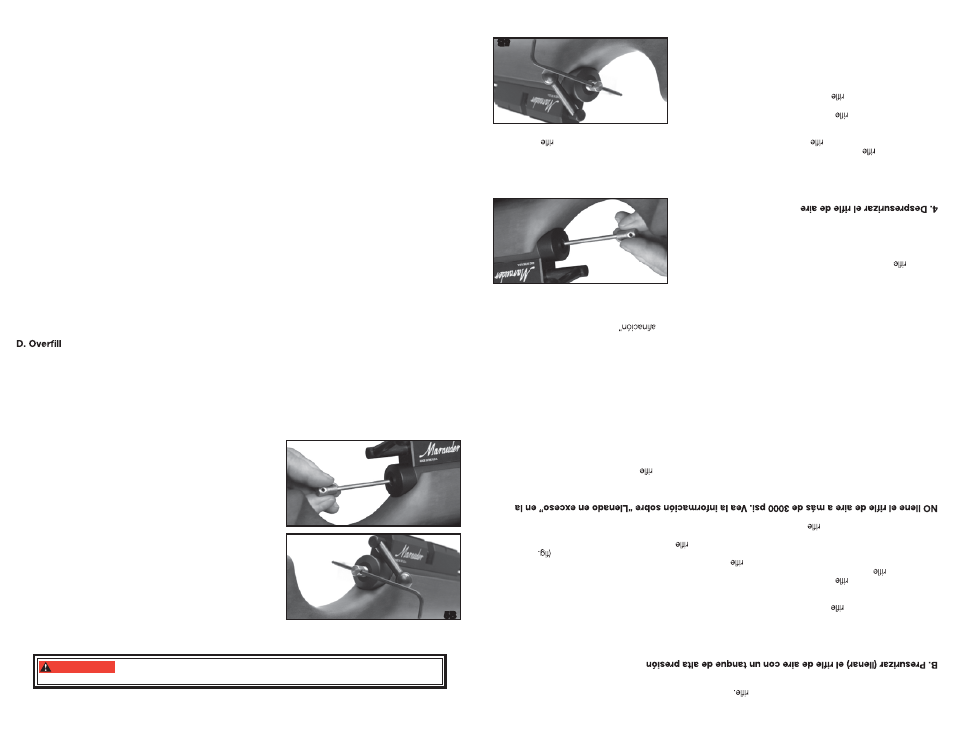
4. Depressurizing the Airgun
Your Marauder airgun, like most PCP airguns, is best stored
with some pressure in the reservoir. This keeps the seals in the
airgun forced against the sealing surfaces. In the event you
want or need to depressurize (e.g. for service) follow the
following steps:
A. Dry Fire Method
Keep the air rifle pointed in a SAFE DIRECTION.)
•
Remove all the air from your air rifle by repeatedly cocking
•
and dry-firing with the air rifle pointed in a SAFE DIREC-
TION) until the pressure gauge on your airgun shows no
pressure and air cannot be heard when the shot is fired.
Put the air gun “ON SAFE”.
•
B. Degassing Tool Method
Make certain the airgun is not in the cocked position by:
•
o
Pointing the airgun in a SAFE DIRECTION.
o
Removing the clip.
o
Closing the airgun bolt by sliding forward and latching.
o
Pulling the trigger.
Insert the degassing tool included with your Marauder airgun
•
into the threaded plug as shown in Figure 5A.
Turn the tool into the airgun in a clockwise direction until resistance is felt. This will indicate the nose of
•
the tool has come in contact with the internal valve.
WARNING:
Performing the following procedure will exhaust air from the barrel at a high
rate. Make certain the airgun is pointed in a SAFE direction.
5A
5B
purgar C
OMPLE
TAMEN
TE
la m
anguera. Debe purgar
la manguera d
e llenado
COMPLE
TAMEN
TE para evitar
qu
e
latiguee p
or tener
pr
esión.
• Desconect
e la
bomb
a de
l nipl
e d
e llenad
o de
l
• V
uelva
a coloca
r e
l tapó
n sob
re
el nipl
e d
e llenad
o y
apriételo
. M
anteng
a siemp
re
el nipl
e d
e llenad
o tapad
o par
a
eliminar la posibilidad de qu
e e
ntre
sucied
ad a la
vá
lvula
regulad
ora
.
El M
arauder puede
llenarse
con un t
anqu
e d
e alt
a p
res
ión
(bo
tel
la)
co
mo
el B
enj
amin
HPB
3K. U
tilic
e el
adaptador universal d
e llenad
o C
ros
man
FAH
002
co
n est
a o
pci
ón.
Ta
mbi
én pueden ut
iliza
rse
tanques d
e
buceo autón
omo p
ara esta
ta
rea.
En el
ca
so de
lo
s ta
nques
de
buce
o, uti
lic
e e
l adapt
ador
de
yug
o par
a
tanques de buceo Cro
sman F
AH
003
.
• Asegú
res
e d
e utiliza
r p
rotec
ció
n par
a lo
s ojo
s
• Ce
rció
res
e d
e qu
e e
l
de
ai
re
esté
descargado
y n
o am
artillado
. (V
ea
la
sección
6
para
obtener instruccione
s
sobre cómo descar
gar y
de
samartill
ar.)
• Le
a toda
s la
s instruccione
s d
e s
u ta
nque
para
familiarizarse
con
su
operación
.
• Activ
e e
l segu
ro
del
de
ai
re
(“ON
SAFE”)
. (Consult
e la
Secció
n 2A)
.
• Apunt
e e
l
de
ai
re
en
una
DIRECCIÓN
SEGURA
.
• Quit
e e
l tapó
n qu
e cub
re
el nipl
e d
e llenad
o de
l
de
ai
re.
• Conect
e e
l aditament
o d
e desconexió
n rápid
a d
e la
m
anguer
a d
e la
adaptado
r a
l nipl
e d
e llenad
o
3)
.
• Lentament
e abr
a la
válvul
a d
e s
u tanqu
e y
empie
ce
a llena
r e
l
LEN
TAM
ENTE. Llena
r demasiad
o rápid
o
ocasionar
á una acu
mul
ació
n de calor
qu
e pu
ede
afectar
la p
rec
isión de la p
res
ión
de
llen
ado
.
• Observ
e lo
s medido
res
de
l
de
ai
re
y d
e s
u tanqu
e (s
i est
á equipad
o co
n él
) hast
a alcanza
r la
pr
esión
deseada
(200
0-30
00 psi
)
sección 3C.
• Cier
re
la
válvula
de
su
tanque
cuando
se
llegue
a la
pr
esión
de
llenado
deseada.
• PURGU
E la
manguer
a d
e llenad
o COMPLE
TAMENT
E par
a evita
r qu
e latigue
e po
r te
ner p
resión
.
• Desconect
e la
manguer
a d
e llenad
o de
l ta
nque
del nipl
e d
e llenad
o de
l
de
ai
re.
• V
uelva
a coloca
r e
l tapó
n sob
re
el nipl
e d
e llenad
o y
apriételo
. M
anteng
a siemp
re
el nipl
e d
e llenad
o tapad
o par
a
eliminar la posibilidad de qu
e e
ntre
sucied
ad a la
vá
lvula
regulad
ora
.
SUGERENCIA: Si
está
llenand
o su
rifle
de
aire
a
part
ir d
e e
star totalm
ente
va
cío
(p
resión
ce
ro)
, la
tensi
ón d
el
martillo presi
onando
contra l
a v
álv
ula pued
e manten
er ésta
abierta,
lo que h
ará
que
esc
ape
aire h
aci
a el
ca-
ñón. Es más
pr
obabl
e que esto
ocurr
a c
on un ri
fle
afinado
pa
ra
altas p
resion
es d
e lle
nado, d
ond
e la
pr
ecarg
a
del re
sorte del marti
llo
está
ajust
ada
a
una a
lta
pro
porc
ión.
En
caso
de
que
esto
ocurra,
int
ente
amartil
lar e
l
cerro
jo y dejarlo en pos
ición
tr
ase
ra (t
ota
lm
ente
abi
erto)
pa
ra
elim
ina
r la
fuer
za
sobre
la v
álvula
, per
mitié
ndol
e
cerrarse. Asegúrese
de que
el rifl
e de
ai
re
no
esté
ca
rgado
y
no teng
a un
di
ábolo
en
la re
cámar
a:
C. Llenado con CO
2
Consulte el manual
de
instruc
cio
nes inc
lui
do
en
los
adapt
ado
res
de
llen
ado
FAH0
01 o
FAH
002.
Ant
es d
e
usar el adaptador, lea
todas l
as
instruc
cion
es y
adv
erten
cias
qu
e vi
enen
con
él.
D. Llenado en exceso
• E
l llenad
o e
n exces
o má
s all
á d
e la
m
ejo
r p
resió
n d
e llenad
o “segú
n la
no
m
ejor
a e
l desempeño
. D
e
hecho puede disminuir el
de
sempeño y o
casionar que se bloquee la vál
vula
. Por
eje
mpl
o, un arma afinada p
ara
su mejor desempeño
a 2
,000 psi pu
ede
sufr
ir un bloque
o pa
rcial d
e válvula
a 3000 psi. S
i descub
re que
se
ha
llenado
en exces
o e
l rifle de
aire, int
ente dispararl
o en
vací
o (a
martille
y dispa
re s
in
cargar diábolos) en
una D
I-
RECC
IÓN SEGURA hast
a qu
e la p
res
ión de su rifle de
aire
caig
a
a 3,0
00 psi o
menos,
de
pendiendo
de
cuál sea
la m
ejor
pr
esió
n
de llenad
o afinada
de
su rifl
e.
• S
i e
l
de
ai
re
no
descarga
aire
co
n cad
a dispa
ro,
la
vá
lvula
puede estar compl
eta
mente bl
oqueada por la
pr
esión y
requ
erir
á
el uso d
e la herr
amienta
de d
esgasado incluida con su rifl
e de
aire
. Siga las
instru
cci
ones
inc
luid
as
con la herram
ienta
de
des-
gasado para despresurizar
el
rifle d
e ai
re p
arc
ial o to
talmente
.
Su rifle de ai
re Mar
aude
r, c
omo
la m
ayor
ía d
e lo
s rifles
de
aire
PCP, se alm
acena m
ejor con
alg
o de
pr
esi
ón en
el
depósito.
Esto mantiene los sellos d
el rifl
e de
aire
pre
sionados
contra
las
sup
erfic
ies d
e s
ellad
o. En c
aso d
e qu
e d
ese
e
o tenga que
desp
resurizar (por
eje
mplo,
par
a dar
le s
erv
icio
) si
ga lo
s pasos
que
apa
rec
en a
continuac
ión:
A. M
étodo de disparo
en seco
• Manteng
a e
l
de
ai
re
apuntado
en
una
DIRECCIÓN
SEGURA.
)
• Extraig
a tod
o e
l ai
re
de
su
de
ai
re
am
artillando
y disparand
o e
n e
l va
cío
repetidament
e co
n e
l
apunt
ado
en una DIRECCIÓN
SEGU
RA hasta qu
e el
medid
or de
pr
esi
ón de su rifle de ai
re
muest
re qu
e n
o hay p
resión
y
no se pueda escu
cha
r ai
re
cuando
el r
ifle s
e dispara vac
ío.
• Activ
e e
l segu
ro
del
de
ai
re
(“ON
SAFE”)
.
B. M
étodo de herramienta de
des
gasa
do
• Asegú
res
e d
e qu
e e
l
de
ai
re
no
esté
en
posición
de
amar
-
tillado
:
o Apuntando el rifl
e de
aire
en una
DIRE
CCIÓ
N SE
GURA
.
o Extrayendo el cargado
r.
o Cerrando
el cer
roj
o del r
ifle
de
aire
de
slizá
ndol
o haci
a
adelante y asegurándo
lo.
o Tir
ando del
gatillo
.
5A
5B
4
4