Crosman MAR177 User Manual
Page 6
6
8. Unloading and Uncocking the Airgun
a. Unloading – Removing the Rotary magazine
1.
Cock the bolt fully rearward in order to remove the rotary magazine.
2.
Put the airgun “ON SAFE” (see firearm owner’s manual) and point in a
SAFE DIRECTION.
3.
Push the rotary magazine out of the receiver from the left side.
4.
With the airgun pointed in a safe direction close bolt and discharge
5.
The airgun is now ready for storage or removal from firearm lower.
9. Aiming and Firing Safely
• Always point your airgun in a SAFE DIRECTION.
• Follow the instructions for filling the airgun (section 5A or 5B) and loading
pellets (sections 7A and 7B).
• You and others with you should always wear shooting glasses to protect
your eyes.
• Do not shoot at hard surfaces or at the surface of water. The pellet
may bounce off or ricochet and hit someone or something you had
not intended to hit.
• Always choose your target carefully and be sure to have a safe
backstop.
• Your airgun is designed for target shooting and is suited for both
indoor and outdoor use. Always remember to place your target care-
fully. THINK about what you will hit if you miss the target.
• Before firing the airgun make certain there is sufficient pressure for
proper operation. The gauge needle should be pointing to the area
between 1000 PSI and 2900 PSI (200Bar) on the gauge.
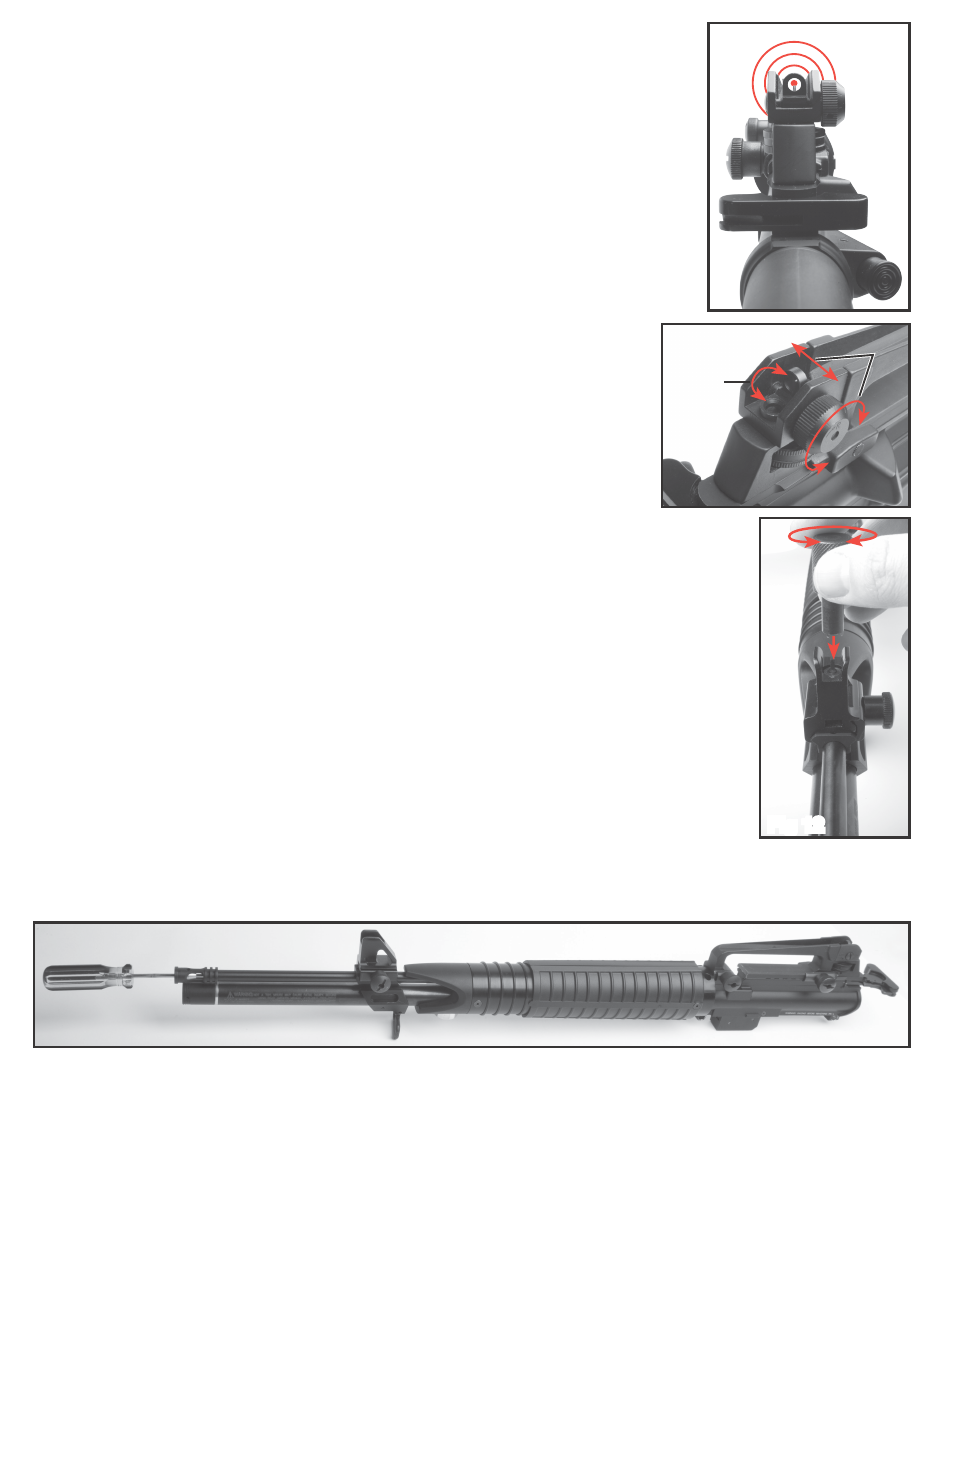
a. Sight Adjustment
1.
This airgun comes with an adjustable rear sight for windage (left or right move-
ment) and elevation (Fig. 11A). You can adjust the rear sight right or left by
turning the vertical knob attached to the dual aperture to the desired direction.
The horizontal knob is for elevation adjustment. Use large aperture for short
range and the small aperture for normal range. (Fig. 11B) To change aperture
size, simply push the desired size to the top.
2.
The front sight is adjustable for elevation. To adjust elevation, depress detent
and rotate post (Fig. 12)
10. Removing a Jammed Pellet
A jammed pellet is usually the result of trying to fire the airgun when the pressure is too
low. Before firing the airgun make certain there is sufficient pressure for proper
operation, by making sure the gauge needle is pointing to the area between 1000 PSI
and 2900 psi (200 bar). If the gun becomes jammed, depressurize the gun follow the
Hex Wrench Method: (section 6B)
a. Make certain the airgun is not in the cocked position by:
1.
Pointing the airgun in a SAFE DIRECTION.
2.
Removing the rotary magazine.
3.
Closing the airgun bolt by sliding forward and latching.
4.
Pulling the trigger.
5.
Depressurize (see section 6a, 6b)
6.
Point the airgun in a SAFE DIRECTION.
7.
Put the airgun “ON SAFE” (see firearm owner’s manual).
8.
Open the bolt by pushing the bolt handle up and pulling it all the way back until you hear two clicks.
9.
With the bolt in the rearward position insert a ramrod of the proper size into the barrel (start at the
muzzle) (Fig. 13). The barrel could be damaged if the proper sized cleaning rod is not used.
NOTE: The bolt must be cocked and open for the jammed pellet to clear the breech when it is pushed
out by the ramrod.
10.
Using the ramrod push the pellet into the pellet loading port (forward of the bolt) remove and dis-
card the pellet. Do not reuse that pellet.
11.
Put the airgun “ON SAFE” (see firearm owner’s manual).
12.
Pressurize (see section 5a, 5b)
13.
If you are not able to unjam your airgun by following this procedure, take no further action. Cros-
man Corporation or an Authorized Service Station will unjam your airgun (no cost during the war-
ranty period).
Fig 10
A
B
Fig 11
Fig 12
Fig 13