Location of controls, Front, Rear – JVC TV 13140 User Manual
Page 6: Description, Of controls, Location, Controls, Location of controls remote control, Front rear description, Description op controls
Attention! The text in this document has been recognized automatically. To view the original document, you can use the "Original mode".
ф
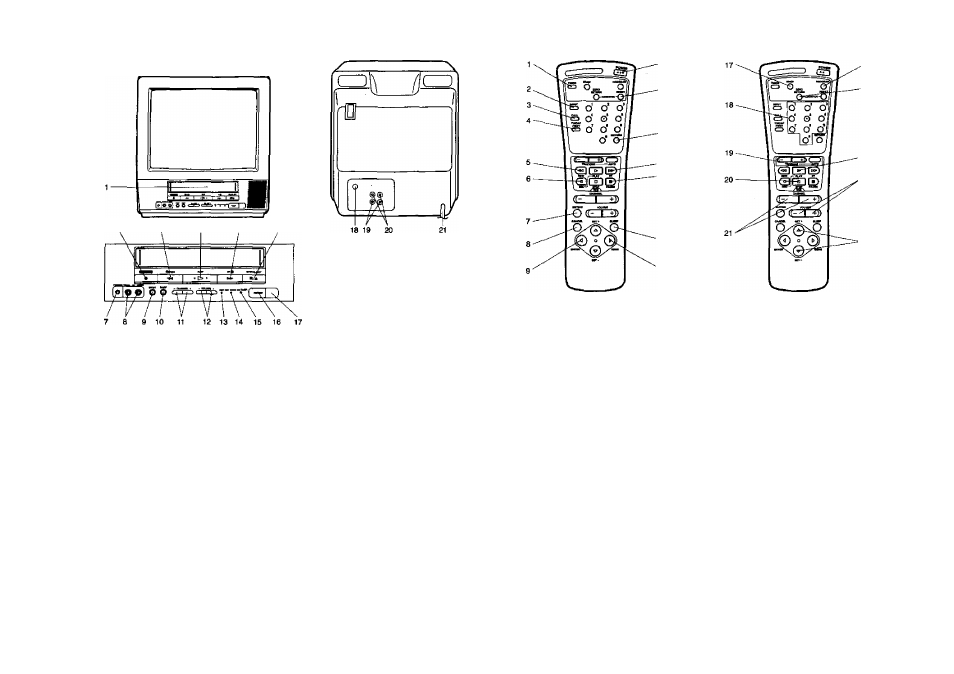
LOCATION OF CONTROLS
REMOTE CONTROL
FRONT
REAR
DESCRIPTION
FRONT:
1. СамвПе Loading Slot - To insert or remove a
videotape.
2. ЯЕС / ITR Button - Press once to start normal
recording. Additional presses activate IttslanI Timer
Recording.
3. REW (Rewind) Button - In the Stop mode, this
button rapidly winds the tape backwards. In the Play
mode, this button activates reverse search.
4. PLAY Button • Press to play a prerecorded tape.
5. FF (Fast Forward) Button - in the Stop mode, this
button rapidly winds the tape forward. In the Play
mode, this button activates forwanj search.
6. STOP/EJECT Button - Press once to stop the tape
in any mode. Press again to eject the tape.
7. Headphone Jack ■ Plug monaural headphones or
an earphone with an 1 /8* miniplug into this jack for
private listening,
8. AUDIO/VIDEO IN Jacks • Audio and video signal
cables from an external source can be connected
here.
9. INPUT Selector Button - Switches the program for
viewing between the VCR and an external input
source.
10. SP/EP Selector Button - Sets the tape speed for
recording.
OF CONTROLS
11. CHANNEL + /- Buttons - Press to select a channel
for viewing or recording.
12. VOLUME + / - Buttons - Press to raise or lower the
volume of the sound.
13. REC Indicator - Lights when Ihe TVA/CR is reconjing.
14. REC TIMER Indlcalor - This lights when the TIMER
button is pressed.
15. ON TIMER Indicator - This indicator lights up when
the powered up. II also lights up when ON TIMER
program is turned ON while power is OFF.
16. POWER Button - Press to turn the TV/VCR on or off,
17. Remote Sensor ■ Signals from the Remote Control
are received here.
REAR:
18. VHFAJHF Antenna Jack-Connect the 75 ohm
coaxial cable from the antenna or Cable TV sen/ice
to this jack.
19. VIDEO/AUDIO IN Jacks - Audio and video signal
cables from an external source can be connected
here.
20. VIDEOfAUDIO OUT Jacks - Used to output audio
and video signals to a TV, amplifier or VCR.
21. AC Power Cord-Connect to a120V, 60Kz outlet.
10
12
-13
-14
■15
'16
-24
,25
-26
DESCRIPTION OP CONTROLS
1. TIMER Button - Used to set the TV/VCR to start
recording at a preset time.
2.
INPUT Sector Button - Switches the program for
viewing between Ihe VCR and external input sources.
3. CALL Button - Displays the present kme/day of the
week, channel, counter, speed selection (and VCR
mode if VCR is playing) on the TV screen.
4. TV/CAP/TEXT Button - Switches between Caption,
Text and TV modes for Closed-Captioned programs.
5. REW (Rewind) Button - In the Slop mode, this
button raptdfy winds the tape backwards. In the Play
mcxle, this button activates reverse search.
6. REC Button - Press once together with the PLAY
button to start normal recording. Additional presses
activate Inslant Timer Recording.
7. MUT1NC Button - Press to turn off the sound, press
again to turn the sound back on.
8. CANCEL Button - Press to cancel existing setups or
to restore default values.
9. ENTER Button - Press to enter selected setup.
10. POWER Button - Press to turn Ihe TV/VCR on.
Press again to turn the TV/VCR oft,
11. COUNTER RESET Button - Used to reset the
counter to 00:00:00.
12. RETURN Buttron - Switches between the present
channel and the last channel selected.
13. FF (Fast Forward) Button - In the Stop mode, this
button rapidly winds the tape forward. In the Play
mode, this button activates forward search.
14. PAUSE Button - During recording, this button
temporarily stops the tape. During playback, it stops
the tape and displays a still image on the TV screen.
15. SLEEP Button - Sets the TV to turn off automaticatly
alter up to 120 minutes,
16. MENU Button - Press to display the On-Screen menu
function.
17. SP/EP Selector Button - Sets the tape speed for
recording.
18. Direct Channel Selection Buttons (0-9) - Allows
direct access to any channel.
19. Digital AUTO TRACKING Buttons - Allows automatic
or manual adjustment of tracking to minimize piclure
noise during playback.
20. STOP Button - Press once to stop the tape.
21. CHANNEL
*1-
Buttons - Press the
+
button to
change to a higher numbered channel set into memory.
Press the - button to change to a lower numbered
channel set into memory.
22. PROGRAM Button - Press to confirm the programmed
timer recording and ON/OFF timer.
23. ZERO RETURN Button • Use to stop the tape when
the counter reaches 00:00:00.
24. PLAY Button - Press to play a prerecorded tape.
25. VOLUME
*1-
Buttons • Press the + button to
Increase, or the - button to decrease the volume level.
26. SET -r / - Buttons - Used to select the option in the
menu or set timer recording, ON/OFF timer, channel
set, picture adjustment, auto repeat, clock and
language.
8