Repair procedures for all traps, Series h traps, Series c & x traps – AERCO Float and Thermostatic Traps Series X User Manual
Page 4: Caution, And 1, Series c trap 1, Trap shown)
4
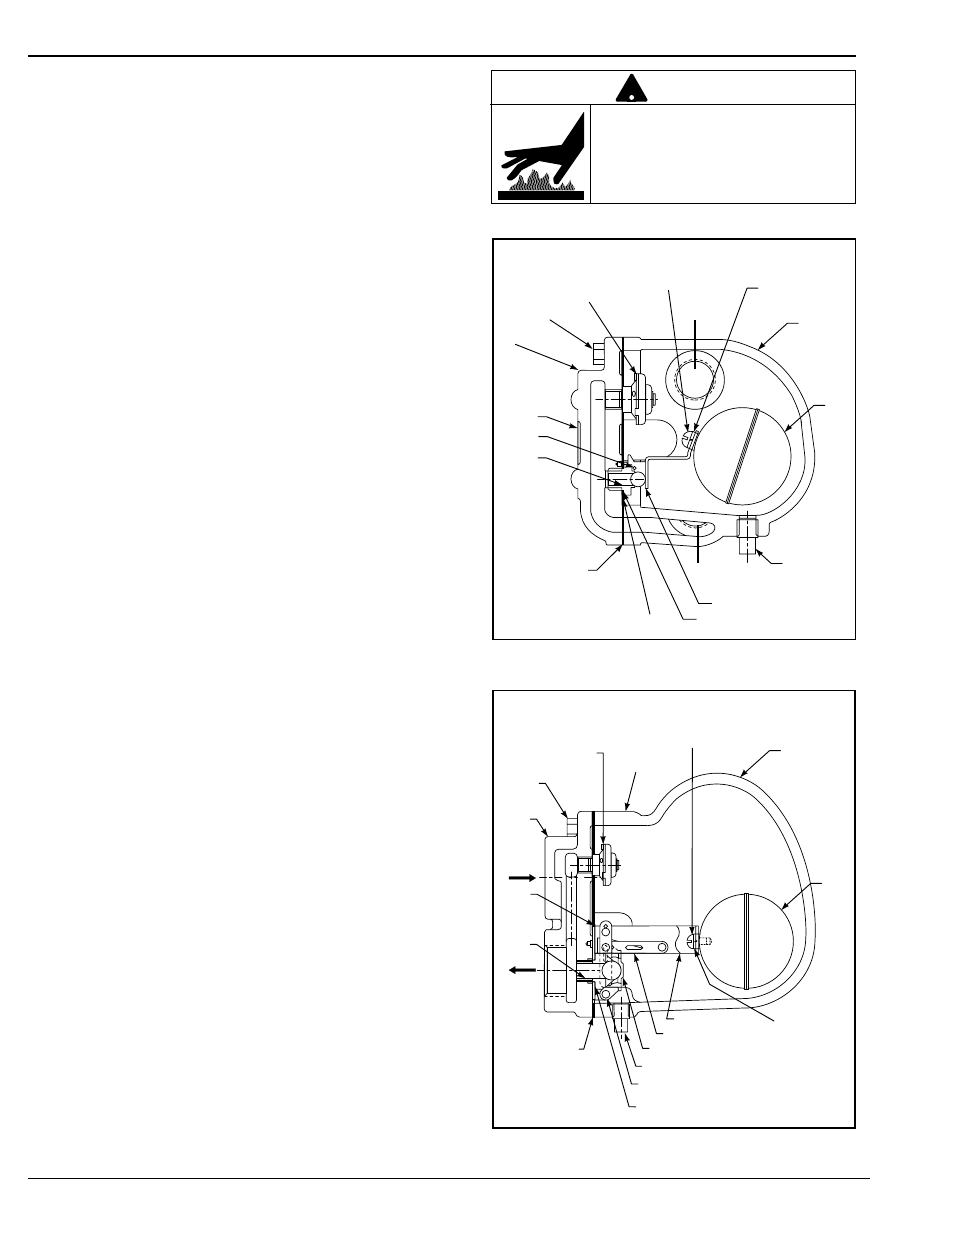
REPAIR PROCEDURES FOR ALL TRAPS
REMOVAL FROM SERVICE
1. Close inlet and outlet supply valves and allow unit to
cool. If a test valve is installed, open this valve to
relieve any pressure.
2. Remove the drain plug to drain condensate from the
trap body.
3. Remove the bolts that attach the cover to the body.
SERIES H TRAPS
REPAIR
4. With cover assembly removed from trap body, remove
pin that holds lever assembly to yoke. Inspect seat
and pin for wear, replace if worn.
5. Inspect thermostatic element by placing it in boiling
water to see if it closes. If it doesn't close, replace it.
6. Check alignment of pin and seat, adjust or replace
parts as necessary.
7. Check float ball for damage, shake the float to make
sure there is no fluid inside the float. Replace if
necessary.
8. Clean gasket surfaces and install new cover gasket.
9. Reassemble the cover to the body. Tighten the bolts in
the indicated sequence shown on page 5. Torque all
bolts evenly to the indicated values.
SERIES C & X TRAPS
REPAIR
4. With body assembly removed from trap cover, remove
pin that holds lever assembly to yoke. Inspect seat
and pin for wear, replace if worn.
5. Inspect thermostatic element by placing it in boiling
water to see if it closes. If it doesn't close, replace it.
6. Check alignment of pin and seat, adjust or replace
parts as necessary.
7. Check float ball for damage, shake the float to make
sure there is no fluid inside the float. Replace if
necessary.
8. Clean gasket surfaces and install new cover gasket.
9. Reassemble the body to the cover. Tighten the bolts in
the indicated sequence shown on page 5. Torque all
bolts evenly to the indicated values.
To prevent serious burns, the internal
pressure of the trap must be 0 psi
(0 bar) before servicing.
Failure to follow this caution will
cause personal injury.
CAUTION
!
;;;;;;;;;;;;;
;;;;;;;;;;;;;
;;;;;;;;;;;;;
;;;;;;;;;;;;;
;;;;;;;;;;;;;
;;;;;;;;;;;;;
;;;;;;;;;;;;;
;;;;;;;;;;;;;
;;;;;;;;;;;;;
;;;;;;;;;;;;;
;;;;;;;;;;;;;
;;;;;;;;;;;;;
;;;
;;;
;;;;
;;;;
;;;;
;;;;
Thermostatic
Module
Cover
Bolt
(6)
Pin
Seat
Name
Plate
Cover Gasket
Yoke
Seat Gasket
Lever Assembly
Drain Plug
Float
Ball
Body
Lock Washer
Screw
INLET
OUTLET
Series H Traps
3
⁄
4
" and 1
1
⁄
4
"
;;;;;;;;;;;;
;;;;;;;;;;;;
;;;;;;;;;;;;
;;;;;;;;;;;;
;;;;;;;;;;;;
;;;;;;;;;;;;
;;;;;;;;;;;;
;;;;;;;;;;;;
;;;;;;;;;;;;
;;;;;;;;;;;;
;;;;;;;;;;;;
;;;;;;;;;;;;
;;;;;;;;;;;;
;;;;;;;;;;;;
;;;;
;;;;
;;;;
;;;;
;;;;
;;;;
;;;;
;;;;
;;;;
;;;;
;;;;
;
;
;;
;;
;;
;;
;;
;;
;;
;;
;;
;;
;
;
Cover
Name Plate
Seat Gasket
Pin (4)
Lever Seat Assembly
Lever Linkage (3)
Lever
Lock Washer
Cover Gasket
Seat
Yoke
Screw
Thermostatic
Module
Bolt
(6)
Body
Float
Ball
INLET
OUTLET
Drain Plug
Series C Trap 1
1
⁄
4
" and 1
1
⁄
2
" (Trap Shown)