Inovonics EN1235S User Manual
Inovonics Communication
© 2011 Inovonics - www.inovonics.com
EchoStream® EN1233S/D and EN1235S/D
Pendant Transmitter
Installation Instructions - 05596D
1 Overview
1.1 Inovonics Wireless Contact Information
If you have any problems with this procedure, contact Inovonics
Wireless technical services:
• E-mail: [email protected]
• Phone: (800) 782-2709
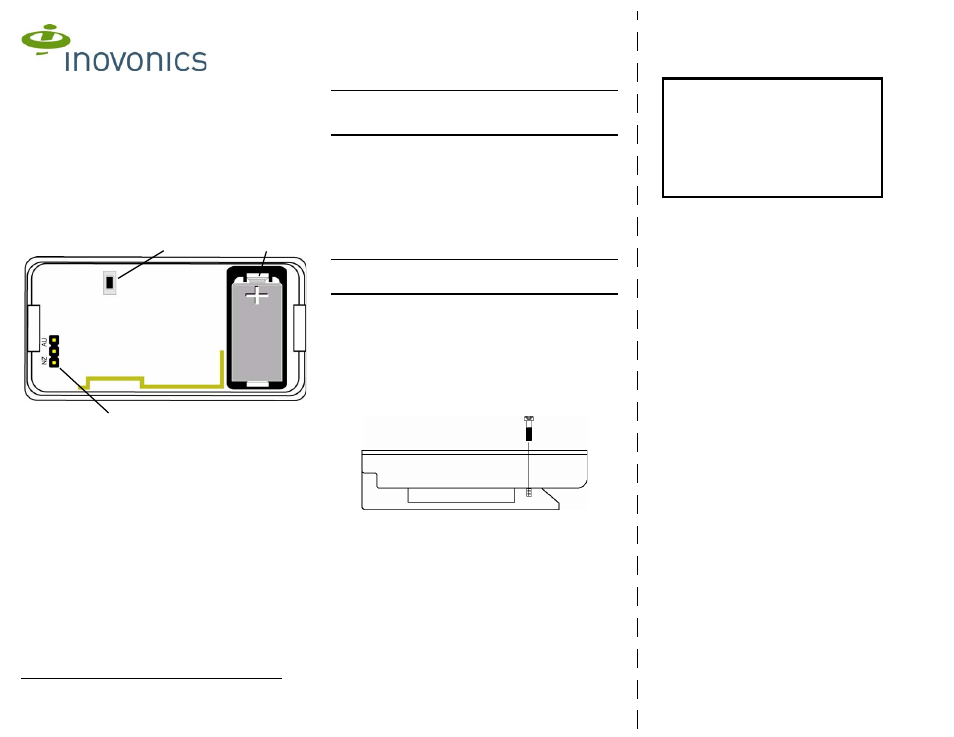
1.2 Pendant Transmitter Components
Figure 1 Pendant Transmitter components
2 Installation and Startup
2.1 Install/Replace the Battery
1. Pry the housing apart at either end and pull the two halves
apart.
2. If replacing a battery, remove the old battery.
3. Install the new battery.
4. Press the Reset button to initialize the transmitter.
2.2 Select the Frequency Band
EchoStream products are able to use a range of radio frequencies,
and must be configured for your geographic area. To configure the
transmitter:
1. Pry the housing apart at either end and pull the two halves
apart.
2. Place a selection jumper on the appropriate frequency band
selection pins.
• Leave the jumper off the pins to set the frequency range to
902-928 MHz for North America.
• Place the jumper on the bottom pins, marked NZ, to set the
frequency range to 921-928 MHz for New Zealand.
• Place the jumper on the top two pins, marked AU, to set the
frequency range to 915-928 MHz for Australia.
3. Press the Reset button to complete configuration.
Caution: When pressing the Reset button, make sure you don’t
also touch the frequency band selection pins. Touching the
frequency band selection pins while pressing the Reset button can
inadvertently set the pendant to the wrong frequency band.
2.3 Register the Pendant Transmitter
The pendant transmitter must be registered with the system in order
to be monitored and supervised. When supervised, the pendant
transmitter will send a check-in message to the serial receiver or
network coordinator every three minutes.
Each pendant has a unique factory-programmed identification
number. Refer to the control panel’s installation instructions for
details on registering a transmitter.
1. When prompted by the receiver to reset transmitter, press the
Reset button.
2. Replace the cover.
Caution: The pendant should be tested after registration to ensure
operation. To test the pendant, activate each of the conditions and
ensure an appropriate response.
3 Operation
3.1 Using The EN1233 Pendant Chain
Always use the chain included with the ES1233. Substituting
stronger cords or chains may result in injury to the wearer.
3.2 Converting the Pendant Transmitter Belt Clip
If you’d like to convert the pendant transmitter belt clip to a belt loop,
secure the bottom of the belt clip to the housing with a coarse
thread screw.
Figure 2 Use a coarse thread screw to secure the belt clip
3.3 Operate the Pendant Transmitter
To activate single button transmitters, press the button for at least
one second. To activate double button transmitters, press both
buttons simultaneously. Alarm signals are transmitted multiple times
and are indicated by the blinking transmission LED. When the
buttons are released, the transmitter sends an alarm restoral
signal.To test a transmitter, activate the alarm by pressing the
button(s).
A Reset button
B Frequency band selection pins
C Battery
B
A
C
Printing Instructions
1. Print Duplex
2. Align and orient back page to match front
page.
3. Cut on dashed line
4. Fold cutsheet in half along the 8.5" axis.