Checkline DTMB User Manual
Page 11
11
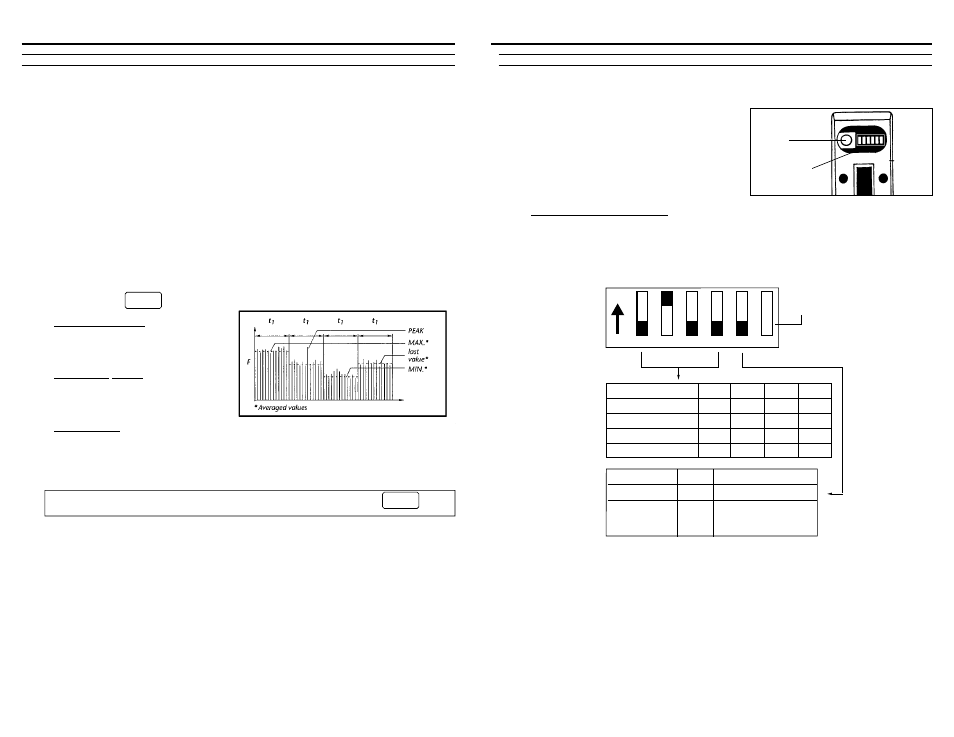
4. The Dip Switch Block will be located
at the top of the opening after
removing the Slide Guide Plate.
5.32 Setting Dip Switches
Using a small slotted screwdriver or other pointed tool, slide each of the five (5)
Dip Switches into the ON (up) or OFF (down) position as indicated in the illus-
tration below for the desired setting. Dip Switch #6 is not used.
Memory Mode
DIP-5 Data Stored in Memory
Standard Memory
OFF
MIN, MAX, PEAK
Standard Memory
Without Auto–
ON
MIN, MAX, PEAK
Power Off
Display Update Rate
DIP-1
DIP-2
DIP-3
DIP-4
0.5 sec
ON
OFF
OFF
OFF
1.0 sec
OFF
ON
OFF
OFF
2.0 sec
OFF
OFF
ON
OFF
4.0 sec
OFF
OFF
OFF
ON
1
2
3
4
5
6
ON
DIP Switch #6
(Not Used)
Factory switch:
DO NOT
TOUCH
DIP switches
14
6.00 BUILT-IN MEMORY SYSTEM
The DTMB Built-In Memory System can be configured to operate in one of two
modes: Standard Memory or Standard Memory With No Auto Power Off. The
data stored in the Standard Memory can be recalled to the display for viewing.
6.10 Standard Memory Mode
The DTMB takes 62 tension measurements per second and displays the aver-
age of these measurements over a user-selected Display Update Rate of 0.5, 1, 2
or 4 seconds. The Standard Memory system checks each displayed value and
retains the Maximum, Minimum and Peak tension values which occurred dur-
ing the Measuring Interval. The Measuring Interval is started and stopped by
pressing the key.
Maximum Value: highest
displayed value during
measuring interval
Minimum Value: lowest
displayed value during
measuring interval
Peak Value: highest transient
valu of all of the measurements used to calculate each displayed value
Note: The “M” indicator on the LCD display will flash on and off, indicating
that the Standard Memory system is activated.
To Start/Stop measuring interval for Standard Memory, press
key.
STORE
STORE