Caution, Initial set-up, Installation – Steffes 6140 User Manual
Page 12: System dimensions figure 3
Installation
n
3.03
Comfort Plus Commercial
Installation
INITIAL SET-UP
Step 1 Remove the Information Package from the
outside of the shipping box and unpackage
the Comfort Plus Commercial heating
system.
Step 2 Remove the heating elements from inside
the base of the system.
Step 3 Move the system into its installation loca-
tion. It is capable of fitting through a 30"
doorway (minimum) without disassembling.
If necessary, it can be disassembled for
ease in moving. To disassemble the system,
refer to the disassembly instructions (Page
A.02) for more information.
Step 4 Once in place, adjust the leveling legs on the bottom of the system as necessary to prevent rocking. If
not placed properly the system may bend or twist during the brick loading process, making element and
brick core temperature sensor installation difficult.
Step 5 Remove the painted front panel of the brick storage cabinet by removing the sheet metal screws along
the top, bottom, and sides of the panel. Detach by pulling the bottom of the panel forward and down.
Step 6 Locate the element wiring harnesses and the brick core temperature sensors behind the front painted
panel. Disconnect them from their shipping location. Carefully position them to avoid damage during the
brick loading and wiring processes.
The 6140 has three brick core temperature sensors.
CAUTION
Risk of improper operation or equipment dam-
age. Read and follow installation instructions
carefully.
w DO NOT install the Comfort Plus Commercial
system on its shipping pallet.
w DO NOT extend the leveling legs more than
one inch.
w DO use and follow generally accepted safety
practices when handling insulation material.
w DO have equipment installed by a qualified
technician in compliance with all applicable
codes and regulations.
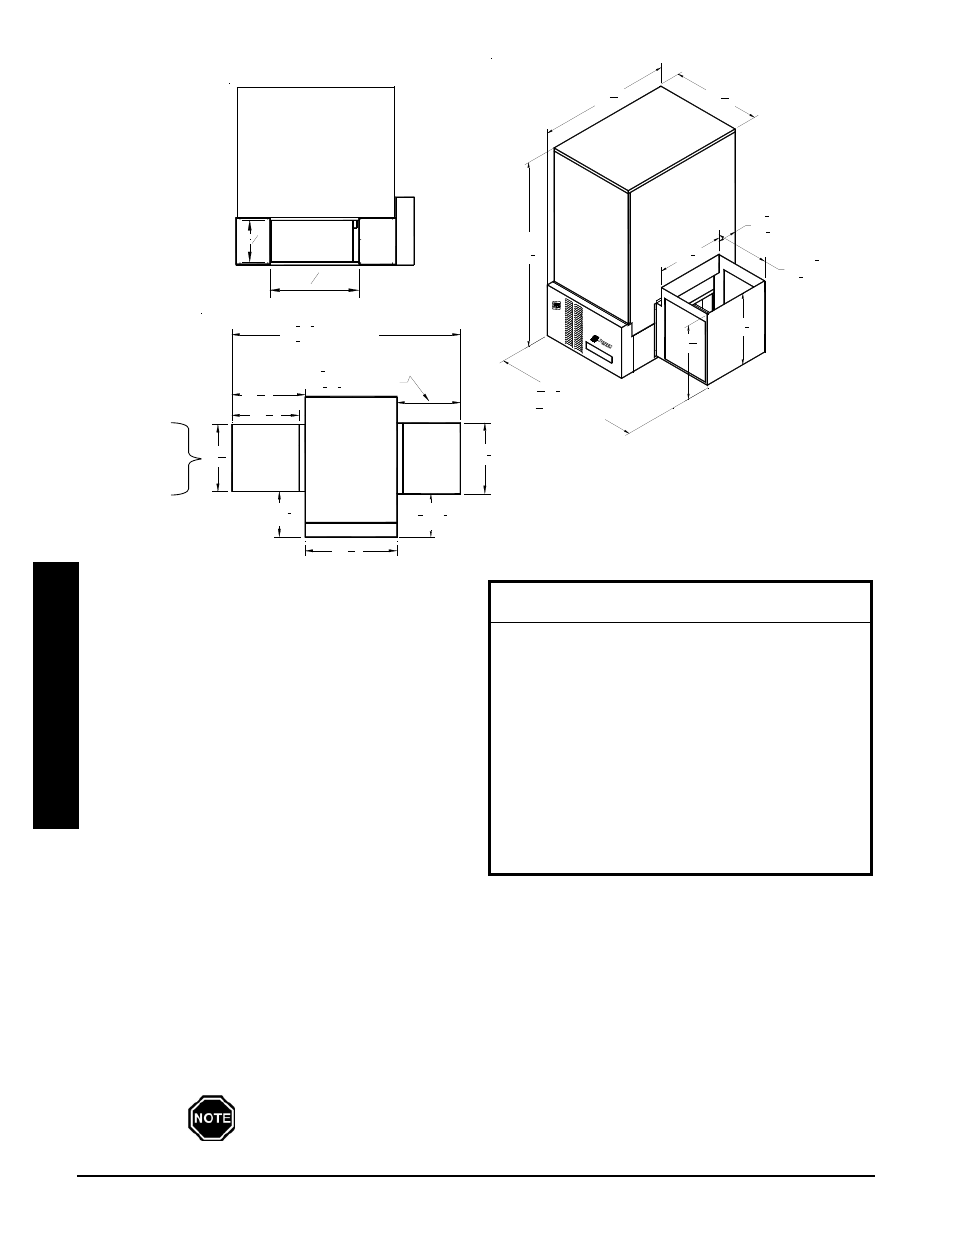
SYSTEM DIMENSIONS
FIGURE 3
29
3
16
"
Front View
44
11
16
"
P
M
M
M
A
49
7
16
" (
1
2
HP Blower)
53
15
16
" (1 HP Blower)
STEFFES
25
1
16
"
24
1
4
"
22
5
8
"
8
3
8
"
(±
1
4
")
18" (
1
2
HP Blower)
22
1
2
" (1 HP Blower)
6140
68
5
8
"
Unit Duct
Opening
225 16"
10
1
2
"
Side View
NOTE:
Factory built
Return Air Plenum
is 52 5/16 high.
77
5
8
" (
1
2
HP Blower)
82
1
8
" (1 HP Blower)
29
3
16
"
Top View
28
3
16
"
26
1
16
"
Return Air Plenum
(Order Item
#1301550)
22
3
16
"
14"(±
1
4
")
22
5
8
"
13
3
4
" (±
1
4
")
Factory Supply
Air Plenum
24
3
4
" (1 HP Blower)
20
1
4
" (
1
2
HP Blower)