3d smartone – Xpres 3D SMARTone User Manual
Page 9
3D SMARTone
INSTALLATION AND OPERATION
9
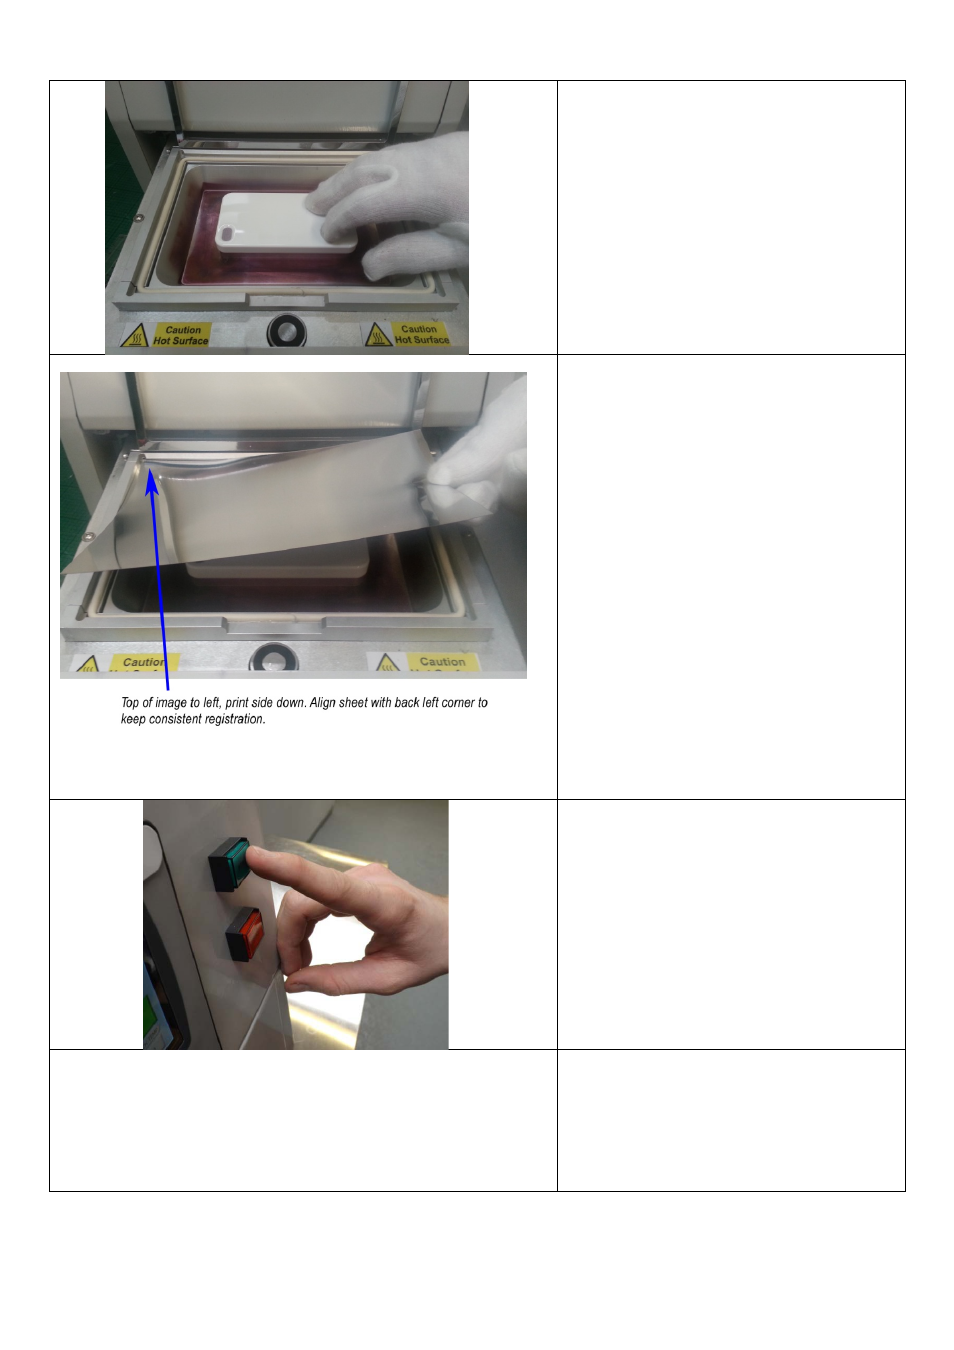
•
The case should fit tightly onto the jig.
•
Press all around the edges to make sure the
part is securely in place.
•
Do not leave the part in the press for more
than 20 secs before adding the film and
starting the cycle to prevent possible part
distortion.
•
Load the film
‐ print side down and
‐ top of the print to the left.
‐ Print templates supplied with the
SMARTone
system will feature a red dot in
the top left corner of the print, so that
orientation can be easily identified on the
printed sheet of film.
This also denotes the corner of the film that is
to be used for registration as shown in the
illustration to the left.
It is recommended that a similar mark is used
if you are making your own templates.
•
Close the frame
•
Push the drawer firmly closed
As soon as the film is loaded close the drawer.
The film may distort if this procedure is not done quickly
•
Press the Cycle Start button.
•
The
SMARTone
will now take care of
everything.
Caution – be careful not to run a cycle with printed film
but no part, as the dye will be transferred onto the
surface of the jig and then will be transferred to the
inside of the next parts you run.
If this happens remove the jig from the drawer and
allow it to cool. The jig can be gently cleaned with water
and a scouring pad (eg 3M Scotch‐Brite green)
- Canvas (2 pages)
- Banner (2 pages)
- Crystal Print (5 pages)
- Easy Dome (12 pages)
- Gem Tec (8 pages)
- Sign Vinyl Application Guide (2 pages)
- SubliJet IQ EPSON Stylus PRO 4880 (Windows Power Driver Setup): Power Driver Installation & Getting Started Guide (52 pages)
- SubliJet IQ EPSON Stylus PRO 4880 (Windows Power Driver Setup): Print & Setup Guide CorelDRAW X5 (6 pages)
- SubliJet IQ EPSON Stylus PRO 4880 (Windows Power Driver Setup): Print & Setup Guide Photoshop CS5 (5 pages)
- SubliJet IQ EPSON Stylus PRO 4880 (Windows Power Driver Setup): Print & Setup Guide Illustrator CS5 (6 pages)
- SubliJet IQ EPSON Stylus PRO 4880/4450 (Windows Power Driver Setup): Sublimation Cartridge Quick Start Guide (2 pages)
- SubliJet IQ EPSON Stylus PRO 4880 (Windows Power Driver Setup): Sublimation Ink Configuration Guide (1 page)
- SubliJet E Epson Stylus Pro 7700 (Windows Power Driver Setup): Power Driver Installation Guide (16 pages)
- SubliJet E Epson Stylus Pro 7700 (Windows Power Driver Setup): Printer Setup (4 pages)
- SubliJet E Epson Stylus Pro 7700 (Windows Power Driver Setup): Print & Setup Guide CorelDRAW 12 - X4 (3 pages)
- SubliJet E Epson Stylus Pro 7700 (Windows Power Driver Setup): Print & Setup Guide CorelDRAW X5 (6 pages)
- SubliJet E Epson Stylus Pro 7700 (Windows Power Driver Setup): Print & Setup Guide Photoshop Elements 8 - 10 (4 pages)
- SubliJet E Epson Stylus Pro 7700 (Windows Power Driver Setup): Print & Setup Guide Illustrator CS4 - CS5 (6 pages)
- SubliJet E Epson Stylus Pro 7700 (Windows Power Driver Setup): Print & Setup Guide Photoshop CS5 (6 pages)
- SubliJet E Epson Stylus Pro 7700 (Mac ICC Profile Setup): Printer/Profile Installation Guide (17 pages)
- SubliJet E Epson Stylus Pro 7700 (Mac ICC Profile Setup): Print & Setup Guide Photoshop Elements 8 - 10 (7 pages)
- SubliJet E Epson Stylus Pro 7700 (Mac ICC Profile Setup): Print & Setup Guide Photoshop CS - CS4 (8 pages)
- SubliJet E Epson Stylus Pro 7700 (Mac ICC Profile Setup): Print & Setup Guide Photoshop CS5 (7 pages)
- SubliJet E Epson Stylus Pro 7700 (Windows ICC Profile Setup): Printer/Profile Installation Guide (15 pages)
- SubliJet E Epson Stylus Pro 7700 (Windows ICC Profile Setup): Driver Configuration Guide (6 pages)
- SubliJet E Epson Stylus Pro 7700 (Windows ICC Profile Setup): Print & Setup Guide CorelDRAW 10 - 12 (4 pages)
- SubliJet E Epson Stylus Pro 7700 (Windows ICC Profile Setup): Print & Setup Guide CorelDRAW X3 - X4 (4 pages)
- SubliJet E Epson Stylus Pro 7700 (Windows ICC Profile Setup): Print & Setup Guide CorelDRAW X5 (5 pages)
- SubliJet E Epson Stylus Pro 7700 (Windows ICC Profile Setup): Print & Setup Guide Photoshop Elements 8 - 10 (4 pages)
- SubliJet E Epson Stylus Pro 7700 (Windows ICC Profile Setup): Print & Setup Guide Illustrator CS4 - CS5 (4 pages)
- SubliJet E Epson Stylus Pro 7700 (Windows ICC Profile Setup): Print & Setup Guide Photoshop CS (4 pages)
- SubliJet E Epson Stylus Pro 7700 (Windows ICC Profile Setup): Print & Setup Guide Photoshop CS2 (4 pages)
- SubliJet E Epson Stylus Pro 7700 (Windows ICC Profile Setup): Print & Setup Guide Photoshop CS3 - CS5 (4 pages)
- SubliJet IQ Epson Stylus Pro 7890 - IQ Pro Photo (Mac ICC Profile Setup): Printer/Profile Installation Guide (16 pages)
- SubliJet IQ Epson Stylus Pro 7890 - IQ Pro Photo (Mac ICC Profile Setup): Printer Setup (4 pages)
- SubliJet IQ Epson Stylus Pro 7890 - IQ Pro Photo (Mac ICC Profile Setup): Print & Setup Guide Photoshop CS6 (7 pages)
- SubliJet IQ Epson Stylus Pro 7890 - IQ Pro Photo (Mac ICC Profile Setup): Print & Setup Guide Photoshop CS - CS5 (7 pages)
- SubliJet IQ Epson Stylus Pro 7890 - IQ Pro Photo (Mac ICC Profile Setup): Print & Setup Guide Photoshop Elements 8 - 11 (6 pages)
- SubliJet IQ Epson Stylus Pro 7890 - IQ Pro Photo (Windows ICC Profile Setup): Printer/Profile Installation Guide (15 pages)
- SubliJet IQ Epson Stylus Pro 7890 - IQ Pro Photo (Windows ICC Profile Setup): Driver Configuration Guide (3 pages)
- SubliJet IQ Epson Stylus Pro 7890 - IQ Pro Photo (Windows ICC Profile Setup): Print & Setup Guide CorelDRAW 12 - X4 (6 pages)
- SubliJet IQ Epson Stylus Pro 7890 - IQ Pro Photo (Windows ICC Profile Setup): Print & Setup Guide CorelDRAW X5 - X6 (7 pages)
- SubliJet IQ Epson Stylus Pro 7890 - IQ Pro Photo (Windows ICC Profile Setup): Print & Setup Guide Illustrator CS - CS6 (8 pages)
- SubliJet IQ Epson Stylus Pro 7890 - IQ Pro Photo (Windows ICC Profile Setup): Print & Setup Guide Photoshop CS - CS5 (6 pages)