Warning notice, Notice warning, Reclining tension adjustment instr uctions – La-Z-Boy La-Z-Touch Cooler Recliner with Massage & Heat prior to 11/27/2011 User Manual
Page 9: Position legrest operating instr uctions: f
17
16
--
To reduce the risk of injur y:
•
This unit is equipped with a tension adjustment feature for the reclining
mechanism that is preset at the factory. The tension setting can be changed for
your personal preference. To avoid tipover and assure stability, do not operate
the unit with the tension adjustment wing nuts completely loosened.
- To reduce risk of product damage:
•
Make sure the legrest on each unit is closed before tilting forward and
adjusting the tension.
•
Do not completely tighten the wing nuts. The tension spr ings should not be
completely compressed after making adjustments . If this occur s , the wing
nuts must be loosened a minimum of
1
⁄
2
-tur n to avoid damage to the
spr ing tension assembly.
•
Do not completely loosen the wing nuts. The spring should not slide on the bolt
after making adjustments. If the spring slides on the bolt, tighten the wing nut
clockwise a minimum of
1
⁄
2
-turn, after the spring no longer slides on the bolt.
•
Adjust bot h wing nuts equally.
Reclining Tension Adjustment Instr uctions
You can adjust the tension of the reclining mechanism to respond to your
individual size.
1. Unplug both power transfor mer s from the electr ical outlet. Gently roll the
reclining chair forward to rest on its ar ms and top of the back. Locate
the wing nuts , one on each side, toward the back of the recliner under
the reclining seat (only one side shown below).
2. Adjust the tension by tur ning the wing nuts in ¼-tur n increments until the
desired setting is reached.
•
A taller or heavier per son may choose to increase the reclining tension
by tightening the wing nuts clockwise.
•
A smaller per son may choose to decrease the reclining tension by
loosening the wing nuts counterclockwise.
3. Retur n the reclining chair to the upr ight position and test the new setting.
Make additional adjustments if needed, repeating these steps . Plug both
power transfor mer s directly into a wall outlet.
Reclining Tension Adjustment Instr uctions:
WARNING
NOTICE
:
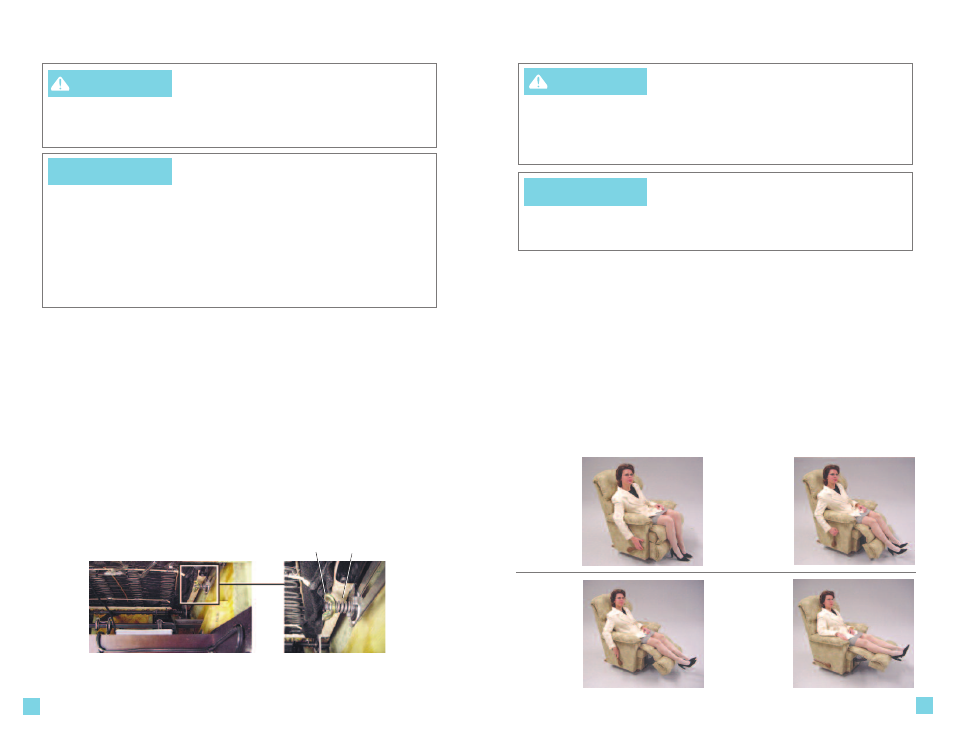
Tension Spr ing
Wing Nut
To Operate the Legrest
1. Your reclining chair is equipped with a three-position locking legrest for seating
comfort. Simply rotate the handle to operate the legrest (F
IGURE
1). You may stop in
any one of three ideal positions. The 1st position is slightly inclined for relaxed reading
(F
IGURE
2). The 2nd position is slightly more inclined for comfortable television viewing
(F
IGURE
3). The 3rd position is fully extended for complete relaxation (F
IGURE
4). To lower
the legrest, rotate the handle counterclockwise to the fully extended position,
then rotate clockwise to the fully closed position.
2. The chair back can be reclined with the legrest closed or extended. To recline,
a pply pressure to the back. Sit upr ight to retur n the back to an upr ight position.
3. Br ing the back upr ight and close the legrest before getting out of the chair.
Additional Feature on Selected Styles
The chair body can be tilted back when the legrest is in use. Shifting your body weight
rearward will cause the chair body to tilt backward offering a number of different positions.
3-Position Legrest Operating Instr uctions:
F
I G U R E
1
F
I G U R E
3
F
I G U R E
2
F
I G U R E
4
CLOSED
POSITION
1ST POSITION
2ND POSITION
3RD POSITION
–
To reduce the risk of serious injur y:
•
Provide a clear path for operation of the back and legrest. Place tables
and area rugs at a distance to allow the legrest to fully extend without
rubbing or interference.
•
To safely exit the unit and prevent a tripping hazard, bring the back
upright and close the legrest.
–
To reduce risk of product damage:
•
Damage will occur to the mechanism if the legrest is forced closed
from the 1st or 2nd position. The legrest must be extended to the 3rd
position and then closed.
NOTICE
WARNING