Perimeter seal later – EFCO 5800 Series User Manual
Page 8
perimeter seal later.
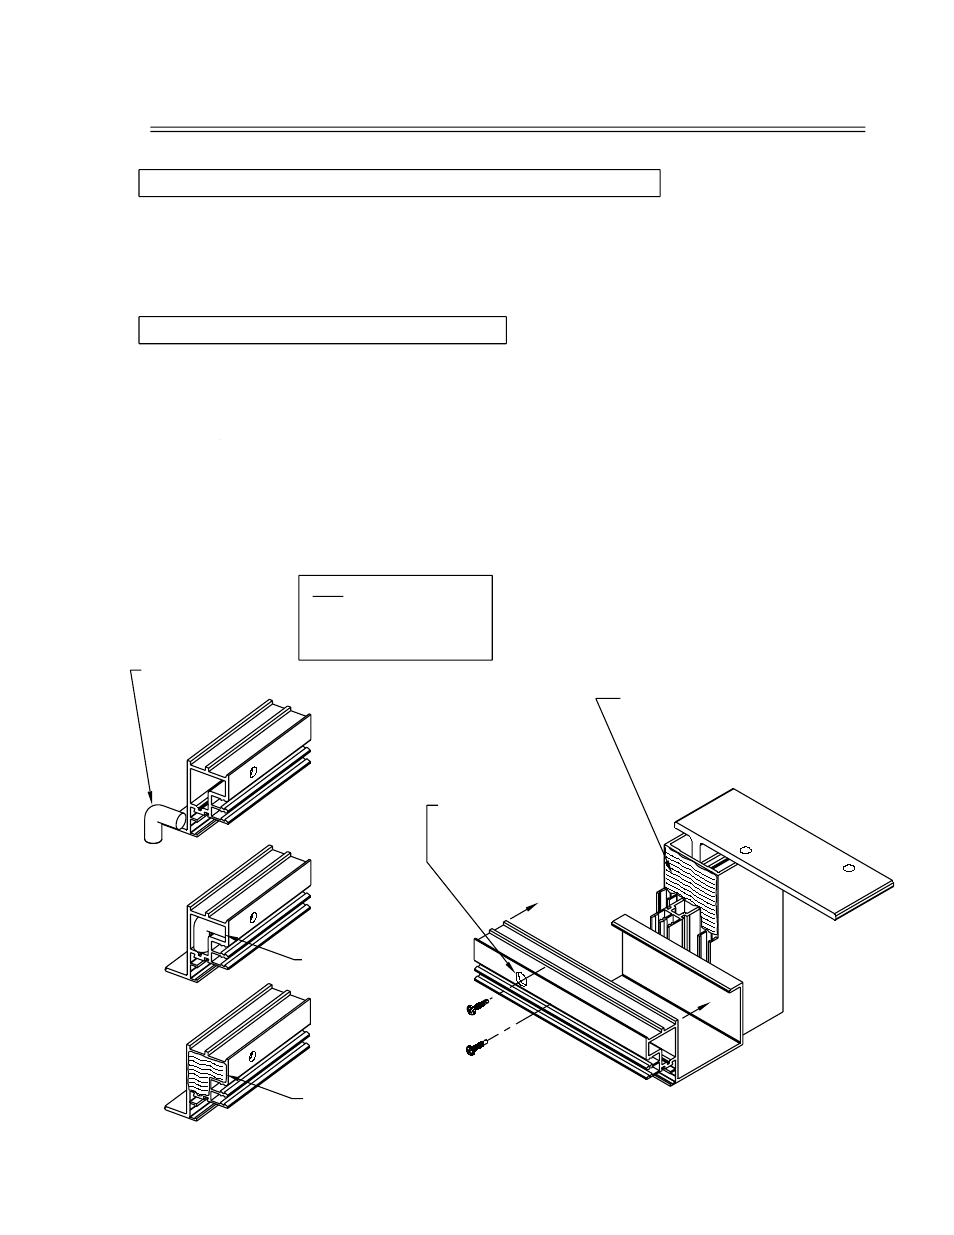
THE BACKER
CUT AND FOLD
ROD 90 DEG.
STEP #1 PLUG ENDS OF PERIMETER HORIZONTALS
spacing to avoid dimensional build-up across the opening.
center line dimension at each horizontal installation before and after fastening
the predrilled holes in the ends of each horizontal. Confirm the mullion
appropriate horizontal member to the vertical mullion at the notch with (2)
the horizontal into place. Verify the mullion locations at every fifth mullion
Stalgard , #10-16 x 3/4", PL-PH-SMS, Tek/2, self drilling fasteners through
to the factory notched vertical mullion, at the horizontal locations. Attach the
Clean all mating surfaces and apply a thin film of specified sealant
silicone to create an end plug. The end plug will act as a back-up for the
Prior to horizontal attachment, insert a 2 1/2" piece of backer rod folded to
SECTION III: HORIZONTAL FRAME INSTALLATION
STEP #2 PERIMETER HORIZONTALS
90 degree into the jamb end of the head and sill horizontals. Seal the ends with
SEAL OVER THE END
AND TOOL FLUSH WITH
THE EXTRUSION.
ROD 1/4" INSIDE
INSERT THE BACKER
THE EDGE OF THE
EXTRUSION.
ONCE THE HORIZONTALS
ARE INSTALLED, INSERT
BACKER ROD INTO THE
HOLE AND SEAL THE
HOLE FLUSH WITH
any area, clean the
alcohol.
surface with denatured
SILICONE.
Note: Prior to sealing
R
APPLY A THIN LAYER OF
MULLION. APPLY SEALANT TO
ENTIRE FACE OF THE COPED
SPECIFIED SEALANT TO THE
THE PERIMETER HEAD AND
SILL HORIZONTAL MEMBERS ONLY.
THE ENDS OF THE MULLION AT
PAGE 6
7/2003