B&M 45126 PRECISION SPORT SHIFTER - BMW E36 & E46 User Manual
Page 2
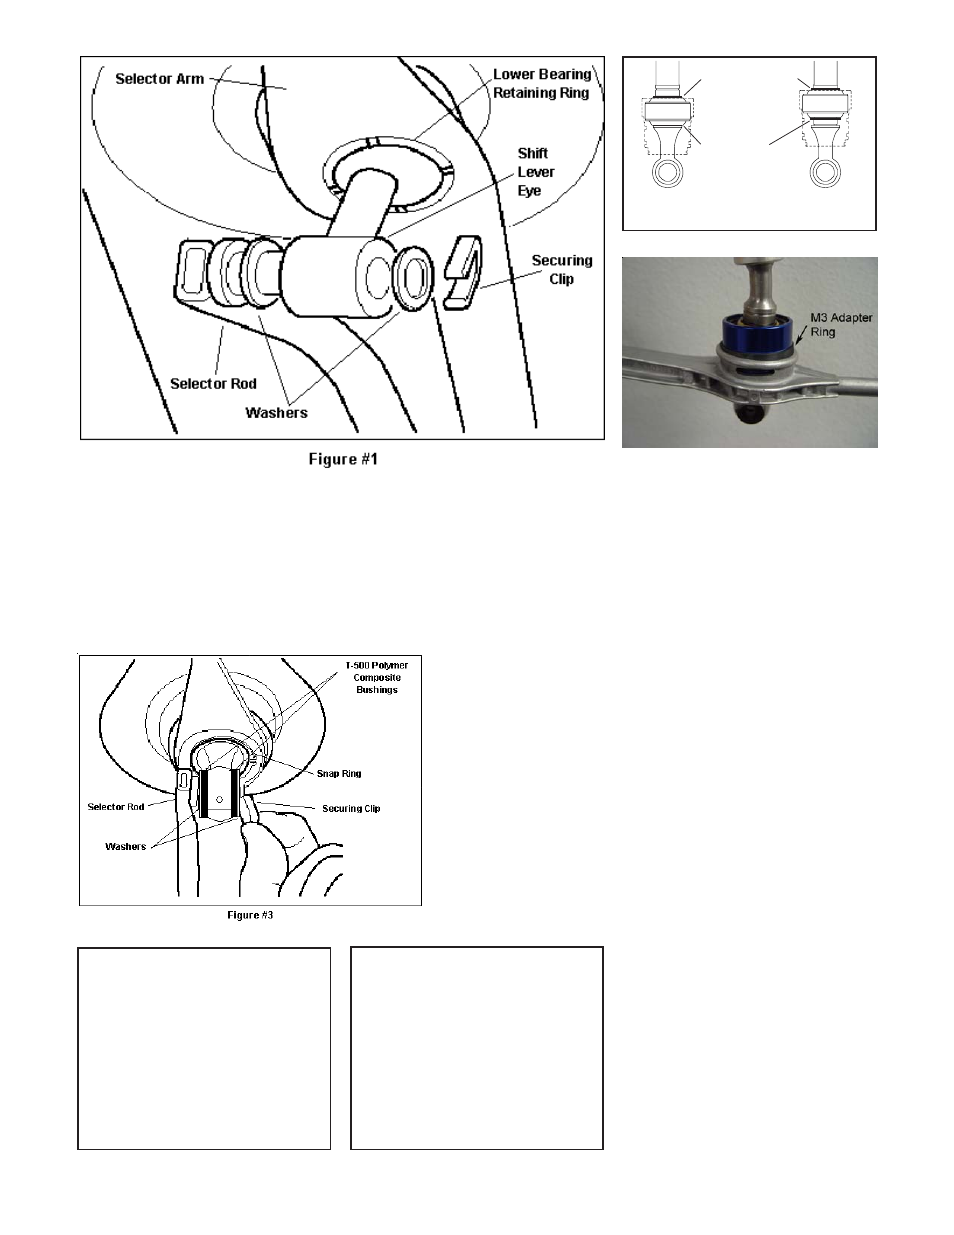
sition (See Figure #2). Note: It will be
necessary to move the top ring above
the top groove to the upper portion
where the stick bends in order to ac-
cess the lower ring. The second ad-
justment is the installation of the M3
Parts List
1 B&M Short Throw Shifter
1 Large Snap Ring
1 Small Spiral Retaining Ring
2 Teflon Bushings
1 Tie Wrap
1 Lithium Grease Packet
2 O-Rings (extra)
1 Instruction Sheet
1 M3 Adapter Ring
Tools List
2 Medium Flat Head Screwdrivers
or BMW tool
External Snap Ring Pliers
2 Small Flat Head Screwdriver
Hydraulic Jack or Hoist
Jackstands or Wheel Ramps
Spiral Retaining
Ring
M3 only:
E30, E36, E46 &
E39 except M3:
Figure #2
Spiral Retaining
Ring
adapter ring. Remove the O-rings on
the bottom of the lower pivot cup noting
which is the upper and lower. From the
bottom, completely slide the included
M3 adapter ring onto the cup. Ensure
the outer wall of the adapter ring is
parallel with the pivot cup.
Replace upper and lower
O-rings. If damaged, use
included replacement
rings. (See Figure #4)
STEP 8. Thoroughly
clean the inner portion of
the gear selector arm
housing. Using the sup-
plied lithium grease, gen-
erously lubricate this
area and the o-rings on
the blue shifter pivot ex-
tension of the B&M Short
Throw Shifter.
STEP 9. Insert the B&M
Short Throw Shifter into
the gear selector arm housing. Make
sure the blue shifter pivot extension
sits flush in the gear selector arm
housing (extra o-rings have been sup-
plied if the installed o-rings should
become damaged). Install the supplied
snap ring into the bottom groove of the
shifter pivot extension using the exter-
nal snap ring pliers. Verify that the
snap ring has fully engaged the groove
of the shifter pivot extension (See Fig-
ure #3).
STEP 10. Using the supplied lithium
grease, lubricate the selector rod pin.
Gently insert the selector rod pin
through the T-500 polymer composite
bushings in the shifter and install the
washers that were set aside earlier.
STEP 12. Reinstall the securing clip
onto the groove of the rod pin (See
Figure #3).
STEP 13. Carefully lower the vehicle
and install the rubber boot (seal the
boot to the stick using the supplied tie
wrap if necessary), the foam insula-
tion, the shifter boot and the shift knob.
Slide the shifter through each gear,
checking for binding or rough move-
ment. If the shifter does not move
smoothly, raise and support the ve-
hicle and check that the washers are
properly seated and that the linkage
does not bind. DO NOT operate vehicle
until each gear can be smoothly and
fully engaged!
Figure #4