Trail Tech FLYWHEEL KIT: HONDA 6142-25 User Manual
Installation instructions, Step 2: install flywheel
010-ELV-65
HONDA CRF150R(B) FLYWHEEL 6142-25
Tech Support: 360-687-4530
LIMITED WARRANTY
TRAILTECH INC. WARRANTS TRAIL TECH FLYWHEEL PRODUCTS TO BE FREE FROM DEFECTS IN MATERIAL AND WORKMANSHIP UNDER NORMAL USE AND IF PROPERLY
INSTALLED FOR A PERIOD OF SIX MONTHS FROM DATE OF PURCHASE. IF FOUND TO BE DEFECTIVE AS MENTIONED ABOVE, IT WILL BE REPLACED OR REPAIRED. THIS SHALL
CONSTITUTE THE SOLE REMEDY OF THE PURCHASER AND THE SOLE LIABILITY OF TRAILTECH INC. TO THE EXTENT PERMITTED BY LAW, THE FOREGOING IS EXCLUSIVE AND
IN LIEU OF ALL OTHER WARRANTIES OR REPRESENTATIONS WHETHER EXPRESSED OR IMPLIED, INCLUDED ANY LIMITED WARRANTY OF MERCHANTABILITY OR FITNESS. IN
NO EVENT SHALL TRAILTECH INC. BE LIABLE FOR SPECIAL OR CONSEQUENTIAL DAMAGES.
INSTALLATION INSTRUCTIONS
HONDA CRF150R(B) FLYWHEELS
STEP 1: BEFORE YOU BEGIN
WARNING:
ALL TRAILTECH FLYWHEELS WILL CHANGE THE PERFORMANCE OF YOUR VEHICLE. It is highly recommended that you spend the time
necessary to familiarize yourself with the performance changes, and become comfortable with the way the bike produces power with the new
part.
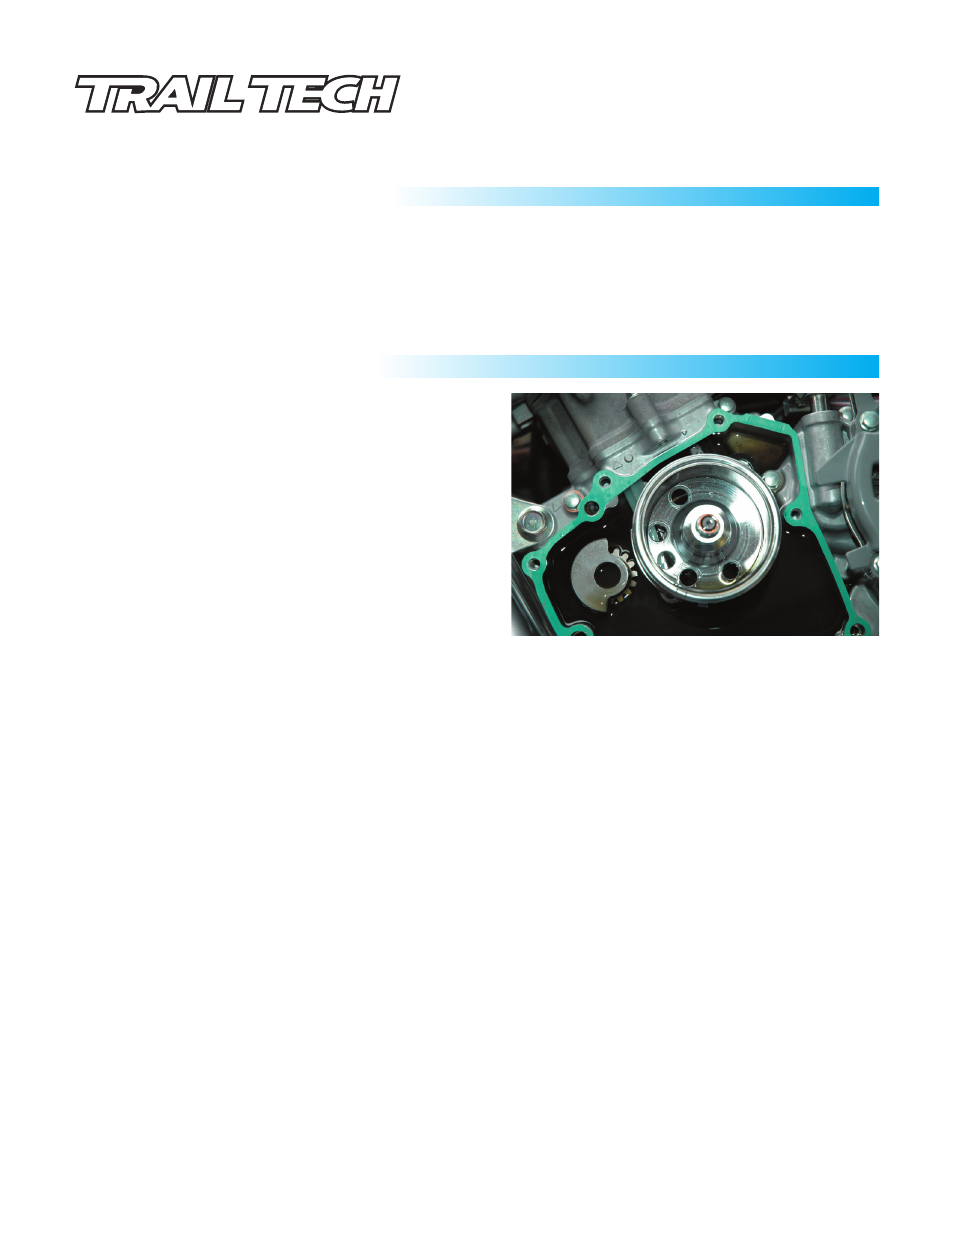
STEP 2: INSTALL FLYWHEEL
1. Drain off the oil from the bike first.
2. Shut the gas supply off on the bike, then lay it over on its side. A
small amount of gas will leak from the overflow tubes when the bike
is first laid down.
3. Remove shifter.
4. Remove oil filler cap
5. Remove the bolts holding the side cover on.
6. Disconnect clutch cable and lay cable out of the way.
7. Remove side case and lay it next to the main case to avoid
removing any wires.
TAKE CARE - do not allow the two alignment
pins to come loose from the side case. They CAN stay in the side
case or in the main case, but you don’t want them to fall out and get
lost; or, even worse, dropped in the oil for later consumption by the
motor!!
8. Use a 17mm deep socket and impact wrench to remove the
flywheel retaining nut. If an air ratchet is not available, hold the rear wheel while removing the 17mm flywheel nut.
Note: If a
Deep socket is not used damage to the crankshaft oiler may occur.
9. Use flywheel puller to remove the flywheel. Remember to install protective nut on to crankshaft to avoid damage to end of
crankshaft.
Note: there is a small hole on the shaft that allows for oil flow to the crankshaft - using the correct flywheel puller will
protect this hole.
10. Install the Trail Tech flywheel and tighten the flywheel retaining nut to manufacturer specification
(do not use an impact
wrench to tighten, damage may occur to flywheel or crankshaft. Trail Tech is not liable for damage due to incorrect installation.)
11. For ease of assembly, connect clutch cable before installing bolts.
12. Replace the side case. Use a new gasket if necessary. Torque side case bolts to 7 foot pounds. Do not over tighten these
bolts! Replace the oil filler cap and shifter. Make sure the bolt threads in smoothly - cross threading is easy.
You will need a Honda CRF flywheel puller (TT part# 6100-P01) for this installation.
An impact wrench is also highly recommended.