Hard drive, Removing the hard drive – Dell Inspiron X200 User Manual
Page 12
Back to Contents Page
Hard Drive
Dell™ X200 Service Manual
Removing the Hard Drive
1.
Remove the
battery
.
2.
Remove the
keyboard
.
3.
Remove the
palm rest
.
4.
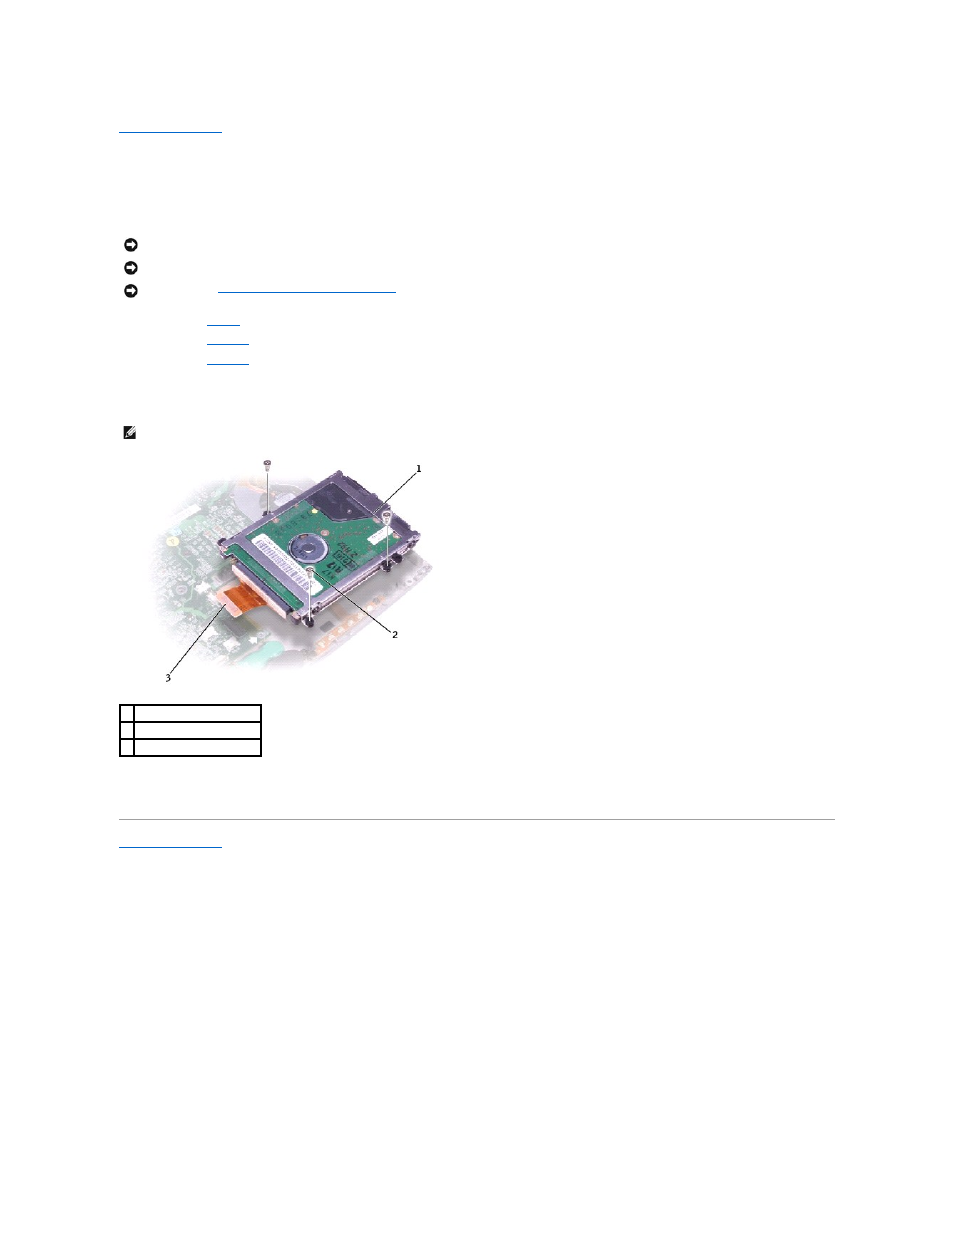
Loosen the three M2 x 5.5-mm screws that secure the hard drive to the bottom case.
Rubber grommets secure each screw to the hard drive so that you do not need to completely remove the screws.
5.
Disconnect the hard drive connector from the system board.
6.
Lift the hard drive up and out of the bottom case.
Back to Contents Page
NOTICE:
Disconnect the computer and any attached devices from electrical outlets.
NOTICE:
To avoid ESD, ground yourself by using a wrist grounding strap or by touching an unpainted metal surface on the computer.
NOTICE:
Read "
Preparing to Work Inside the Computer
" before performing the following procedure.
NOTE:
Each hard drive screw has an arrow beside it.
1 hard drive
2 M2 x 5.5-mm screws (3)
3 hard drive connector
- Latitude E6410 (8 pages)
- Latitude E6410 (52 pages)
- Latitude D630 (218 pages)
- Latitude E6400 (99 pages)
- Latitude E6400 (70 pages)
- Latitude E6400 (2 pages)
- Latitude E6400 (8 pages)
- Latitude E6400 (4 pages)
- Latitude D630 (168 pages)
- Latitude D630 (43 pages)
- Latitude D630 (69 pages)
- Latitude D620 (102 pages)
- Latitude D620 (43 pages)
- Inspiron 1545 (51 pages)
- Inspiron 1545 (72 pages)
- Inspiron 1545 (4 pages)
- LATITUDE C510 (55 pages)
- LATITUDE C510 (170 pages)
- Inspiron 1200 (45 pages)
- Latitude D531 (224 pages)
- Latitude D531 (Mid 2007) (46 pages)
- Inspiron 1300 (142 pages)
- Inspiron 1300 (44 pages)
- INSPIRON 2600 (87 pages)
- INSPIRON 2600 (168 pages)
- INSPIRON 2600 (2 pages)
- INSPIRON 2600 (134 pages)
- Inspiron 1100 (40 pages)
- Inspiron 1100 (164 pages)
- Inspiron 5150 (160 pages)
- Inspiron E1505 (45 pages)
- Inspiron E1505 (186 pages)
- Inspiron 1150 (112 pages)
- Inspiron 1150 (38 pages)
- Inspiron M5040 (2 pages)
- Inspiron 3520 (72 pages)
- A860 (96 pages)
- 1000 (98 pages)
- STREAK 7 (141 pages)
- XPS 14Z (L412z) (2 pages)
- Latitude D520 (124 pages)
- Latitude D520 (96 pages)
- Latitude D520 (168 pages)
- Latitude D520 (99 pages)
- Latitude D520 (42 pages)