Opener down-pressure adjustment, Press wheel adjustment, Setting the seeding rate – Great Plains 2N-3010 Operator Manual User Manual
Page 24
22
Section 3 Adjustments
2N-2410 and 2N-3010 Folding No-Till Drill 196-126M
12/27/05
Great Plains Mfg., Inc.
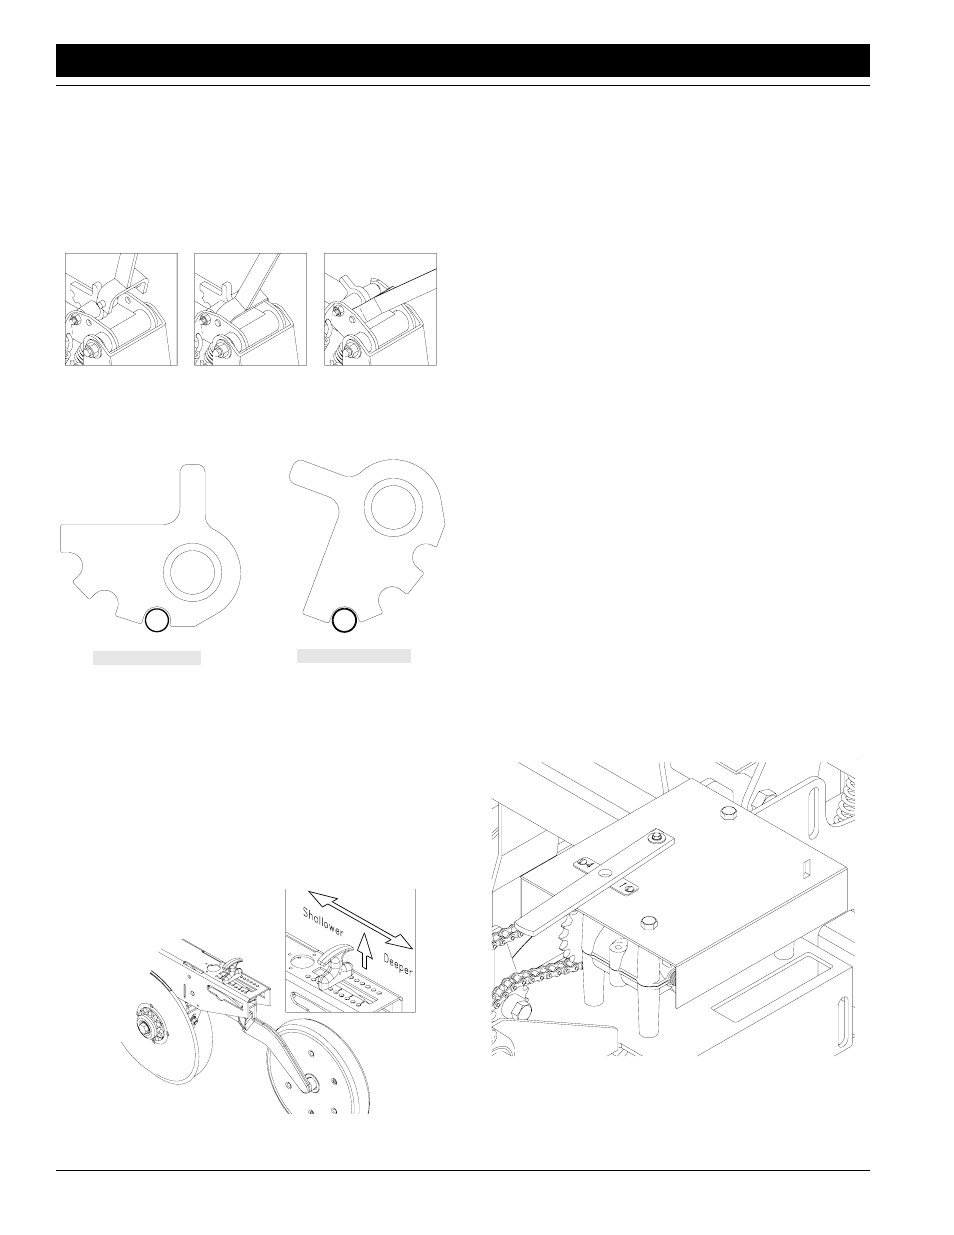
Opener Down-Pressure Adjustment
You can adjust spring down pressure individually for each
opener. This is useful for penetrating hard soil and plant-
ing in tire tracks.
To adjust down pressure, use the adjustment tool stored
under the walkboard. Position the tool in the holes on the
spring mounting plates and pull down on the adjuster as
shown Figure 3-6.
Figure 3-6
Opener-Spring Adjustment
Minimum and maximum settings are indicated by the po-
sition of spring adjuster as shown in Figure 3-7.
Figure 3-7
Spring Settings
Press Wheel Adjustment
Changing the height of the press wheel automatically
changes seeding depth. To adjust, lift up on the T-handle
and slide it forward or back as shown in Figure 3-8.
•
For shallower seeding, slide the handle toward the im-
plement.
•
For deeper seeding, slide the handle away from the im-
plement.
Figure 3-8
Press Wheel Adjustment
12105
Minimum Force
12104
Maximum Force
12100
Setting the Seeding Rate
Calibrating the seeding rate requires four steps: shifting
the speed-change gearbox, adjusting the seed-rate han-
dle, setting the seed-cup doors, and checking the seeding
rate.
Check the seed-rate charts starting on page 24 or in the
drill boxes. These charts list the proper settings for the
speed-change gearbox and seed-rate handle for various
seeds and seeding rates.
The seed-rate charts are based on cleaned, untreated
seed of average size and test weight. The rates are based
on 11L x 15 8-ply rib implement tires and 265/70B16 skid
steer tires. Many factors will affect seeding rates including
foreign material, seed treatment, seed size, field condi-
tions, tire pressure and test weight. Minor adjustments
likely will be needed. Set and check the seeding rate using
the procedures below, then re-adjust the rate as neces-
sary.
Before setting the seeding rate, rotate both gauge wheels
to see that the seed cups and drive are working properly
and free from foreign material.
NOTE: Each drill box has its own metering mechanism.
After adjusting and checking the rate on one box, set the
same rate on the other box.
1.
Shift Speed-Change Gearbox
The speed-change gearbox, Figure 3-9, is designed
to give you a variety of speeds for different seeds and
seeding rates. You can shift between four different
drive types.
Refer to the seed-rate charts for the correct drive
type–1, 2, 3 or 4. Move the selector handle on the
gearbox until the correct number appears in the han-
dle window as shown in Figure 3-9. Rotate the tires a
few turns to confirm the gearbox has engaged.
Figure 3-9
Speed-Change Gearbox
12916