OSRAM SYLVANIA LED 2x2 Retrofit Kit User Manual
Page 3
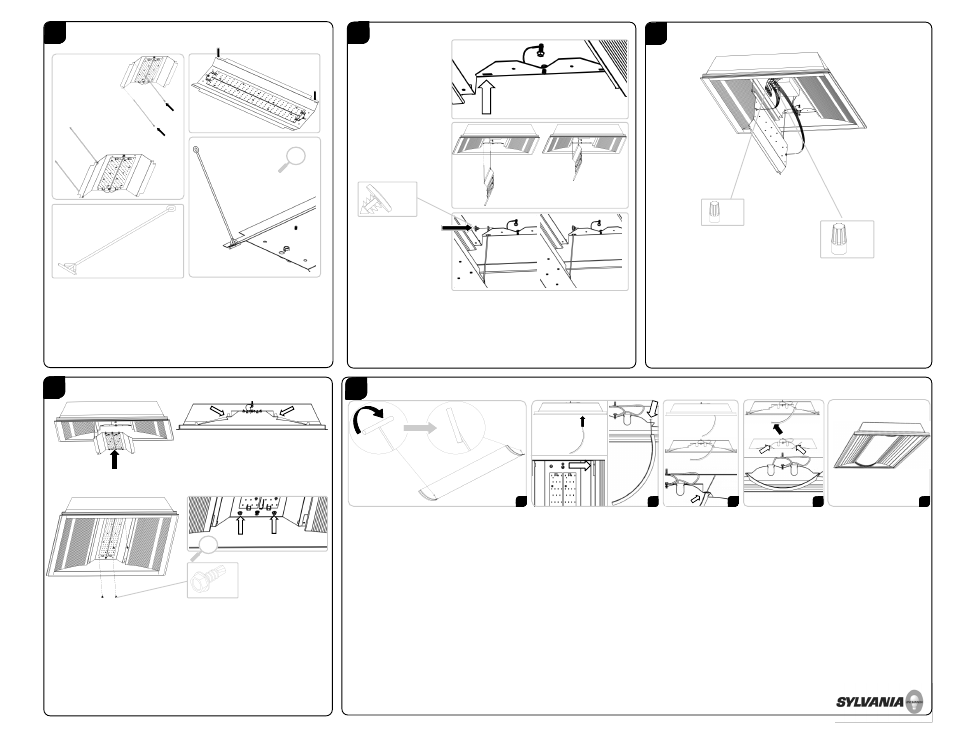
7
ASSEMBLE SAFETY TETHERS TO LIGHT ENGINE PANEL
8
9
10
ASSEMBLE LIGHT ENGINE PANEL TO FIXUTRE
To assemble the Light Engine Panel to the fixture, locate
the rectangular slots on the End Brackets. Insert the
circular end of the Light Engine Panel Safety Tether into the
rectangular slots. Using the black plastic Push Fastener,
lock the circular end of the Light Engine Panel Safety
Tether into the End Bracket. Repeat the steps for the
second Light Engine Panel Safety Tether.
WIRE LIGHT ENGINE PANEL TO LED DRIVER
Install the Light Engine Panel to the fixture buy setting the end
flanges into the ‘Z’ shaped recesses in the Reflector Brackets.
The Light Engine Panel should positively snap into place.
Secure the Light Engine Panel to the fixture by using the
provided self drilling screws.
INSTALL DIFFUSER LENS ASSEMBLY
11
Locate the rectangular slots on the edge of the Light Engine
Panel. Insert the circular end of the Light Engine Panel Safety
Tethers into the slots and pull until the barbs fasten. Verify
that the tethers are locked into place.
A
B
D
E
A Prior to installing the Diffuser Lens Assembly, pinch the ends
of the nylon tethers so that the fastening ends form a barb.
Refer to corresponding image A.
C With the nylon tethers secure into the Reflector Bracket,
insert one edge of the lens assembly into the lens groove in
the Reflector Bracket. Refer to image C for lens groove
location.
D When the first edge of the lens assembly is properly seated
into the lens groove, place the second edge of the lens
assembly into the other Reflector Bracket’s lens groove. The
lens groove locations are visible in image D. The gasket will
expand to fit the lens groove. Outward pressure from the
lens and friction from the gasket expanding will serve to
secure the lens assembly into the retrofit kit.
E Image E shows the finished assembly of the retrofit kit.
B With the nylon tethers ready to install, locate the two slots on
the Reflector Brackets where the nylon tethers will insert. Push
the end of the nylon tether into the slot and check that the
tethers secure into the Reflector Brackets. This is shown in B.
C
Using the provided Wire nuts, correctly wire the driver leads
to the LED input connector harnesses.
INSTALL LIGHT ENGINE PANEL TO FIXTURE
2X
2X
5X
4X
+
NOTE: Above image and all images with wires are for
illustration purposes only. Please follow driver wiring
instructions.
2X
+