Winchester Repeating Arms 94 (Includes Take Down) User Manual
Page 13
i
nitial
c
leaning
anD
o
iling
wear eye Protection when asseMbling and
disasseMbling your riFle to Prevent sPrings,
sPring-loaded Parts, solvents or other agents
FroM contacting your eyes, resulting in injury.
Various exposed metal parts of your new firearm have
been coated at the factory with a rust preventative
compound. Before firing your rifle, clean the anti-rust
compound from the inside of the barrel, receiver and the
action-chamber areas. A fine, light gun oil is ideal for
removing this compound and for giving your new firearm
its first lubrication. Clean the barrel using a cleaning rod
and patch as explained under “Cleaning and Maintenance
Suggestions” on pages 29-31. If your rifle is to be stored, it
is acceptable to leave the rust preventative compound on
the rifle and keep it in its original packaging.
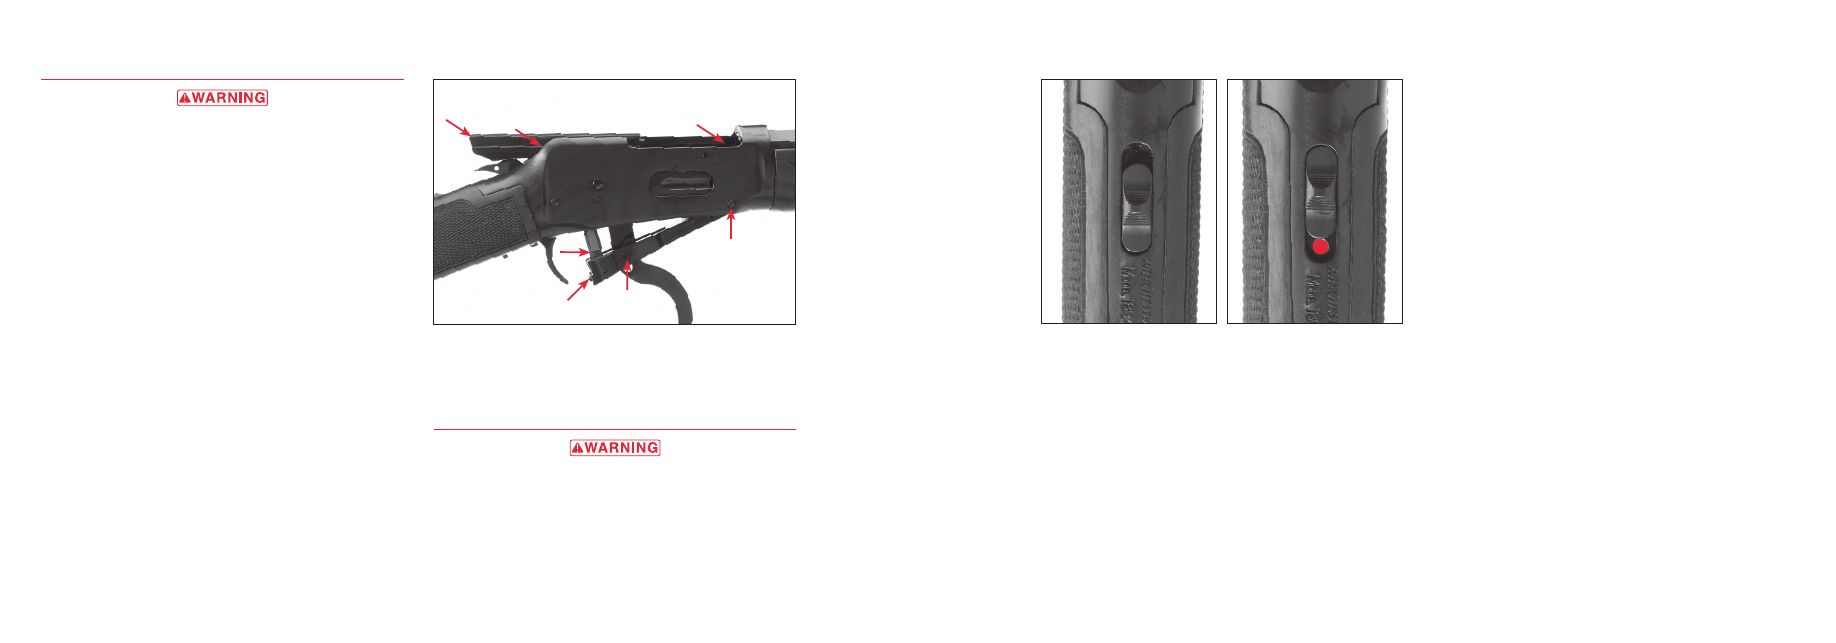
Before beginning the first firing of your Model 1894 you
should first wipe the mechanism completely clean. Clean
the bore and apply a few drops of quality oil on the
following surfaces (Figure 5):
• Along the breech bolt surface.
• Along the breech bolt rail surfaces.
• On all pivot points and bearing surfaces on the finger
lever mechanism.
Avoid applying too much oil. Only a light film is
necessary. Cleaning and Maintenance Suggestions should
be followed before each oiling.
o
peration
of
the
“S
afetY
”
always KeeP the “saFety” in the on saFe Position
and the haMMer in the rebound Position unless
shooting is iMMinent. always KeeP the MuZZle
Pointed in a saFe direction. Failure to Follow
these warnings could result in serious injury
or death.
10
Model 1894s produced in 2003 to present feature a
top-tang hammer block “safety.” Models produced
between 1992 and 2002 feature a cross-bolt style “safety.”
When the “safety” has been placed in the on safe position
it blocks the hammer from striking the firing pin.
However, the “safety” does not prevent the hammer from
falling when the trigger is pulled, even if the “safety” is in
the on safe position. When the trigger is pulled, with the
“safety” in the on safe position, the hammer drops to the
rebound position without striking the firing pin.
t
op
-t
ang
“S
afetY
” o
peration
• On Safe — This is the recommended position of the
“safety” for all times except when firing is imminent.
To place the “safety” in the on safe position, point
your rifle in a safe direction, then slide the “safety”
fully to the rear with your thumb until the red
warning dot is covered by the “safety” and the “S” is
visible (Figure 6). Moving the “safety” fully rearward
and exposing the “S” blocks the hammer from
striking the firing pin.
• Off Safe — When the “safety” is pushed all the way
forward it is in the off safe position (Figure 7). In this
position, and with the finger lever fully depressed,
when the trigger is pulled, the cocked hammer will
fall and strike the firing pin.
If a cartridge is in the chamber the firing pin will
strike the primer and fire the cartridge.
To place the “safety” in the off safe position, point
your rifle in a safe direction, then slide the “safety”
fully forward, covering the “S” inscribed on the rifle,
and exposing the red warning dot. When the red
warning dot is visible the “safety” is in the off safe
position. The “safety” can be actuated with the
hammer in the rebound or cocked position.
c
roSSbolt
“S
afetY
” o
peration
• On Safe — This is the recommended position of the
“safety” for all times except when firing is imminent.
To place the “safety” in the on safe position, point
your rifle in a safe direction, then push the “safety”
fully to the right until the red warning band is not
visible (Figure 8, page 12).
11
FIGURE 6
The top-tang “safety”
in the on safe position.
FIGURE 7
The top-tang “safety” in
the off safe position.
FIGURE 5
Lightly oil the rifle
at these points.