Winchester Repeating Arms X3 Shotgun User Manual
Page 36
34
35
KeeP all aMMunition away FroM the cleaning
area. never test the Mechanical Function oF
your shotgun with live aMMunition. Failure to
Follow these warnings could result in serious
injury or death.
The trigger group and bolt can be removed if the action
becomes excessively dirty or wet. If this occurs,
disassemble the action for a complete cleaning as
explained in the following sections. The trigger group and
bolt assembly of your Super X3 shotgun are designed to be
removed in the field, without special tools.
Disassembly of the action involves the removal of the bolt
assembly and the trigger group. Disassembly beyond this
point should only be performed by a qualified gunsmith.
r
emoving
the
t
rigger
g
roup
1. Place the bolt in the forward position by holding
the operating handle and depressing the carrier
release button.
NOTICE! never allow the action to slaM closed
by Pressing the carrier release button without
the barrel installed. iF the bolt is released
Forward with the barrel reMoved, the
oPerating handle will hit the receiver and
cause daMage.
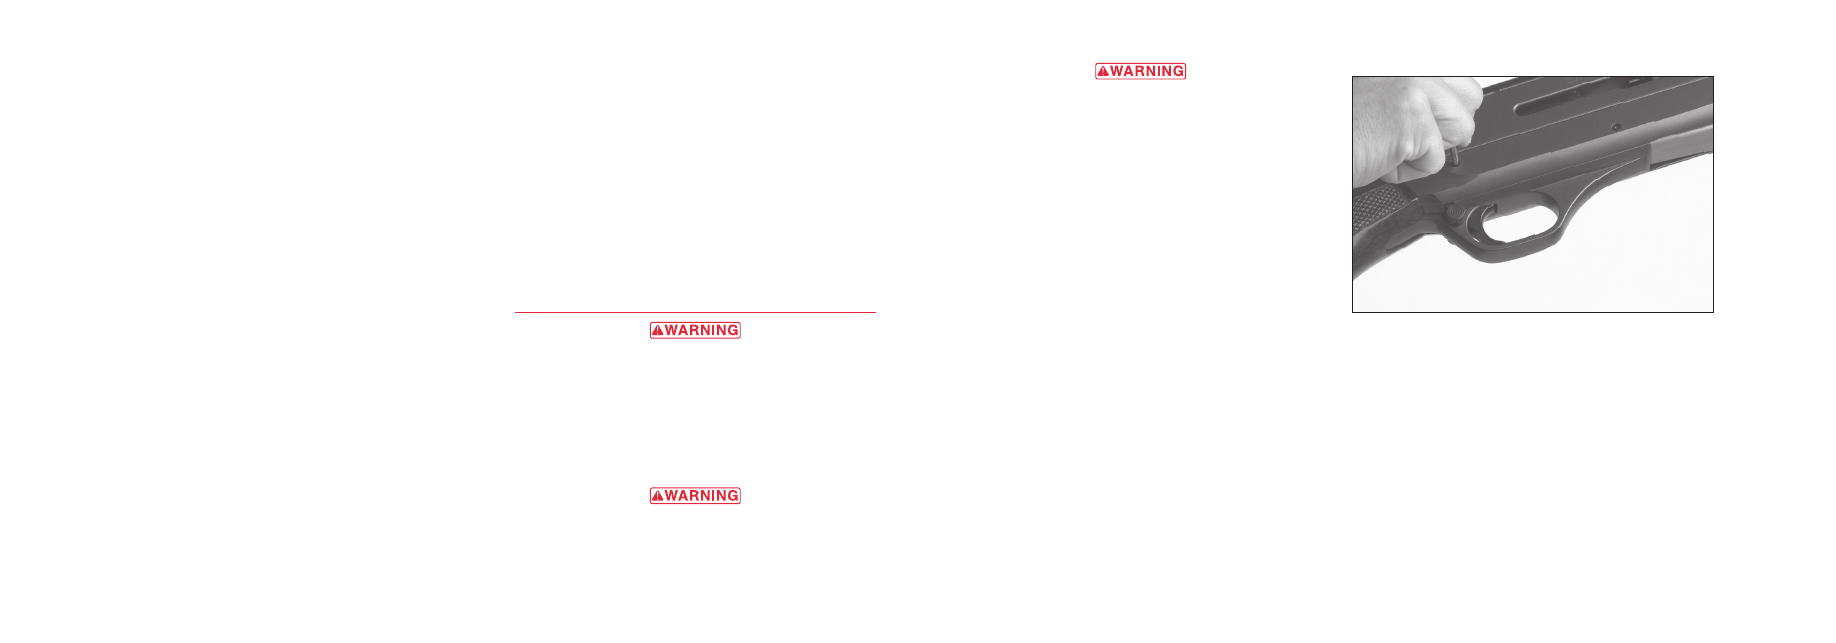
2. Use a punch or similar object to push inward on the
trigger group pins, taking care not to scratch the
receiver (Figure 24). Trigger group pins may be
removed from either side of the receiver. Push the
trigger group pins through the receiver. Pull on them
from the opposite side to remove them (Figure 25,
page 36).
3. Grasp the trigger guard and pull it up and out of the
receiver (Figure 26, page 36).
4. Perform any cleaning of the parts and receiver cavity
as necessary. We suggest cleaning the trigger group
with a quality aerosol gun solvent. Allow it to dry and
then very lightly oil the moving parts.
10. The wood surfaces can also be wiped with a quality,
lightweight gun oil or they can be polished with any
quality furniture wax (but not both).
c
leaning
the
g
aS
S
YStem
1. Remove the gas piston, piston sleeve spring and piston
sleeve from the magazine tube as explained in
“Disassembly” on page 14.
2. Spray the magazine tube, gas piston and piston sleeve
with gun solvent and brush them thoroughly with a
nylon brush to remove any deposits. It will be easier to
remove the piston sleeve spring to clean the interior
of the piston sleeve. Spray the inside of the gas piston
with solvent. A green Scotch-Brite
®
kitchen scrub pad
works best for removal of heavy carbon fouling on the
tube and inside the gas piston. Do not remove the
spring inside of the piston. Never use a steel brush on
any of the gas system components.
3. Complete the cleaning of the gas system by applying
a very light film of oil to all parts for protection
and lubrication.
p
erioDic
o
iling
The metal parts of a firearm should receive a light film
of oil after the firearm has been exposed to weather
or handling.
Occasionally, a drop of lightweight gun oil may be placed
inside the receiver on the rails on which the bolt slides,
and on the surface of the magazine tube, where the gas
piston slides. This will help relieve friction and ensure
smooth operation.
If the firearm has been exposed to excessive dust, dirt,
mud or water, the principal working parts (including the
gas system) should be wiped clean and lubricated with a
light film of quality, lightweight gun oil.
NOTICE! do not Place large quantities oF oil into
the action. excess oil will run bacK into the
wood oF the stocK soFtening the wood, with
consequential loosening oF the stocK.
r
emoval
oF
the
t
rigger
g
roup
anD
b
olt
a
SSemblieS
beFore PerForMing cleaning Procedures, Place
the “saFety” in the on saFe Position. oPen the
action and MaKe certain your shotgun is
coMPletely unloaded. KeeP the MuZZle Pointed
in a saFe direction. Failure to Follow these
warnings could result in serious injury
or death.
wear eye Protection when disasseMbling and
cleaning your shotgun to Prevent sPrings,
sPring-loaded Parts, solvents or other agents
FroM contacting your eyes, resulting in injury.
FIGURE 24
Remove the trigger group pins.
Be careful not to mar or scratch
the receiver.