Service, Torch maintenance, Service -1 – Tweco PWH-M 2A User Manual
Page 23: Torch maintenance -1
Service
4-1
Manual 0-2005
SERVICE
The Service Section is divided into two parts:
4.1. Torch Maintenance
4.2. Torch Leads
4.1. TORCH MAINTENANCE
WARNING
Check to be sure the main disconnect to the weld-
ing system is open before disassembling the torch.
Torch Disassembly and Inspection
CAUTION
The electrode cap has an O-ring seal to prevent
gas leakage. It is important to observe the fol-
lowing precautions for the 0-ring:
A) Make sure that the groove and the surface that
the O-ring will seal against are clean and free
of nicks and scratches.
B) Check to see that the O-ring is not cut or cracked.
C) Lubricate O-ring with a light coating of Cat. No.
8-4025 O-ring lubricant. This should be used
sparingly, just enough to make the O-ring slip-
pery, but not enough to accumulate in the torch.
Disassemble the torch as follows:
1) Unscrew the ceramic shield cup (1).
CAUTION
Hold the torch with the tip end up to prevent the
gas distributor from falling out and breaking.
2) Using the wrench (10), unscrew the tip (2).
3) Unscrew the electrode cap (9) while still hold-
ing torch tip end up. Slowly lower the cap until
the collet (7), and the electrode (8) can be
grasped with fingers. The gas distributor (3) will
come out with the electrode and collet.
Torch Assembly
WARNING
Primary power to the welding system must be
disconnected before assembling the torch.
1) Insert the electrode (8) in the collet (7) and then
this assembly into the rear of the torch head (5).
Hold in place with finger.
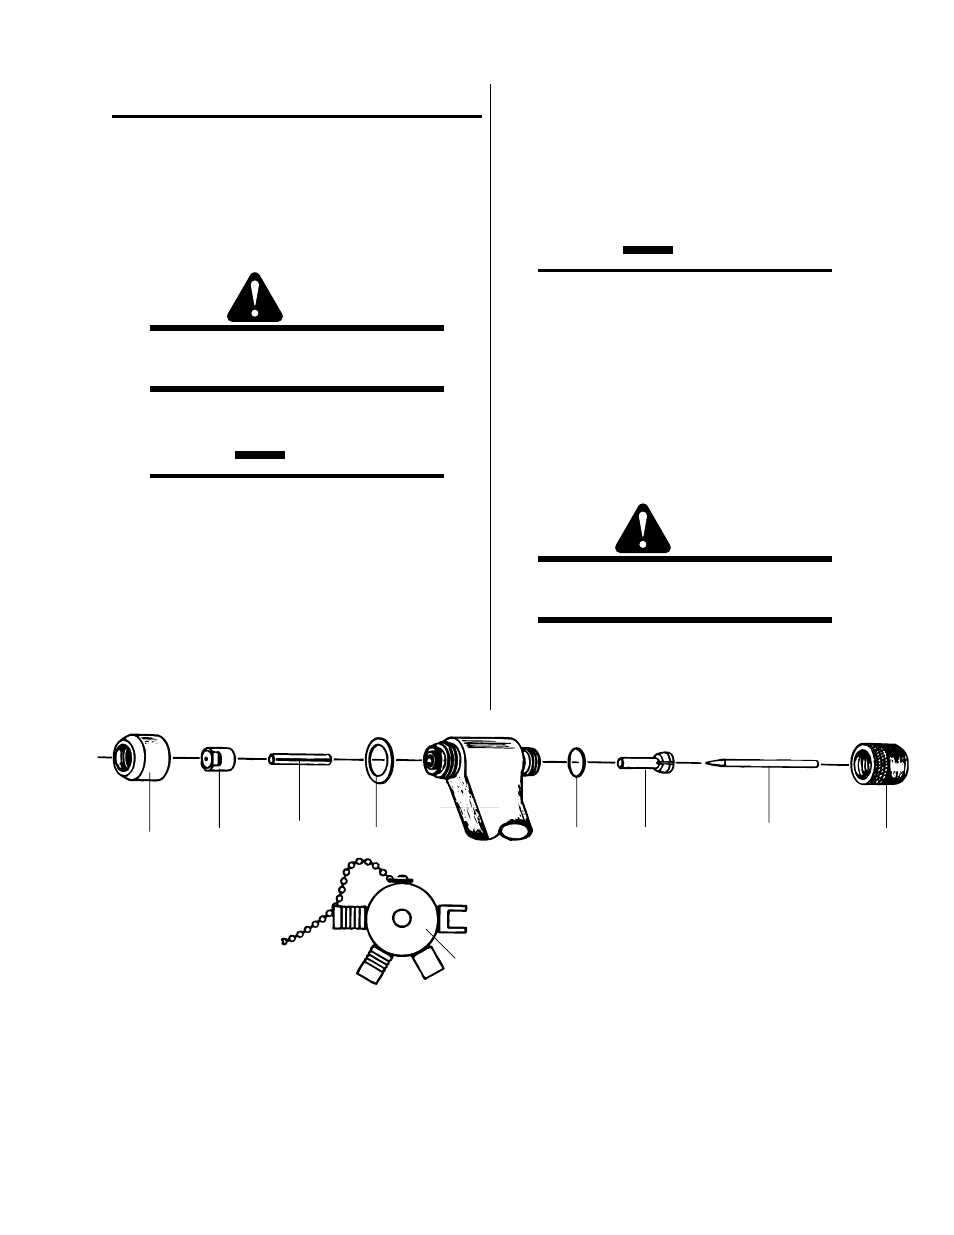
3
9
5
4
1
2
6
7
8
10
1.
Shield Cup
2.
Tip
3.
Gas Distributor
4.
Gasket
5.
Basic Head Assembly
6.
O-ring
7.
Collet
8.
Electrode
9.
Electrode Cap
10.
Wrench & Gage Assembly
Figure 4-A Torch Parts Explosion