Hinkley Lighting VIRGINIAN 5128PB User Manual
Hinkley, Start here, Commencez ici
start here
commencez ici
empezar aquí
Assembly Instructions
Item No.
Les Instructions D’assemblage
Numéro d’article:
Instrucciones De Montaje
Número del artículo:
L I G H T I N G
HINKLEY
english
spanish
french
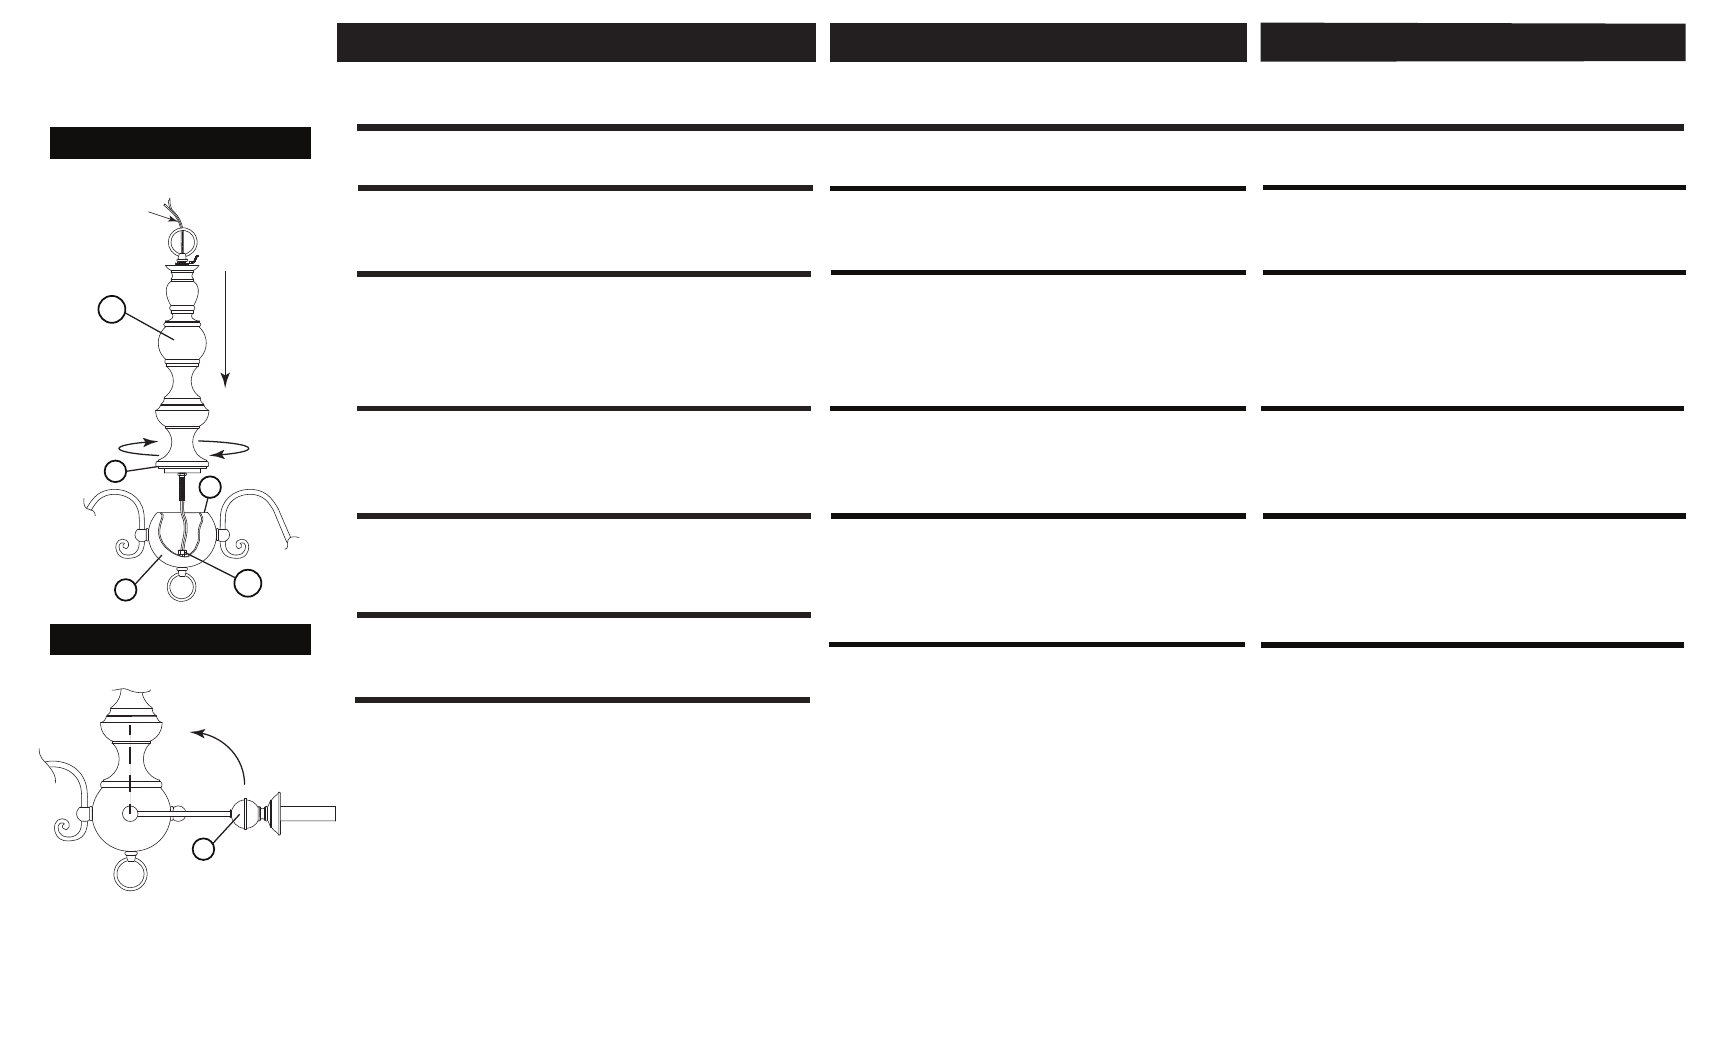
Drawing 1 - Fixture Assembly
Drawing 2 - Fixture Assembly
FIXTURE
SUPPLY WIRE
B
L
R
CC
HC
A
.
.
*** The construction of this fixture will be accomplished by first
assembling the fixture, attaching the mounting strap to the junction
box, making all necessary eletrical connections, and then mounting
the fixture to the ceiling.
1. To assemble the fixture first slide the center column (CC) along the
fixture supply wire and thread the threaded tube at the bottom of the
column into the hex shaped coupler
(HC) located inside the body (B)
- see
Drawing 1.
2. Tighten center column, until lip (L) is snug against the rim (R) of the
body
(B).
1. After center column is attached. The arms (A) can be rotated into an
upright position - see
Drawing 2.
2. Fixture is ready for installation. Read through and follow instruction
sheet
(IS-19) provided.
SAFETY WARNING: READ WIRING AND GROUNDING INSTRUCTIONS
(IS-18) AND ANY ADDITIONAL DIRECTIONS. TURN POWER SUPPLY
OFF DURING INSTALLATION. IF NEW WIRING IS REQUIRED, CONSULT
A QUALIFIED ELECTRICIAN OR LOCAL AUTRHORITIES FOR CODE
REQUIREMENTS.
Make electrical connections from supply wire to fixture lead
wires. Refer to instruction sheet
(I.S. 18) and follow all
instructions to make all necessary wiring connections. Then refer
back to this sheet to continue installation of this fixture.
*** La construcción de este dispositivo se llevará a cabo por
primera de montar el dispositivo, colocar la correa de montaje
para la unión caja, por lo que todas las conexiones eléctricas
necesarias, y luego el montaje la luminaria en el techo.
1. Después se une la columna central. Las brazos (A) se pueden
girar en un posición vertical - ver dibujo 2.
2. Fixture está listo para la instalación. Lea y siga las instrucciones
hoja (IS-19), siempre.
ADVERTENCIA DE SEGURIDAD: INSTRUCCIONES DE
CABLEADO Y CONEXIÓN A TIERRA LEA (IS-18), E
INSTRUCCIONES ADICIONALES. CORTAR EL SUMINISTRO
ELÉCTRICO DURANTE LA INSTALACIÓN. SI NUEVO
CABLEADO SE REQUIERE, CONSULTAR UN ELECTRICISTA
CALIFICADO O AUTRHORITIES LOCALES PARA EL CÓDIGO
REQUISITOS.
Haga las conexiones eléctricas del cable de alimentación al
accesorio los hilos conductores. Consulte la hoja de instrucciones
(IS-18) y siga todas las instrucciones para hacer todas las
conexiones necesarias. Luego vuelva a esta hoja para continuar
la instalación de este accesorio.
Une. trouver un espace libre dans lequel vous pouvez travailler.
2. Déballez appareil et toutes les pièces nécessaires à partir de carton.
3. Examiner et lire bien attentivement toutes les instructions
1. encontrar un área clara en la que se puede trabajar.
2. Desembale aparato y todas las piezas necesarias de cartón.
3. Revise cuidadosamente y leer aunque todas las instrucciones
1. Find a clear area in which you can work.
2. Unpack fixture and all necessary parts from carton.
3. Carefully review and read though all instructions
*** La construcción de este dispositivo soi llevará un cabo por
primera de montar el dispositivo, colocar la correa de montaje
par La Unión caja, por lo que todas las Conexiones eléctricas
necesarias, y luego el montaje la luminaria en el techo.
1. Recoja la primera diapositiva del aparato columna central (CC)
para cable de alimentación de largo y un tubo de hilo de accesorio
la parte inferior de la columna en la forma de acoplamiento
hexagonal (HC) en el cuerpo (B) - Ver dibujo 1.
2. Apriete la columna central para que sea ajustado el labio (L)
contra el borde (R) del cuerpo (B).
Une. Après la colonne centrale est attaché. Les bras (A) peuvent être
tournés dans une position verticale - voir schéma 2.
2. Luminaire est prêt pour l'installation. Lisez et suivez les instructions
feuille (IS-19) fourni.
Une. Pour assembler l'appareil abord glisser la colonne centrale (CC)
le long de la luminaire fil d'alimentation et du fil le tube fileté en bas
de la dans la colonne de forme hexagonale coupleur (SC) située à
l'intérieur du corps (B) - Voir schéma 1.
2. Serrer la colonne centrale, jusqu'à ce que la lèvre (L) est serré
contre la jante (R) de la corps (B).
AVERTISSEMENT DE SÉCURITÉ: LIRE RACCORDEMENT ET
MISE À LA TERRE (IS-18) ET TOUTE AUTRE INSTRUCTION.
COUPER L'ALIMENTATION ÉLECTRIQUE EN COURS
D'INSTALLATION. SI DE NOUVELLES CÂBLAGE N'EST
NÉCESSAIRE, CONSULTER UN ÉLECTRICIEN QUALIFIÉ OU
LES AUTORITÉS LOCALES POUR CODE EXIGENCES.
Effectuer les connexions électriques à le cordon d'alimentation
mise en place des fils. Reportez-vous à la feuille d'instructions
(IS-18) et suivez les instructions pour tous
connexions nécessaires. Revenez ensuite à cette page pour continuer
installation de cet accessoire.
H I N K L E Y L I G H T I N G 33000 Pin Oak Parkway, Avon Lake, OH 44012 800.446.5539 / 440.653.5500 hinkleylighting.com
R021014