Hinkley Lighting WALDEN 3292VZ User Manual
Hinkley, Start here, Commencez ici
start here
commencez ici
empezar aquí
Assembly Instructions
Item No. 3292
Les Instructions D’assemblage
Numéro d’article: 3292
Instrucciones De Montaje
Número del artículo: 3292
L I G H T I N G
HINKLEY
English
Spanish
French
H I N K L E Y L I G H T I N G 33000 Pin Oak Parkway, Avon Lake, OH 44012 800.446.5539 / 440.653.5500 hinkleylighting.com
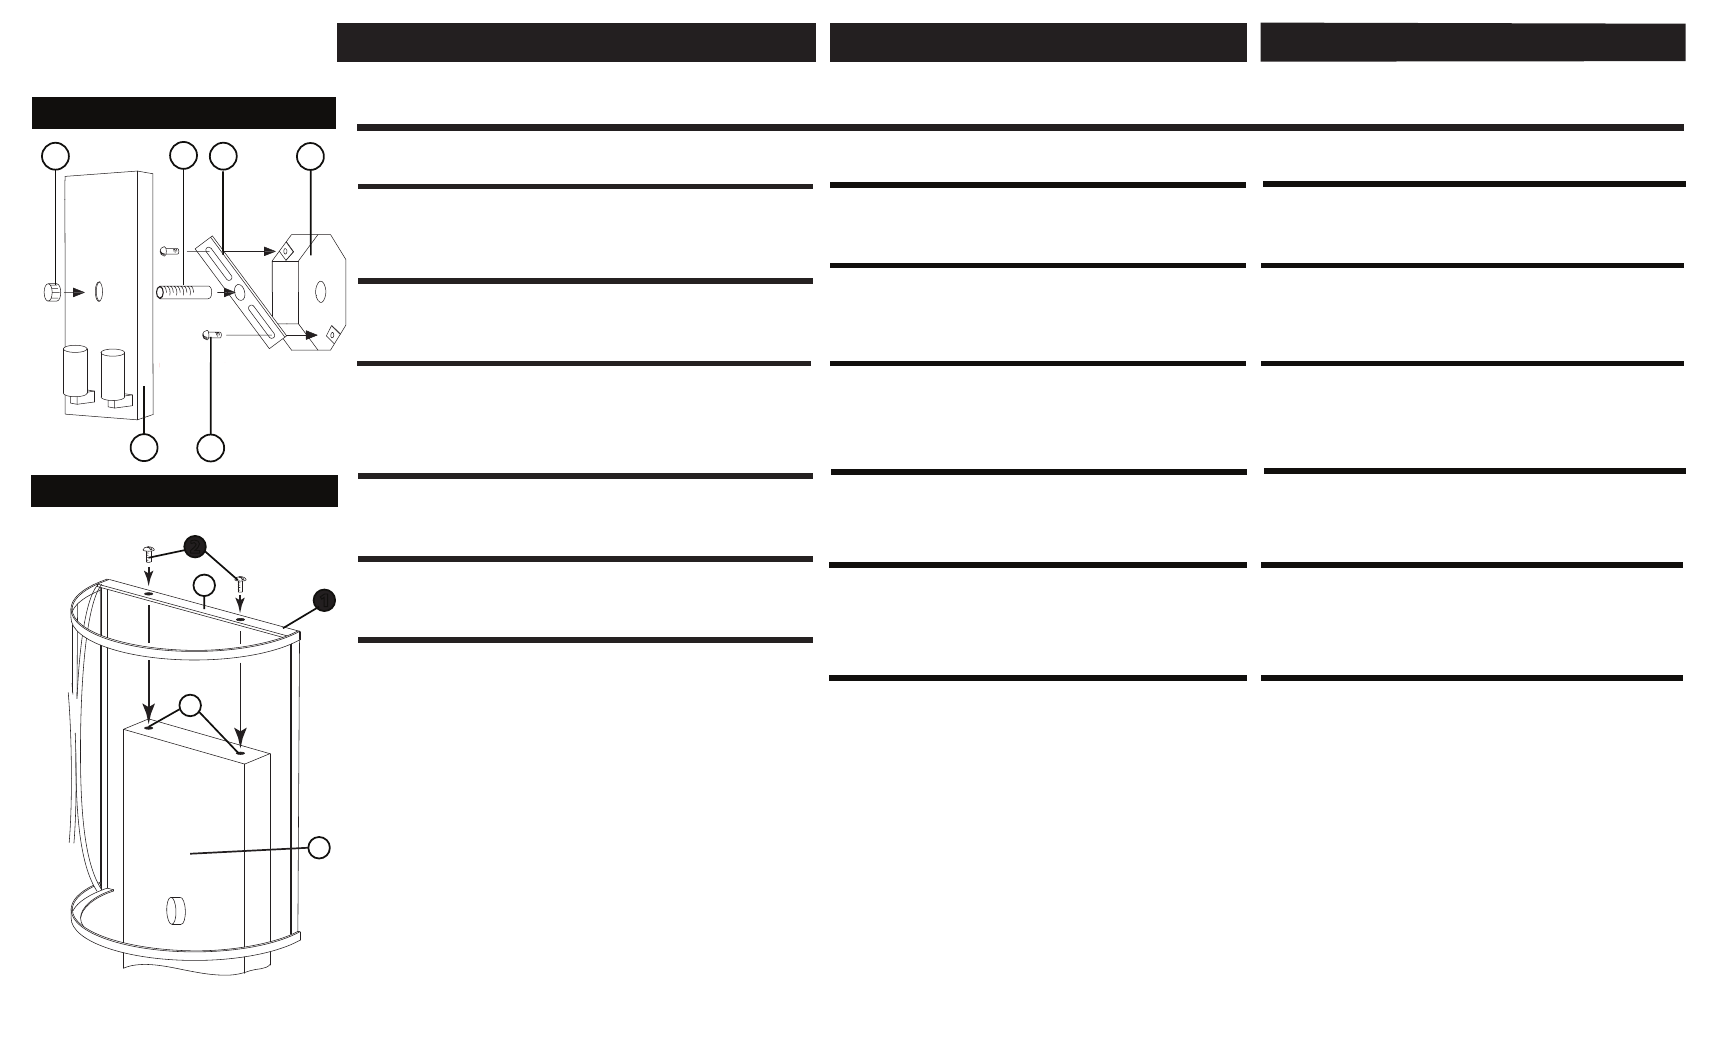
A
J
B
C
D
E
Drawing 1 - Fixture Mounting
1. Find a clear area in which you can work.
2. Unpack fixture and glass from carton.
3. Carefully review instructions prior to assembly.
*** The construction of this fixture will be accomplished by first
attaching the mounting strap to the junction box, making all
necessary electrical connections, and then completing assembly
1. Prepare mounting strap (A) by threading all thread tube (C) into the
center hole of the mounting strap (A), approximately 1/4“.- see Drawing 1.
2. Attach mounting strap (A) to junction box (J) using two 8-32 screws (B)
(not provided).
SAFETY WARNING: READ WIRING AND GROUNDING INSTRUCTIONS
(I.S. 18) AND ANY ADDITIONAL DIRECTIONS. TURN POWER SUPPLY
OFF DURING INSTALLATION. IF NEW WIRING IS REQUIRED,
CONSULT A QUALIFIED ELECTRICIAN OR LOCAL AUTHORITIES
FOR CODE REQUIREMENTS.
Make electrical connections from supply wire to fixture lead wires. Refer
to instruction sheet (I.S. 18) and follow all instructions to make all necessary
wiring connections. Then refer back to this sheet to continue installation
of this fixture.
1. To mount fixture, slip center hole of backplate (E) over all thread tube
(C) and hold fixture in position - see Drawing 1.
2. Thread decorative knob (D) onto end of all thread tube (C) and tighten
to secure fixture to wall.
Drawing 2 - Shade / Cage Installation
NOTE: Prior to installing the cage / shade, the fixture can be lamped
accordingly.
1. To attach cage / shade (1) to mounted backplate, first unthread the
two screws (2) on the top of the backplate (E) and remove - see Drawing 2.
2. Next align holes in cage / shade (1) crossbar (X) with threaded holes (T)
in top of backplate (E).
3. Now slip screws (2) through holes in crossbar (X) and thread
into holes (T) in top of backplate and tighten.
1. Busque un lugar claro en el que se puede trabajar.
2. Desempaque la luminaria y el vidrio de la caja.
3. Revise cuidadosamente las instrucciones antes de asamblea.
Une. Allez dans un endroit dans lequel vous pouvez travailler.
2. Déballez luminaire et le verre de boîte.
3. Examinez attentivement les instructions avant le montage.
of the fixture
*** La construcción de este accesorio se logrará primero que
una la correa de montaje a la caja de conexiones, hacer todas
las conexiones eléctricas necesarias, y luego completar el
montaje de la luminaria
*** La construction de cet accessoire sera accomplie par la
première fixation de l'étrier de montage de la boîte de jonction,
toutes les connexions électriques nécessaires, puis
le montage de l'appareil
1. Preparar la correa de montaje (A), enroscando todo tubo de hilo
(C) en el orificio central de la banda de montaje (A),
aproximadamente 1/4 "-. ver Dibujo 1.
2. Coloque la correa de montaje (A) a la caja de conexiones (J)
utilizando dos tornillos 8-32 (B) (no incluido).
Une. Préparer une languette de fixation (A) tout en enfilant le tube
de fil (C) dans la trou central de la sangle de fixation (A), environ
1/4 "-. voir Dessin 1.
2. Fixez la lanière de fixation (A) à la boîte de jonction (J) à l'aide
de deux vis 8-32 (B) (non fourni).
ADVERTENCIA DE SEGURIDAD: INSTRUCCIONES DE CABLEADO
Y CONEXIÓN A TIERRA LEA (I.S. 18) , E INSTRUCCIONES
ADICIONALES. CORTAR EL SUMINISTRO ELÉCTRICO
DURANTE LA INSTALACIÓN. SI NUEVO CABLEADO SE
REQUIERE, CONSULTE CON UN ELECTRICISTA O
AUTORIDADES LOCALES PARA REQUISITOS DEL CÓDIGO.
AVERTISSEMENT DE SÉCURITÉ: LIRE RACCORDEMENT ET MISE
À LA TERRE (I.S. 18) ET TOUTE AUTRE INSTRUCTION. COUPER
L'ALIMENTATION ÉLECTRIQUE EN COURS D'INSTALLATION. SI
DE NOUVELLES CÂBLAGE N'EST NÉCESSAIRE, CONSULTEZ
UN ÉLECTRICIEN QUALIFIÉ OU LES AUTORITÉS LOCALES
POUR LES EXIGENCES DE CODE.
Haga las conexiones eléctricas del cable de alimentación los
cables conductores del luminario. Consulte la hoja de instrucciones
(IS 18) y siga todas las instrucciones para hacer todas las
conexiones necesarias. Entonces referirse a esta hoja para
continuar instalacion de este luminario.
Effectuer les connexions électriques du câble d'alimentation au
montage des fils conducteurs. Reportez-vous à la feuille d'instruction
(IS 18) et suivez les instructions pour faire toutes les connexions
nécessaires. Ensuite, se reporter à la fiche de continuer installatio
de ce luminaire.
1. Para montar aparato, deslice el agujero central de la placa
trasera (E) en todos los tubos de rosca (C) y mantenerlo fijo en la
posición - ver dibujo 1.
2. Enrosque la perilla decorativo (D) en el final de todo el tubo de
rosca (C) y apriete para asegurar accesorio a pared.
Une. Pour fixation de montage, glisser le trou central de la plaque
arrière (E) sur l'ensemble tube de fil (C) et maintenez appareil en
position - voir schéma 1.
2. Enfilez bouton décoratif (D) sur l'extrémité de tous les tubes de fil
(C) et serrez pour garantir fixation au mur.
T
E
X
1
2
NOTA: Antes de instalar la jaula / sombra, el aparato se puede
lamped en consecuencia.
1. Para adjuntar jaula / sombra (1) para la placa trasera montada,
primero desenroscar el dos tornillos (2) en la parte superior de la
placa posterior (E) y eliminar - vea el dibujo 2.
2. A continuación alinear los agujeros en la jaula / sombra (1)
travesaño (X) con orificios roscados (T) en la parte superior de la
placa posterior (E).
3. Ahora deslizarse tornillos (2) a través de agujeros en la barra
transversal (X) y el hilo en los agujeros (T) en la parte superior de
la placa trasera y apriete.
REMARQUE: Avant d'installer la cage / ombre, l'appareil peut être
lamped en conséquence.
1. Pour joindre cage / ombre (1) de la plaque arrière monté,
d'abord dévisser la deux vis (2) sur le dessus de la plaque arrière
(E) et enlever - voir schéma 2.
2. Suivant aligner les trous dans la cage / ombre (1) traverse (X)
avec des trous filetés (T) en haut de la plaque arrière (E).
3. Maintenant glisser vis (2) dans les trous de la barre transversale
(X) et le fil dans des trous (T) en haut de la plaque arrière et serrer.