Hinkley Lighting CHARLOTTE 3521AN User Manual
Start here, Commencez ici, Empezar aquí
H I N K L E Y L I G H T I N G 33000 Pin Oak Parkway Avon Lake, OH 44012 800.446.5539 / 440.653.5500 hinkleylighting.com
Assembly Instructions
Item No. 3521
start here
1. Find a clear area in which you can work.
2. Unpack fixture from carton.
3. Carefully review instructions prior to assembly.
*** The construction of this fixture will be accomplished by first
installing the mounting hardware, making all necessary electrical
connections, mounting the fixture body to the ceiling, then installing
the glass and shade.
SAFTEY WARNING: READ WIRING AND GROUND INSTRUIONS (I.S.18)
AND ANY ADDITIONAL DIRECTIONS. TURN POWER SUPPLY OFF
DURING INSTALLATION. IF NEW WIRING IS REQUIRED, CONSULT A
QUALIFIED ELECTRICIAN OR LOCAL AUTHORITIES FOR CODE
REQUIREMENTS.
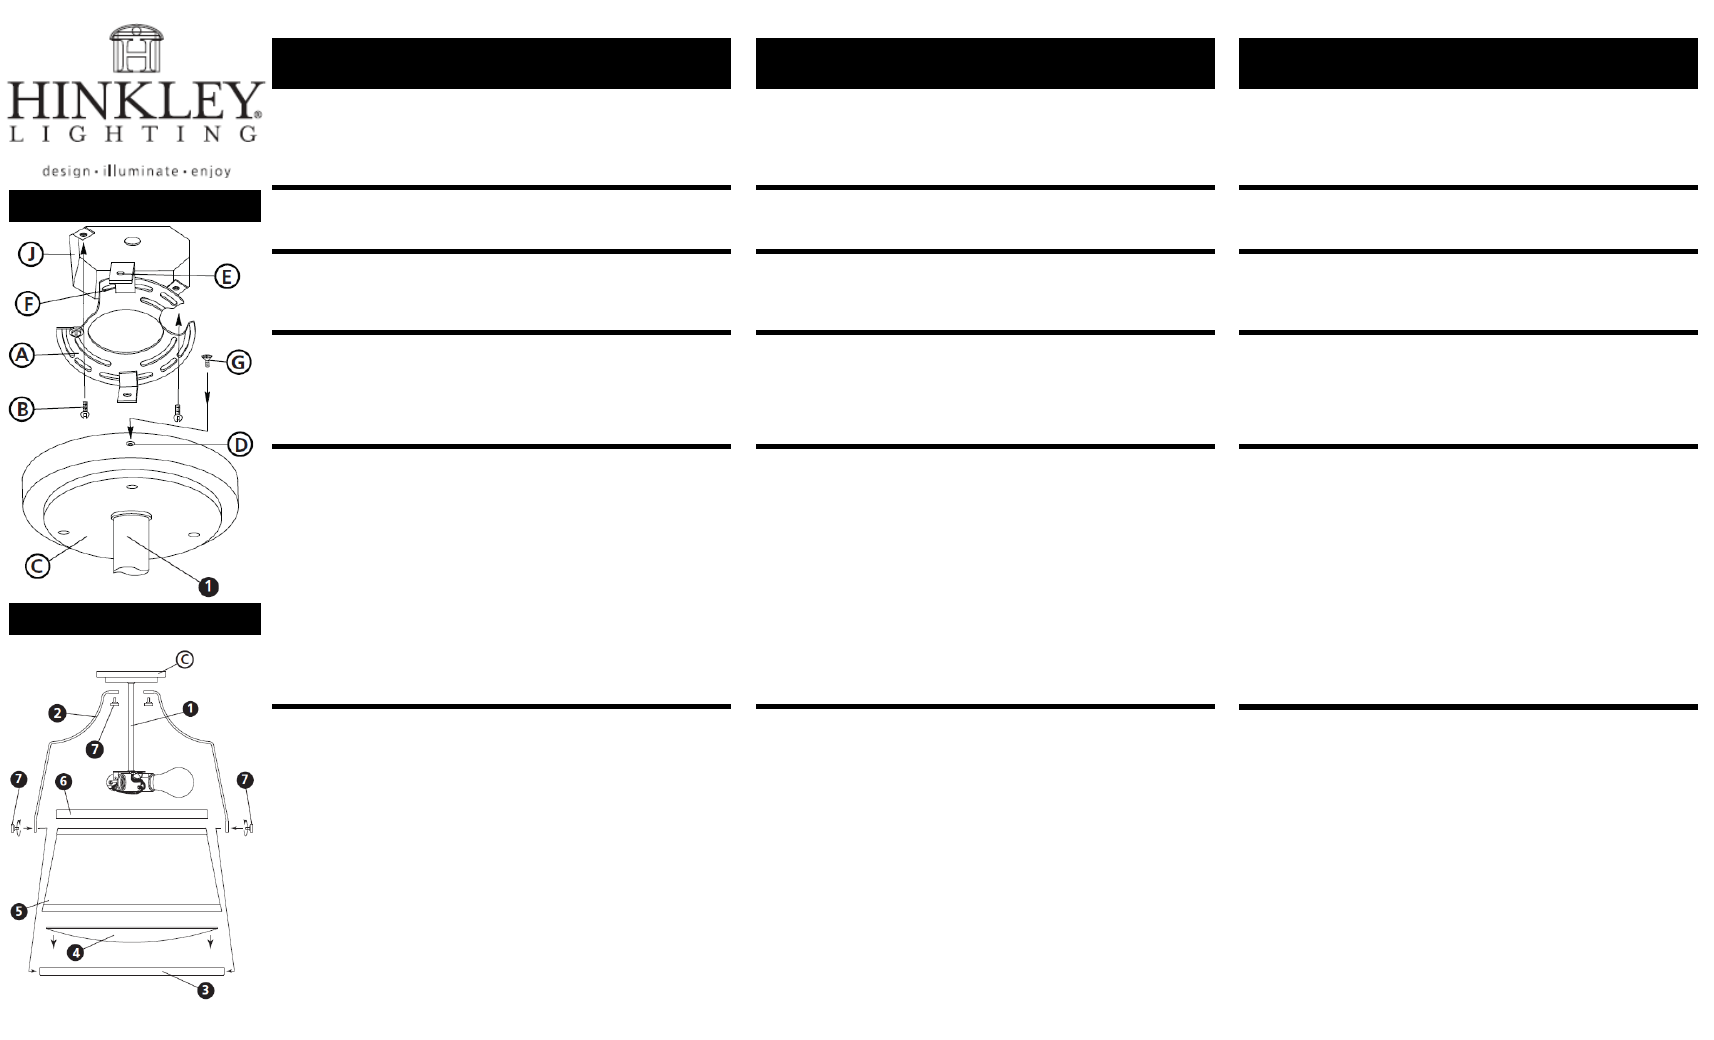
1. Fixture body can be installed prior to installation of the glass and
shade. First attach the mounting strap (A) to the junction box (J)
with two screws (B) – see Drawing 1.
2. Make all necessary electrical connections, please follow instruction
sheet (IS18) provided.
3. Next slip canopy (C) of main fixture body (1) over the mounting
strap (A) attached to the junction box (J).
4. Align holes (D) in the side of canopy (C), with holes (E) located on
the mounting tab (F) of mounting strap (A).
5. Thread in screws (G) to secure canopy and fixture body to ceiling.
1. To complete assembly of this fixture, first attach top of the three
uprights (2) to the face of canopy (C) of the fixture body (1), using
decorative knobs (7). Do not tighten at this time – see Drawing 2.
2. Take large bottom ring (3) and attach two of the uprights (2) to the
bottom ring with decorative knobs (7).
Note: fixture can be lamped accordingly at this time.
3. Move the remaining upright (2) to one side and slide glass (4) into
bottom ring (3).
4. Now slip shade (5) into bottom ring (3).
5. Slip smaller ring (6) over top edge of shade (5).
6. Attach final upright (2) to bottom ring (3) and tighten all decorative
knobs (7) on bottom ring and tighten decorative knobs (7) at top of
uprights.
Les Instructions D’assemblage
Numéro d’article: 3521
commencez ici
1. Trouvez un espave libre dans lequel vous pouvez travailler.
2. Déballlez appareil de la boîte.
3. Examinez attentivement les instructions avant le montage.
*** La construction de cet appareil sera accompli en installant d’abord
le matériel de montage, ce qui rend toutes les connexions électriques
nécessaires, le montage du corps du luminaire au plafon, puis
l’installation du verre et de l’ombre.
AVERTISSEMENT DE SECURITE: LIRE CABLAGE ET INSTRUCTIONS DE
MISE (I.S.18), ET TOUTE AUTRE INSTRUCTION. COUPER
L’ALIMENTATION ELECTRIQUE PENDANT L’ONSTALLATION. SI DE
NOUVELLES CABLAGE N’EST NECESSAIRE, CONSULTEZ UN
ELECTRICIEN QUALIFIE OU AUTORITES LOCALES POUR EXIGENCES DU
CODE.
1. Corps de luminaire peut être installé avant l’installation du verre et
de l’ombre. Fixez d’abord la sangle de fixation (A) à la boîte de
jonction (J) avec deuc vis (B) - Voir Schéma 1.
2. Assurez-vous que toutes les connexions électriques necessaries, s’il
vous plait suivre la feuille d’instruction (IS18) fourni.
3. Suivant dais de glissement (C) du corps de fixation principal (1) sur
la bande de fixation (A) fixé à la boîte de jonction (J).
4. Aligner les etrous (D) dans le côté du boile (C), avec des trous (E)
situé sur la patte de montage (F) de la bride de montage (A).
5. Enfiler les vis (G) pour fixer verrière et luminaire corps au plafond.
1. Pour terminer l’assemblage de cet appareil, fixez premier sommet
des trios montants (2) à la face de canopée (C) du corps de fixation
(1), en utilisant les boutons décoratifs (7). Ne pas serrer à ce
moment – Voir Schéma 2.
2. Prendre grand anneau de fond (3) et attacher deux des montants
(2) à la bague de fond avec des boutons décoratifs (7).
Remarque: montage peut être lamped en consequence à ce moment.
3. Déplacer le restant de bout (2) d’un côté et lame de verre (4) dans
l’anneau inférieur (3).
4. Maintenant glisser ombre (5) dans l’anneau inférieur (3).
5. Glissez petit anneau (6) sur le bord supérieur de l’ombre (5).
6. Fixez final montant (2) à l’anneau inférieur (3) et serrer tous les
boutons décoratifs (7) sur l’anneau niférieur et serrer les boutons
décoratifs (7) au sommet de poteaux.
Instrucciones De Montaje
Número del artículo: 3521
empezar aquí
1. Busque un lugar claro en el que se puede trabajar.
2. Desembale accesorio de la caja.
3. Revise cuidadosamente la Instrucciones antes del montaje.
*** La construcción de este aparato se llevará a cabo mediante la
instalación de primero el hardware de montaje, por lo que todas las
conexiones eléctricas necesarias, el cuerpo del útil de montaje para el
techo, a continuación, instalar el cristal y la sombra.
ADVERTENCIA DE SEGURIDAD: LE LAS INSTRUCCIONES DE
CABLEADO Y LA TIERRA (I.S.18), E INSTRUCCIONES ADICIONALES.
APAUGE LA ALIMENTACIÓN DE CORRIENTE DURANTE LA
INSTALACIÓN. SI SE REQUIERE NUEVO CABLEADO, CONSULTE CON
UN ELECTRICISTA O AUTHORIDADES LOCALES PARA REQUISTOS
DEL CÓDIGO.
1. Cuerpo del accesorio se puede instalar antes de la instalación del
vidrio y la sombra en primer lugar colocar la correa de montaje (A) a
la caja de conexiones (J) con dos tornillos (B) – Véase la Figura 1.
2. Haga todas las conexiones eléctricas necesarias, siga hoja de
Instrucciones (IS18) proporcionado.
3. Canopy slip siguiente (C) del cuerpo principal sorporte (1) en el
soporte de montaje (A) conectado a la caja de conexiones (J).
4. Alinear los agujeros (D) en el lado de la campana (C), con agujeros
(E) se encuentra en la pestaña de montaje (F) de la brida de montaje
(A).
5. Tema de tornillos (G) para asegurar conopy y el accesorio del cuerpo
hasta el techo.
1. Para conpletar el montaje de este accesorio, primero fijar la paste
superior de los tres montates (2) a la cara de cuierta (C) del cuerpo
de la luminaria (1), usando perilla decorativas (7). No apriete en este
momento – Véase la Figura 2.
2. Tome anillo inferior grande (3) y coloque dos de los montantes (2) a
la parte inferior del anillo con botones decorativos (7).
Nota: accesorio se puede lamped en consecuencia en este momento.
3. Mueva el montate restante (2) a un lado y portaobjetos de vidrio (4)
en la parte inferior del anillo (3).
4. Ahora deslice la sombra (5) en el anillo inferior (3).
5. Deslice el anillo más peque~no (6) sobre superior de la cortina (5).
6. Conecte última posición vertical (2) para el anillo inferior (3) y
apretar todos los botones decorativo (7) en el anillo inferior y apriete
las perillas decorativaas (7) en la parte superior de los montantes.
Drawing 1 – Fixture Installation
Drawing 2 – Fixture Assembly