Hinkley Lighting LINCOLN 2462 User Manual
Hinkley, Start here, Commencez ici
start here
commencez ici
empezar aquí
Assembly Instructions
Item No. 2462
Les Instructions D’assemblage
Numéro d’article: 2462
Instrucciones De Montaje
Número del artículo: 2462
L I G H T I N G
HINKLEY
English
Spanish
French
H I N K L E Y L I G H T I N G 33000 Pin Oak Parkway, Avon Lake, OH 44012 800.446.5539 / 440.653.5500 hinkleylighting.com
1. Find a clear area in which you can work.
2. Unpack fixture and glass from carton.
3. Carefully review instructions prior to assembly.
1. Busque un lugar claro en el que se puede trabajar.
2. Desempaque la luminaria y el vidrio de la caja.
3. Revise cuidadosamente las instrucciones antes de asamblea.
Une. Allez dans un endroit dans lequel vous pouvez travailler.
2. Déballez luminaire et le verre de boîte.
3. Examinez attentivement les instructions avant le montage.
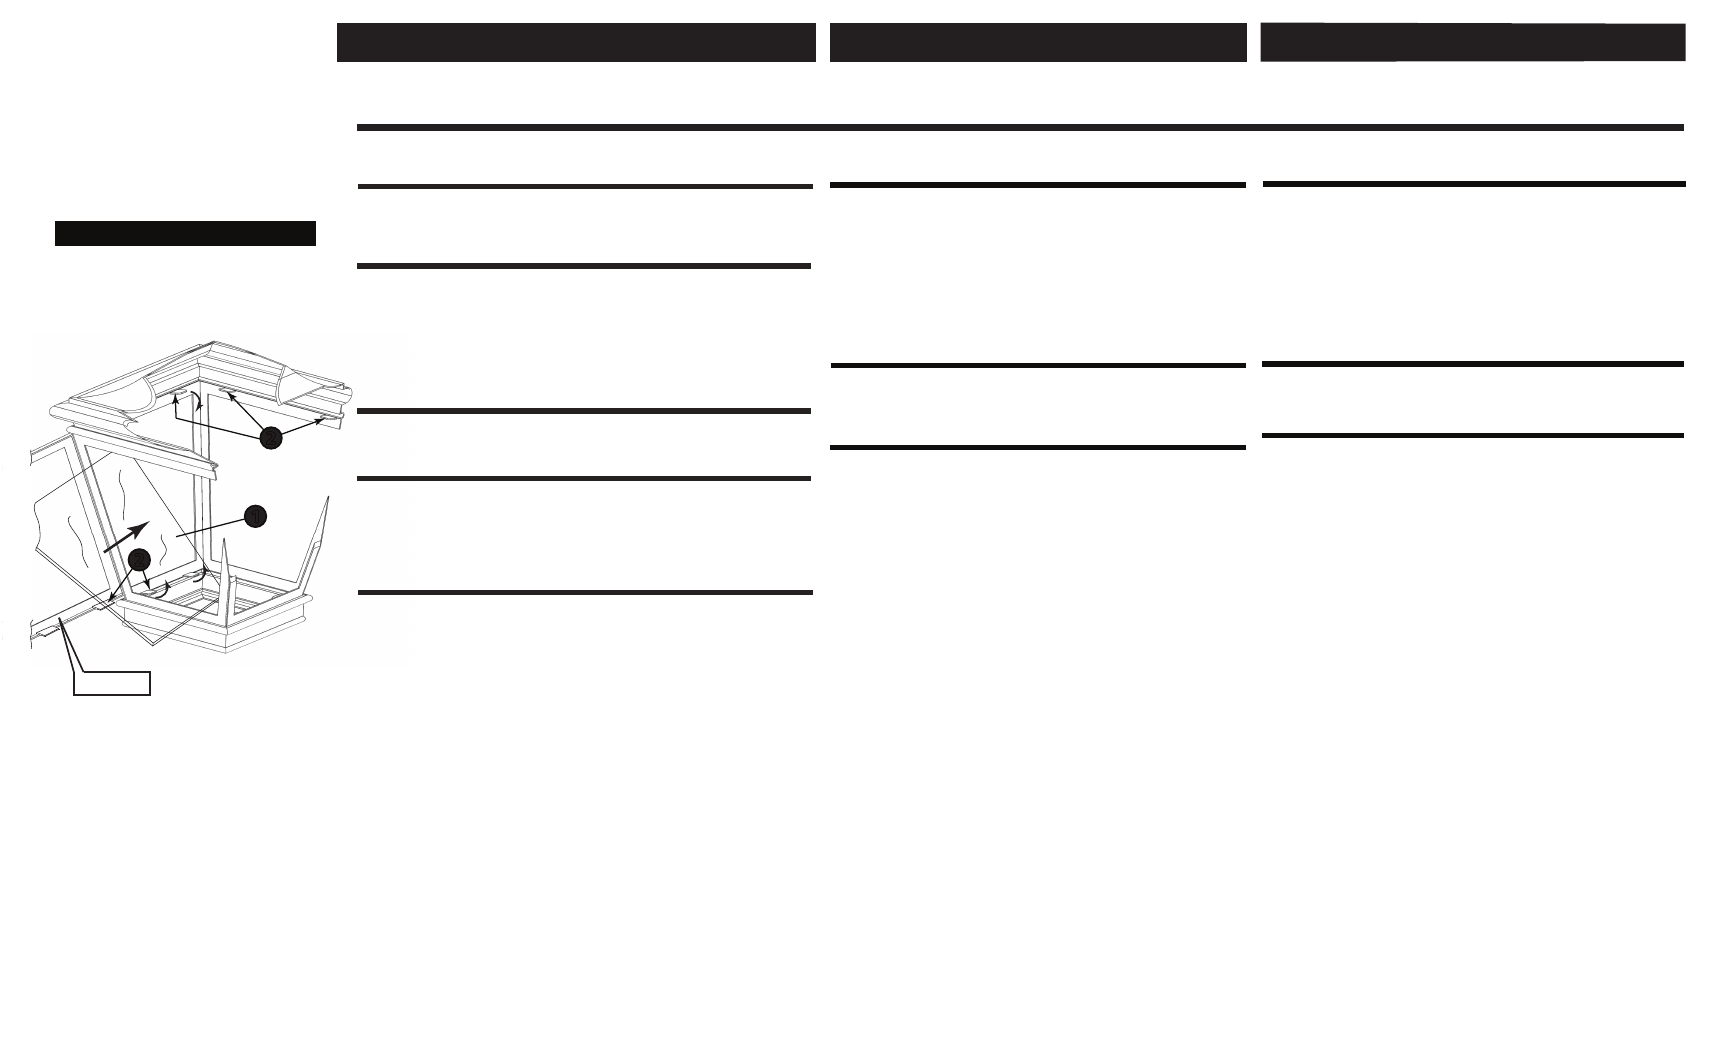
cage door
1
2
2
*** The constructoin of this fixture will be accomplished by first,
installing the glass, attaching the mounting strap to the junction box,
making all necessary electrical connections, and then mounting the
fixture to the ceiling.
1. To install glass, lift latch on fixture cage door and open. Next slip glass
panels (1) through door opening and position inside cage between the
glass clips (2). NOTE: glass panel for door is smaller in size than panels
for cage. this panel will be install last - see
Drawing 1
2. Gently fold down class clips (2) to secure glass panels (2) in cage.
3. Repeat process for remaining glass panels and then install door panel
in same manne
1. Para instalar el vidrio, levante el pestillo en la puerta del aparato
jaula y abierta. Siguiente vidrio antideslizante paneles (1) a través
de la apertura de la puerta y la posición dentro de la jaula entre la
cierres de cristal (2). NOTA: panel de vidrio para puerta es de
menor tamaño que los paneles para la jaula. este panel se
instalará pasado - vea
dibujo 1.
2. Incorpore suavemente hacia abajo los clips de clase (2) para
fijar los paneles de vidrio (2) en la jaula.
3. Repita el proceso para el resto de los paneles de vidrio y luego
instalar el panel de la puerta de la misma manera.
e
d
n
o
it
a
x
if
e
tr
o
p
a
l
r
u
s
t
e
u
q
o
l
e
l
t
n
a
v
e
l
u
o
s
n
e
,
e
r
r
e
v
r
e
ll
a
t
s
n
i
r
u
o
P
.
1
la cage et ouverte. Suivant verre de glissement Panneaux (1) à
travers l'ouverture de la porte et la position à l'intérieur de la cage
entre l' clips de verre (2). REMARQUE: panneau de verre pour porte
est plus petit en taille que les panneaux pour cage. ce panneau sera
installer dernière - voir
schéma 1.
2. Plier doucement clips de classe (2) pour fixer les panneaux de
verre (2) dans la cage.
3. Répétez la procédure pour restantes panneaux de verre et ensuite
installer le panneau de porte de la même manière.
Drawing 1 - Glass Installation
After glass is installed fixture can be mounted to the ceiling. Please refer
to instrucion sheet (IS-19) provided. Read all instructions provided
completely before starting installation.
SAFETY WARNING: READ WIRING AND GROUNDING INSTRUCTIONS
(I.S. 18) AND ANY ADDITIONAL DIRECTIONS. TURN POWER SUPPLY
OFF DURING INSTALLATION. IF NEW WIRING IS REQUIRED,
CONSULT A QUALIFIED ELECTRICIAN OR LOCAL AUTHORITIES
FOR CODE REQUIREMENTS.
Después de accesorio está instalado de vidrio se puede montar en
el techo. consulte a Instrucion hoja (IS-19), siempre. Lea todas las
instrucciones proporcionadas completamente antes de comenzar
la instalación.
Après fixation verre est installé peut être monté au plafond. S'il vous
plaît se référer à instrucion feuille (IS-19) fourni. Lisez toutes les
instructions fournies complètement avant de commencer l'installation.
ADVERTENCIA DE SEGURIDAD: INSTRUCCIONES DE CABLEADO
Y CONEXIÓN A TIERRA LEA
(I.S. 18), E INSTRUCCIONES
ADICIONALES. CO RTAR EL SUMINISTRO ELÉCTRICO
DURANTE L A INSTALACIÓN. SI NUEVO CABLEADO SE
REQUIERE, CONSU LTE CON UN ELECTRICIS TA O
AUTORIDADES LOCALES PARA REQUISI TOS DEL CÓDIGO.
AVERTISSEMEN T DE SÉCURITÉ: LIRE RACCORDEMEN T ET MISE
À LA TERRE
(I.S. 18) ET TOUTE AUTRE INSTRUCTION. COUPER
L'ALIMEN TATION ÉLECTRIQUE EN COURS D'INS TALLATION. SI
DE NOUVELLES CÂBLAGE N'ES T NÉCESSAIRE, CONSU LTEZ
UN ÉLECTRICIEN QUALIFIÉ OU LES AUTORITÉS LOCALES
POUR LES EXIGENCES DE CODE.