Hinkley Lighting CORTINA FR42002PNI User Manual
Fredrick ramond, Instrucciones de montaje, Advertencia de seguridad
FREDRICK RAMOND
FR42002
Bulbos: 60w CAND.
Las piezas de repuesto:
CRYSTALS: R42000CRYSTR
Instrucciones de Montaje
Montaje de este accesorio se llevará cabo mediante la instalación por primera
vez la conta de montaje de la caja de conexions, por lo que todas las
conexiones eléctricas necesarias, montar el aparato a la pared y luego colgar
los cristales accesorio.
Advertencia De Seguridad:
Lea las Instrucciones de cableado
y conexión a tierra [FRIS 18], e instrucciones adicionales. Encienda la
alimentación de corriente durante la instalación. Si se necesita un nuevo
cable, consulte a un electricista calificado o con las autoridades locales de los
requisitos del código.
PASO 1
1. Preparar cinta de montaje (A) por threading 1-15.875mm pezón en el
orificio central de la cinta de montaje (A), aproximadamente 6.350mm
– Véase la Figura 1.
2. Sujete la correa de montaje (A) a la caja de conexiones (J) utilizando dos
tornillos 25.4mm (B) suministrados.
3. Deslizar la arandela de seguridad (F1) sobre la boquilla (C) y la tuerca
hexagonal hilo (F) en la boquilla (C).
4. Tuerca hexagonal (F) se puede apretar contra el soporte de montaje (A)
después de ajustar pezón.
PASO 2
Hag alas conexiones eléctricas de los cables de alimentación a los cables
conductores accesorio. Consulte la hoja de instrucciones [FRIS18] y
siga todas las instrucciones para hacer todas las conexiones necesarias. A
continuación, hacer referencia a esta hoja para continuar con la
instalación de este accesorio.
PASO 3
1. Para el montaje de la placa posterior a la pared, deslice el orificio
central de la placa posterior (E) sobre la boquilla (C) sobre la boquilla
(c) y mantenga fijo en la posición – Véase la Figura 1.
2. Tema botón decorativo (D) en el extremoo del pezón (C) y apriete
para asegurar accesorio.
PASO 4
1. Para instalar cristales sobre el soporte sujetador, primero gancho de un
extreme de cadena de cristal R42000CRYSTR al bucle exterior (1a)
situado en el lado exterior de la titular de la vela (ch), a continuación,
extremo al bucle correspondiente parte inferior (2a)
se encuentra en la parte inferior de la placa posterior (e), repetir en
Véase la Figura 3.
2. Instale la segunda cadena cristalina de la lámpara por primera fijación
de un extreme al asa (1b), que se encuentra en el interior de la titular de
la vela (ch) y luego conecte el otro extremo a la parte correspondiente
del loop (2b) de montjae superior de cristal (t), que fue montado antes.
3. Repita el proceso para fijar cristal a otro lado del apararto.
FREDRICK RAMOND
FR42002
Ampoules: 60w CAND.
Les pièces de rechange:
CRYSTALS: R42000CRYSTR
Instructions de Montage
Assemblage de ce dispositif va être effectuée par la première installation de
l’étrier de montage de la boîte de junction. Toutes les connexions élecriques
nécessaires, le montage de la fixation à la paroi, puis suspendus les cristaux de
fixation.
Avertissement De Sécurité:
Lire câblage et de mise à la terre
instructions [FRIS 18] et les instructions supplémentaires. Couper
l’alimentation électrique pendant l’installation. Si un nouveau câblage n’est
nécessaaire, consultez un électrique qualifié ou les autorités locales pour
connaître les exigences du code.
ETAPE 1
1. Préparer sangle de montage (A) de 1 à 15.875 mm par filetage écrou dans
le trou central de l’étrier de montage (A), enbiron 6.350mm – Voir
Schéma 1.
2. Attacher la sangle de fixation (A) à la boîte de jonction (J) à l’aide de deux
vis 25.4mm (B) fournies.
3. Glissez la rondelle de blocage (F1) sur mamelon (C) et l’écrou hexagonal
de fil (F) sur le mamelon (C).
4. Ecrou hexagonal (F) peut être serré contre sangle de fixation (A) après
ajustment mamelon.
ETAPE 2
Effectuez les connexions électriques du cable d’alimentation à fils de
connexion du projecteur. Reportez-vous aux instructions feuille
[FRIS18] et suivez toutes les instructions pour effectuer tous les
branchements nécessaires. Puis se référer à cette fiche pour continuer
l’installation de cet accessoire.
ETAPE 3
1. Pour monter la plaque arrière à la paroi, glisser le trou central de la plque
de fond (E) au cours de mamelon (C) et le maintenir en position de
montage – Voir Schéma 1.
2. Discussion bouton decorative (D) sur l’extrémité du mamelon (C) et
serrer pour sécuriser appareil.
ETAPE 4
1. Pour installer cristaux de fixation, premier crochet d’une extrémité du
cristal de volet R42000CRYSTR à la boucle à l’extérieur (1a) siruée sur
du support de bougie (ch), puis fixer autre extrémité
correspondante de fond (2a) située sur le bas de la plaque (e)
,
recomencez avec l’autre côté – Voir Schéma 3.
2. Installez le deuxième volet de cristal pour la fixation par la première
fixation d’une extrémité à boucle (1b), situé à l’intérieur du bougeoir
(ch), puis branchez l’autre extrémité sur le côté correspondant de la
boucle (2b) du support supérieur cristal (t), qui était monté plus tôt.
3. Répétez l’opération pour fixer cristal de l’autre côté de montage.
FREDRICK RAMOND
FR42002
Bulbs: 60w CAND.
Replacement parts:
CRYSTALS: R42000CRYSTR
Assembly Instructions
Assembly of this fixture will be accomplished by first installing the mounting
strap to the junction box, making all necessary electrical connections,
mounting the fixture to the wall and then hanging the fixture crystals.
Safety Warning:
Read wiring and grounding instruction [FRIS 18]
and any additional directions. Turn power supply off during installation. If
new wiring is required, consult a qualified electrician or local authorities for
code requirements.
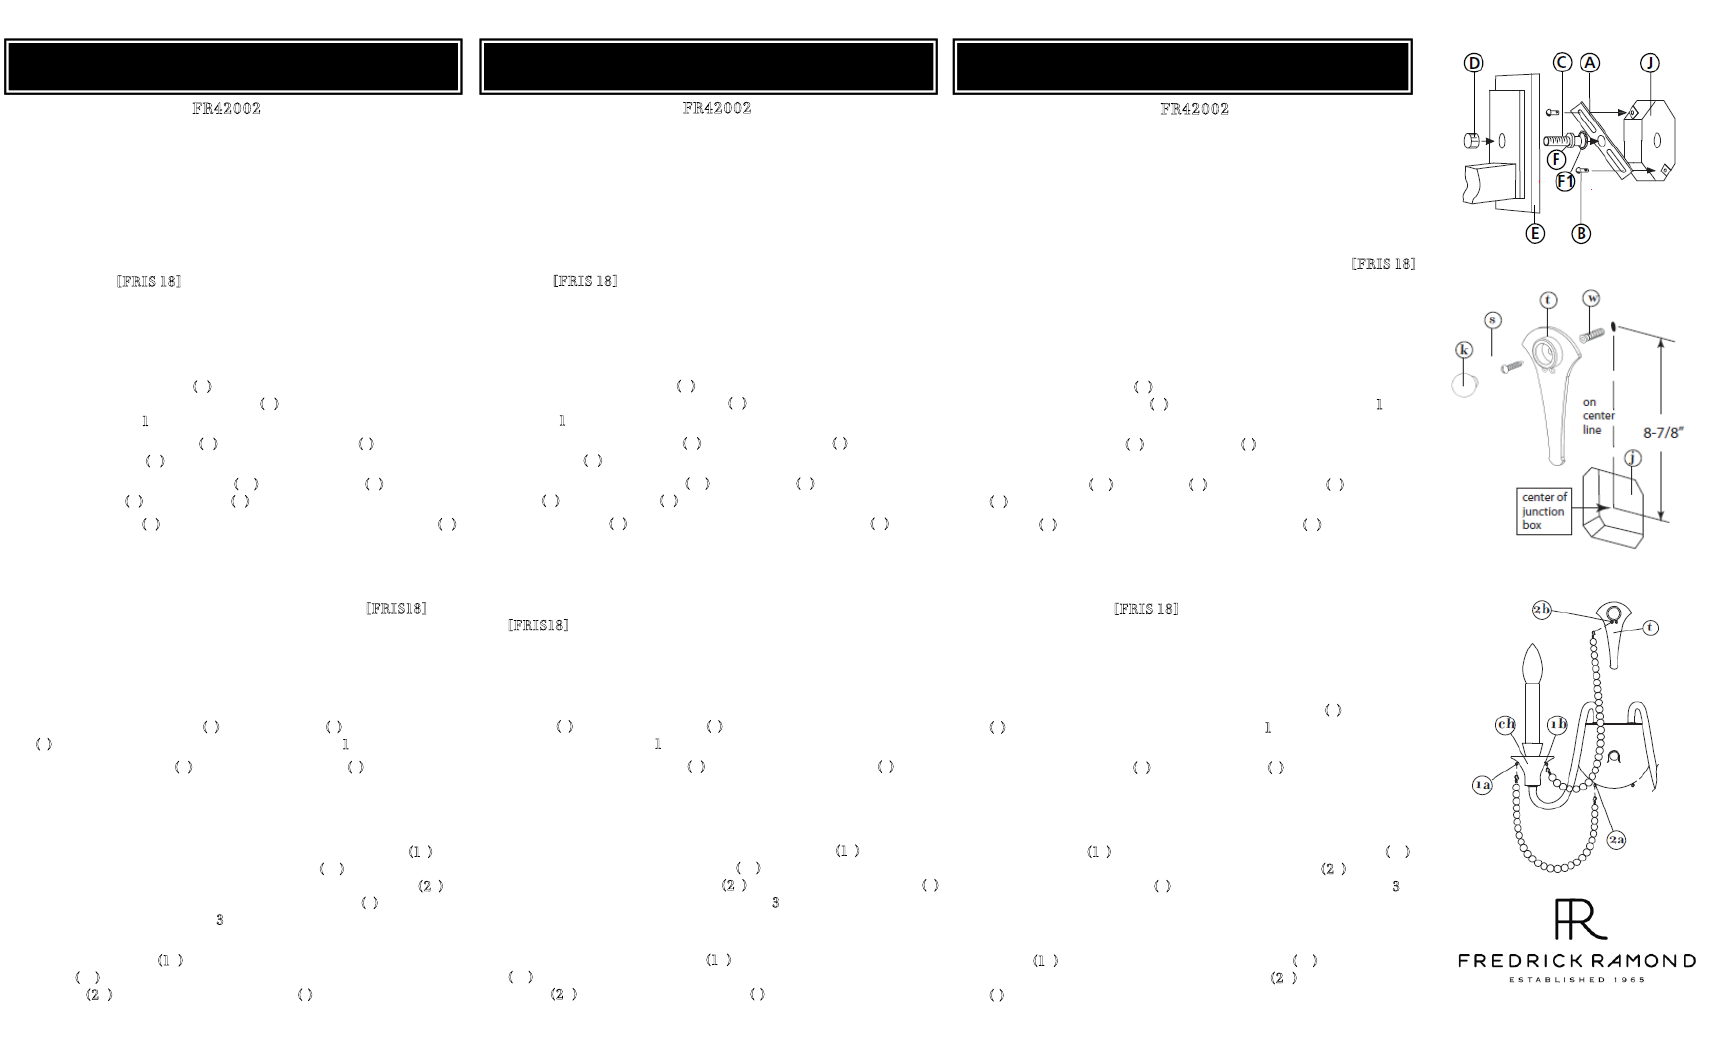
STEP 1
1. Prepare mounting strap (A) by threading 1-5/8” nipple into the center
hole of the mounting strap (A), approximately ¼” – see Drawing 1.
2. Attach mounting strap (A) to junction box (J) using two 1” screws (B)
provided.
3. Slip lock washer (F1) over nipple (C) and thread hex nut (F) onto nipple
(C).
4. Hex nut (F) can be tightened against mounting strap (A) after adjusting
nipple.
STEP 2
Make electrical connections from supply wire to fixture lead wires. Refer
to instructions sheet [FRIS 18] and follow all instructions to make all
necessary wiring connections. Then refer back to this sheet to continue
installation of this fixture.
STEP 3
1. To mount backplate to wall, slip center hole of backplate (E) over nipple
(C) and hold fixture in position – see Drawing 1.
2. Thread decorative knob (D) onto end of nipple (C) and tighten to secure
fixture.
STEP 4
1. To install crystals on fixture, first hook one end of crystal strand R42000CRYSTR
the outside loop (1a) located on the outer side of the candle holder (ch),
then attach other end to the bottom corresponding loop (2a) located on
the bottom of the backplate (E), repeat for other side – see Drawing 3.
2. Install the remaining crystal strand to the fixture by first attaching one end
to loop (1b), located on the inside of candle holder (ch) and then attach
the other end to the corresponding side of loop (2b) of top crystal mount
(t), that was mounted earlier,
3. Repeat process to attach crystal to other side of fixture.
[DRAWING 1]
[DRAWING 2]
[DRAWING 3]
A Division of Hinkley Lighting Inc.
33000 PIN OAK PARKWAY | AVON LAKE, OHIO 44012
toll free 800.446.5539 | phone 440.653.5500
11.12.13
le côté extérieur
à la boucle
conecte el otro
el otro lado –