Hinkley Lighting WALDEN 3294VZ User Manual
Hinkley, Start here, Commencez ici
start here
commencez ici
empezar aquí
Assembly Instructions
Item No. 3294 / 3296
Les Instructions D’assemblage
Numéro d’article: 3294 / 3296
Instrucciones De Montaje
Número del artículo: 3294 / 3296
L I G H T I N G
HINKLEY
English
Spanish
French
H I N K L E Y L I G H T I N G 33000 Pin Oak Parkway, Avon Lake, OH 44012 800.446.5539 / 440.653.5500 hinkleylighting.com
*** Assembly of this fixture will be accomplished by first, assembling the
top body of the fixture, attaching the mounting hardware to the junction
box, hanging the fixture from the ceiling, and then finishing the fixture
assembly.
2. Fixture is ready for installation, please follow instruction sheet (IS-19)
provided. Please read all instruction sheets supplied with this fixture prior
to installation.
3. After fixture is installed please return to this instruction sheet to
complete assembly.
SAFETY WARNING: READ WIRING AND GROUNDING INSTRUCTIONS
(I.S. 18) AND ANY ADDITIONAL DIRECTIONS. TURN POWER SUPPLY
OFF DURING INSTALLATION. IF NEW WIRING IS REQUIRED,
CONSULT A QUALIFIED ELECTRICIAN OR LOCAL AUTHORITIES
FOR CODE REQUIREMENTS.
1. Find a clear area in which you can work.
2. Unpack fixture and glass from carton.
3. Carefully review instructions prior to assembly.
1. Busque un lugar claro en el que se puede trabajar.
2. Desempaque la luminaria y el vidrio de la caja.
3. Revise cuidadosamente las instrucciones antes de asamblea.
Une. Allez dans un endroit dans lequel vous pouvez travailler.
2. Déballez luminaire et le verre de boîte.
3. Examinez attentivement les instructions avant le montage.
*** Asamblea de este accesorio se llevará a cabo por primera, el
montaje de la parte superior del cuerpo de la luminaria, adjuntando
los elementos de montaje para la unión caja, colgando el aparato
del techo, y luego terminar el fixture asamblea.
*** Assemblée de ce luminaire sera accompli par la première,
l'assemblage de la haut corps de l'appareil, fixer le matériel de
montage à la jonction boîte, accrocher l'appareil au plafond, puis
terminer le montage ensemble.
2 . Aparato está listo para la instalación , por favor, siga la hoja de
instrucciones (19 - IS) proporcionado . Por favor, lea todas las hojas
de instrucciones que se suministran con este aparato antes
de la instalación.
3 . Después de instalar luminaria por favor regrese a esta hoja de
instrucciones para conjunto completo.
2 . Fixture est prêt pour l'installation , s'il vous plaît suivez feuille
d'instruction (IS- 19) fourni . S'il vous plaît lire toutes les fiches
d'instructions fournies avec ce projecteur avant à l'installation .
3 . Après appareil est installé s'il vous plaît revenir à cette feuille
d'instructions à assemblage complet .
ADVERTENCIA DE SEGURIDAD: INSTRUCCIONES DE CABLEADO
Y CONEXIÓN A TIERRA LEA (I.S. 18), E INSTRUCCIONES
ADICIONALES. CORTAR EL SUMINISTRO ELÉCTRICO
DURANTE LA INSTALACIÓN. SI NUEVO CABLEADO SE
REQUIERE, CONSULTE CON UN ELECTRICISTA O
AUTORIDADES LOCALES PARA REQUISITOS DEL CÓDIGO.
AVERTISSEMENT DE SÉCURITÉ: LIRE RACCORDEMENT ET MISE
À LA TERRE (I.S. 18) ET TOUTE AUTRE INSTRUCTION. COUPER
L'ALIMENTATION ÉLECTRIQUE EN COURS D'INSTALLATION. SI
DE NOUVELLES CÂBLAGE N'EST NÉCESSAIRE, CONSULTEZ
UN ÉLECTRICIEN QUALIFIÉ OU LES AUTORITÉS LOCALES
POUR LES EXIGENCES DE CODE.
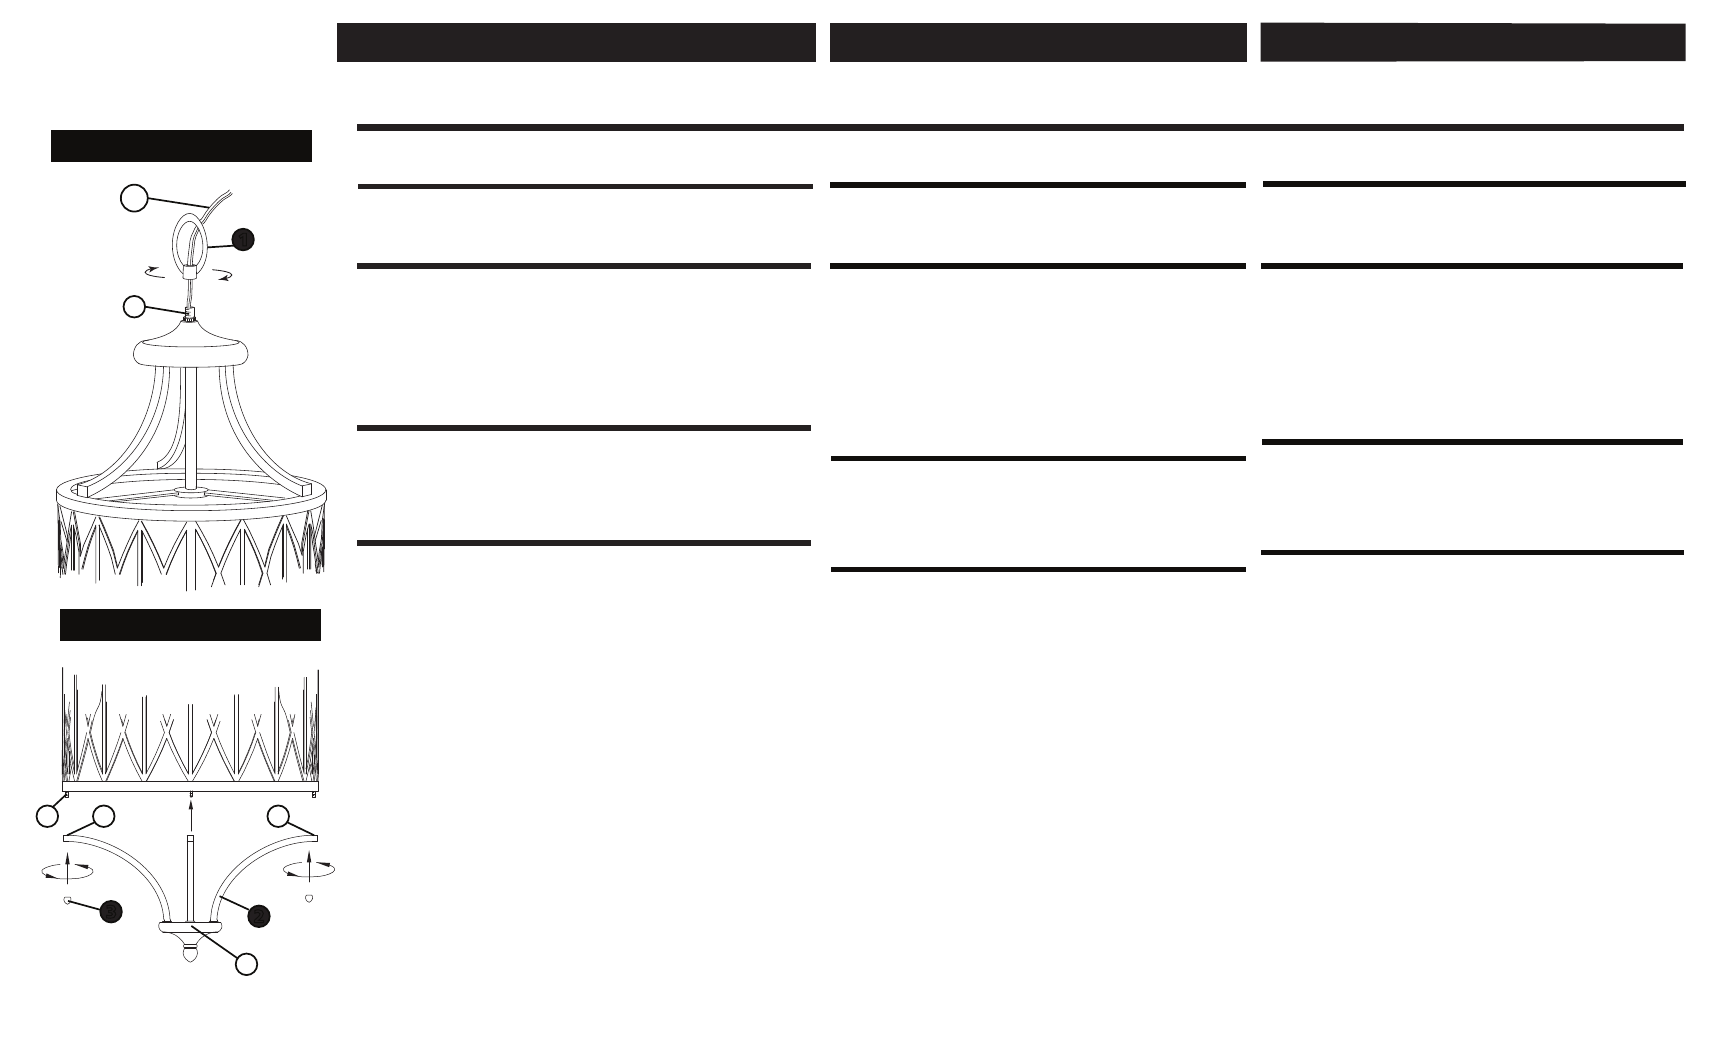
1. To prepare fixture for istallation it is necessary to attach the loop to
the top of the fixture. This is accomplished by slipping the loop (1)
along the fixture supply wire (SP) and threading the loop onto exposed
threaded tube (T) and tightening - see Drawing 1.
T
H
H
S
SP
1
2
3
Drawing 1 - Fixture Assembly
Drawing 2 - Fixture Assembly
1. Para preparar accesorio para istallation es necesario para sujetar
el bucle de la parte superior de la luminaria. Esto se logra por el
deslizamiento del bucle (1) a lo largo del cable de suministro de
accesorio (SP) y roscado en el bucle expuesto tubo roscado
(T) y aprietea
Une. Pour préparer fixation pour istallation il est nécessaire de fixer
la boucle de la partie supérieure de l'appareil. Ceci est réalisé par le
glissement de la boucle (1) le long du fil appareil d'alimentation (SP)
et enfiler la boucle sur exposée tube fileté (T) et de serrage
- voir dessin 1
- vea el dibujo 1.
1. Prior to attaching bottom spider (2) fixture can be lamped accordingly
- see Drawing 2.
2. To attach bottom spider assembly (SA), slip holes (H) in end of spider
arms (2) over studs (S) located on bottom of fixture. Hold spider assembly
in position.
3. Now thread balll knobs (3), supplied in parts bag, on end of studs (S)
and tighten to complete
1. Antes de fijar la araña de fondo (2) accesorio se puede lamped
consecuencia - ver dibujo 2.
2. Para adjuntar cruceta inferior (SA), se deslizan agujeros (H) en
el extremo de los brazos de la araña (2) sobre los espárragos (S)
situado en la parte inferior del aparato. Mantenga cruceta en su
posición.
3. Ahora enrosque las perillas Balll (3), suministrados en la bolsa de
piezas, en los extremos de los espárragos (S) y apriete para
completar
Une. Avant de fixer araignée de fond (2) montage peut être lamped
conséquence - voir schéma 2.
2. Pour fixer ensemble de fond de l'araignée (SA), glisser trous (H)
en fin de bras d'araignée (2) sur les montants (S) situé au bas de la
fixation. Maintenez l'ensemble de croisillon en position.
3. Maintenant enfiler boutons BALLL (3), fournis dans le sac de
pièces, sur la fin de goujons (S) et serrer à compléter
SA