Hinkley Lighting BARCELONA FR44102SLF User Manual
Barcelona
FR44102
BARCELONA
ASSEMBLY INSTRUCTIONS
Assembly of this fixture will be accomplished by first spreading the arms to their
proper position, assembling the main body parts, hanging the fixture, installing
the glass and then attaching the crystals.
SAFETY WARNING:
Read wiring and grounding instructions [FRIS 18]
and any additional directions. Turn power supply off during installation. If new wiring
is required, consult a qualified electrician or local authorities for code requirements.
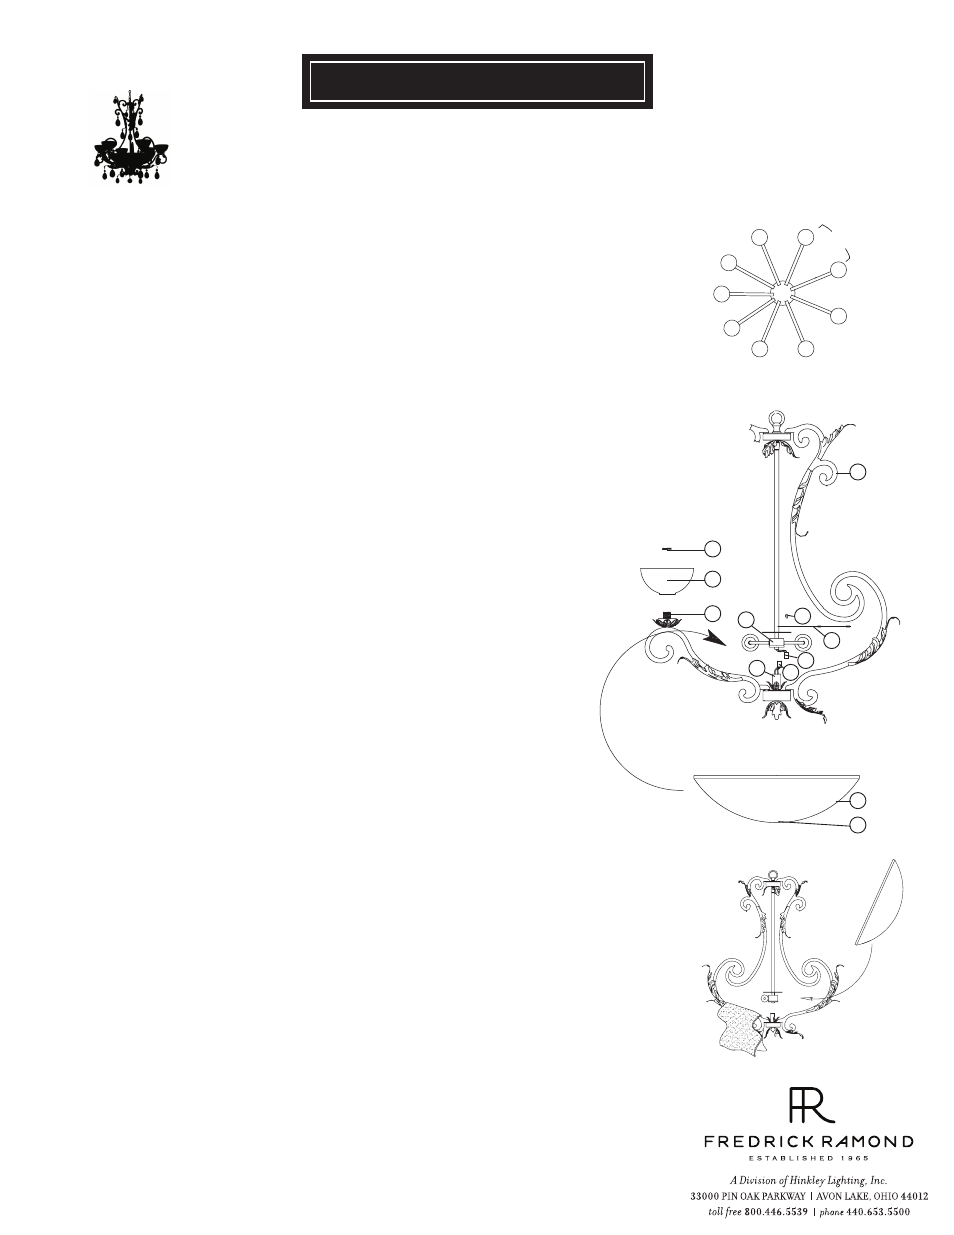
STEP 1
1
Take the main fixture assembly and spread the arms (a) until they are
approximately 40° apart - See Drawing 1.
STEP 2
Refer to Hanging Instruction Sheet [FRIS19-50R] to hang fixture. Then refer
back to this sheet to continue installation of this fixture.
STEP 3
1
Remove threaded socket ring (1) from socket (c) - See Drawing 2.
2
Slip small alabaster bowl (2) over socket (c).
3
Thread socket ring (1) onto socket (c) to secure glass (2).
· The large natural alabaster bowls used on the Barcelona series can be scratched
during installation if care is not taken. To prevent scratching of the alabaster,
we suggest the following procedure.
4
Prior to inserting large bowl (3), take small hand towels and lay them over
each of the arms - See Drawing 3.
5
Tilt alabaster bowl up and slip lip of glass under uprights, being careful not to
damage the wires and quick connect (5) located in the bottom center of the
fixture.
Note: Make sure quick connect is passed through the center hole (d) of the
alabaster bowl (3) and the center hole also slips over the center pipe (e).
6
Plug quick connector (4) and (5) together.
Note: the connector is designed to fit only one way.
7
Fixture can now be lamped accordingly.
STEP 4
1
Remove the ball knob screws (6) located above the socket assembly (f)- See
Drawing 2.
2
Talk half of the perforated diffuser (7) and attach it above socket assembly (f)
using the ball knob screws (6) removed earlier.
3
Repeat steps 1-2 for opposite half of perforated diffuser (7), making sure the tabs
are engaged on the opposite diffuser half.
STEP 5
Refer to Crystal Installation Sheet provided to install crystals.
[DRAWING 1]
[DRAWING 2]
40°
a
a
a
a
a
a
Bulbs:
60W CAND. & 75W MED.
a
3
5
d
1
2
c
7
6
4
e
f
a
a
a
[DRAWING 3]
09.12.08