Installing the block i/o – Rockwell Automation 1791-XXXX ANALOG BLOCK I/O User Manual
Page 21
Installing Block I/O
Chapter 2
2-3
Maximum
Network Distance
Baud Rate
Used
Maximum Capacity
and
When using
16 blocks/channel, 32
blocks/scanner (128 blocks with 4
57.6K
10,000 cableĆfeet
PLC 5/250
i
blocks/scanner, (128 blocks with 4
scanners) with 150 ohm terminator
115.2K
5,000 cableĆfeet
PLCĆ5 family (continued)
PLCĆ5/250 Ć requires
a 5150ĆRS remote scanner
32 blocks/channel, 32
57.6K
10,000 cableĆfeet
a 5 50 S e o e sca e
32 blocks/channel, 32
blocks/scanner, (128 blocks with 4
scanners) with 82 ohm terminator
115.2K
5,000 cableĆfeet
scanners) with 82 ohm terminator
and extended node addressing
230.4K
2,500 cableĆfeet
S C /
S
/O S
8 blocks with 150 ohm terminator
3
57.6K
10,000 cableĆfeet
SLCĆ5/02 (and greater)
Controller
1747ĆSN Remote I/O Scanner
Module (discrete mode only)
8 blocks with 150 ohm terminator
3
115.2K
5,000 cableĆfeet
Controller
Module (discrete mode only)
8 blocks with 82 ohm terminator
3
230.4K
2,500 cableĆfeet
1
PLCĆ5/15 series A and PLCĆ5/15 series B prior to revision H (B/H) can only address 3 blocks.
2
PLCĆ5/25 revisions prior to A/D can only address 7 blocks.
3
Analog block is 1/2 rack in discrete transfer mode. If you combine analog block and discrete transfer on the same RIO link, the capacity ranges between 8 and 15 blocks.
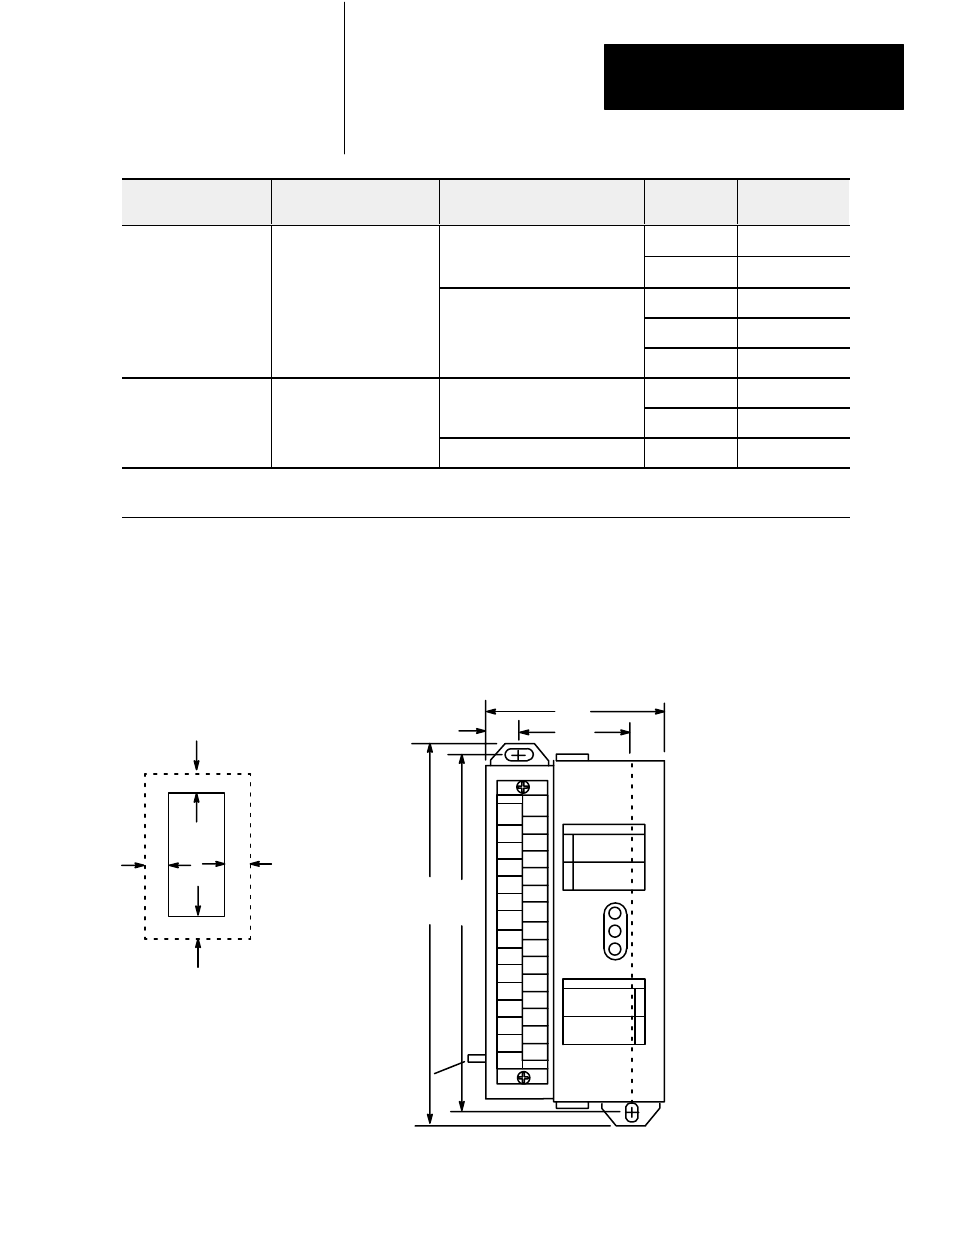
Figure 2.1 shows the mounting dimensions for the block I/O module.
Mount the blocks vertically with a minimum of 2” between blocks. This air
gap is necessary to maintain proper cooling air flow through the block.
Figure 2.1
Mounting Dimensions for the Block I/O Modules (1791ĆN4V2 shown)
2 mounting holes
for 1/4Ćinch screws
1
30
2.710
(68.8)
1.71
(43.4)
6.95
(176.5)
6.60
(167.6)
0.5
(12.7)
6.95H x 2.710W x 3.85D
(176.5H x 68.8W x 98D)
Inches
(Millimeters)
Equipment
Grounding
Stud
CAUTION: When tightening grounding stud nut, do not exceed 15 inĆlbs.
2.0 (50.8) air gap
on all 4 sides.
Block
Operating temperature in
air gap below module must
not exceed 60
o
C (140
o
F).
1791ĆN4V2
ANALOG BLOCK
POWER
COMM
FAULT
OUTPUT
INPUT
0
1
0
1
2
3
Installing the Block I/O