Steps 3 and 4, 180a precharge contactor replacement, S1 t1 – Rockwell Automation 1336R REGEN 48,78,180A Precharge Contactor Repl. User Manual
Page 3: Rs t pe pe
1336 REGEN Precharge Contactor Replacement
3
1336 REGEN-5.14 May, 1998
CAT 1336R-VB180PRE-AN
SER A
118.7-143.7
AC INPUT
K W
VOLTS
A
PH
HZ
AC OUTPUT
DC OUTPUT
REFER TO USER MANUAL FOR
INSTALLATION INSTRUCTIONS
180.4
118.7-143.7
380-480
180.4 3
50/60
–
–
–
–
–
3
50/60
380-480
ALLEN-BRADLEY
MADE IN U.S.A.
UL
®
LIST
ED 966X
IN D
C O N T E
Q
UL
®
LIST
ED 966X
IN D
C O N T E
Q
C
®
R
S
T
PE
PE
!
DANGER
RISK OF SHOCK
REPLACE AFTER
SERVICING
R1
1
L1
3
L2
5
L3
S1
T1
TORQUE TERMINALS TO 275 LB-IN
USE 75˚C WIRE ONLY
13
14
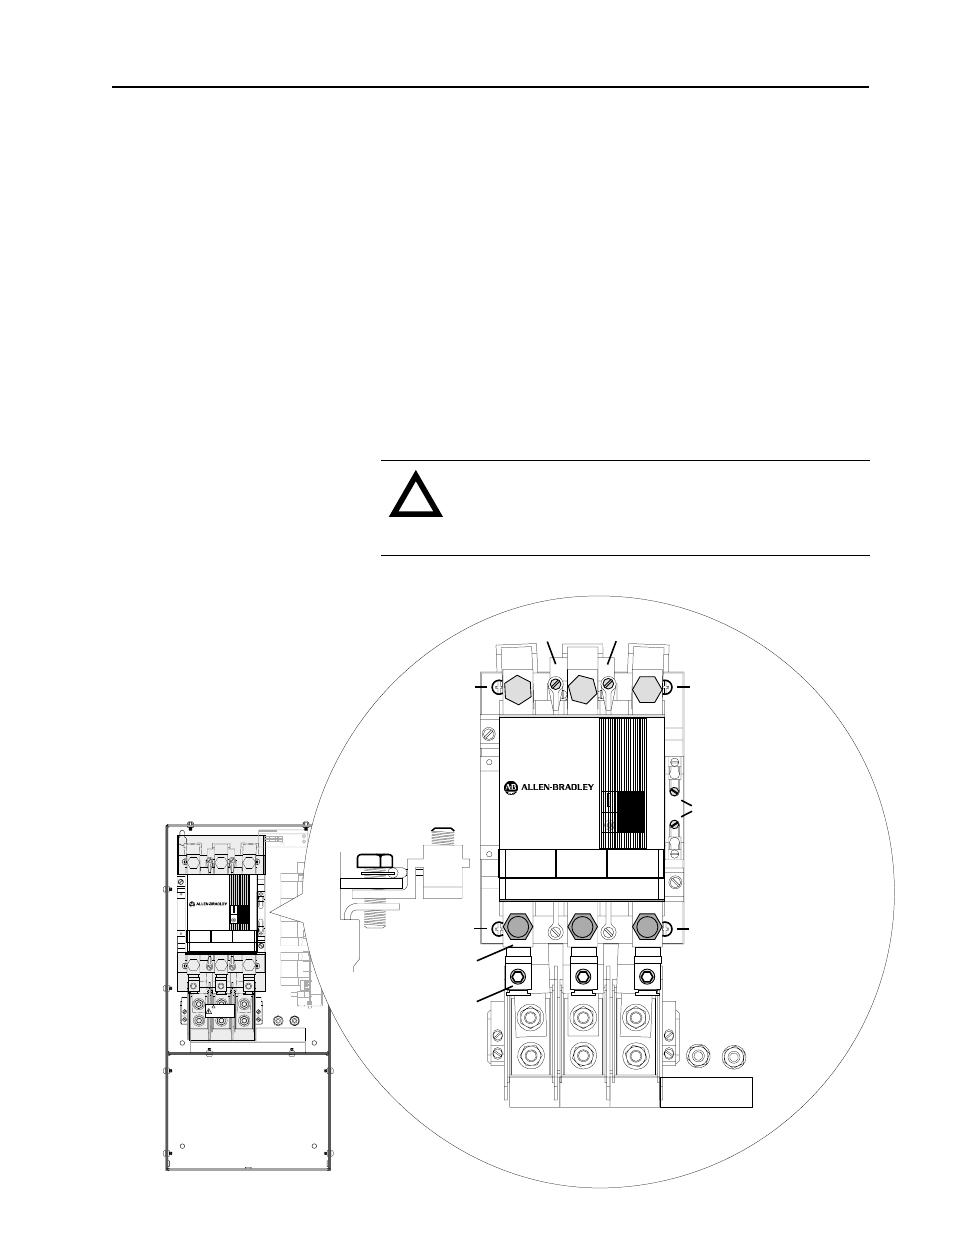
Steps 3 and 4
AC Coil Leads A1 ,A2
Mounting
Screw
Mounting
Screw
A1
A2
R1
1
L1
3
L2
5
L3
S1
T1
TORQUE TERMINALS TO 275 LB-IN
USE 75˚C WIRE ONLY
R
S
T
PE PE
Aux Contact
Leads 13 ,14
Set Screw
(3) Places
Mounting
Screw
Mounting
Screw
Lug Bolt
(3) Places
Set Screw
Lug Bolt
1.
Remove and lock-out all incoming power to the 1336 REGEN Line
Regeneration Package.
2.
Remove the Precharge Unit front cover. Measure the voltage at input
power terminals R1–S1–T1 and terminal block TB1 with a voltmeter to
ensure that no voltage is present.
3.
Disconnect all leads at the contactor and remove the (4) mounting
screws.
4.
Install the new contactor.
Torque the (4) contactor mounting screws to 2.6-4.1 N-m (23-36 lb.-in.).
Torque A1-A2 to 2.6-4.1 N-m (23-36 lb.-in.).
Torque L1-L2-L3 and the (3) R1-S1-T1 lug bolts at the bottom of the
contactor to 31.6 N-m (275 lb.-in.).
Torque the (3) R1-S1-T1 set screws to 0.9 N-m (8 lb.-in.).
Torque 13-14 to 2.6-4.1 N-m (23-36 lb.-in.).
180A
Precharge Contactor
Replacement
!
ATTENTION:
Replace any guards or shields previously
removed before reapplying power to the 1336 REGEN Line
Regeneration Package. Failure to replace guards or shields
may result in death or serious injury.
5.
Reinstall the Precharge Unit front cover.