Installation, Materials required, Venting – Regency Excalibur EX-E33 Large Gas Insert User Manual
Page 9: Flue liner installation, Gas insert aeration system, Minimum fireplace opening, Minimum fireplace opening excalibur, Option
E33 FPI Direct Vent Gas Insert
9
INSTALLATION
MATERIALS
REQUIRED
No electrical power supply is required for the gas
control to operate. A 120 Volt AC power cord is
hooked up to the fan. Plug the 3 wire cord into
a suitable receptacle. Do not cut the ground
terminal off under any circumstances. When
connected with 120 volts, the appliance must be
electrically grounded in accordance with local
codes, current version of the Canadian Electrical
Code CSA C22.1 (in Canada) or in the absence
of local codes, with the National Electrical Code
ANSI/NFPA 70.
NOTE: This unit is equipped with a heat
sensor thermodisc which will prevent the
blower from operating until the unit reaches
the correct temperature.
VENTING
This appliance is designed to be attached to two
3" (76mm) co-linear aluminium fl ex running the full
length of the chimney. The fl ue length must be a
minimum length of 8 ' (2.44m) and a maximum
of 35' (10.7m). See chart above for minimum
distances from roof. Periodically check that the
vent is unrestricted.
Masonry chimneys may take various contours
which the fl exible liner will accommodate. However,
keep the fl exible liner as straight as possible,
avoid unnecessary bending.
Part #
Description
948-305
3" Flex - 35 ft.
946-529
FPI Co-linear DV Vertical
Termination
Cap
Alternate Approved Caps
46dva-VC Vertical
Termination
Cap
46dva-VCH High Wind Cap
46dva-GK 3" Co-linear Adaptor with fl ashing
In areas of consistently high winds, we recommend
using the Simpson Dura-Vent System (46dva-GK
adapter and 46dva-VCH high-wind cap).
The Air Intake pipe must be attached to the inlet
air collar of the termination cap.
FLUE LINER
INSTALLATION
1) Cut
the
fl ex liner as required.
2) Mark the end of one liner with an "E" to
indicate Exhaust.
3) Connect the other end of the above liner to the
exhaust side of the termination adaptor, seal
connection with high temperature silicone.
Secure with gear clamp.
4) Connect the 2nd liner to the inlet side of the
adaptor, seal connection with high temperature
silicone. Secure with gear clamp.
GAS INSERT
AERATION SYSTEM
The air shutter can be adjusted by moving the
adjusting wire up or down. The wire is accessed
through the bottom louver opening. Open the air
shutter for a blue fl ame or close for a yellower
fl ame. The burner aeration is factory set but may
need adjusting due to either the local gas supply
or altitude.
Minimum Air Shutter Opening:
5/16"
Natural
Gas
7/16"
Propane
CAUTION: Carbon will be produced if air
shutter is closed too much.
Note: Any damage due to carboning resulting
from improperly setting the aeration
controls is NOT covered under warranty.
Note: Aeration Adjustment should only be
performed by an authorized FPI Installer
at the time of installation or service.
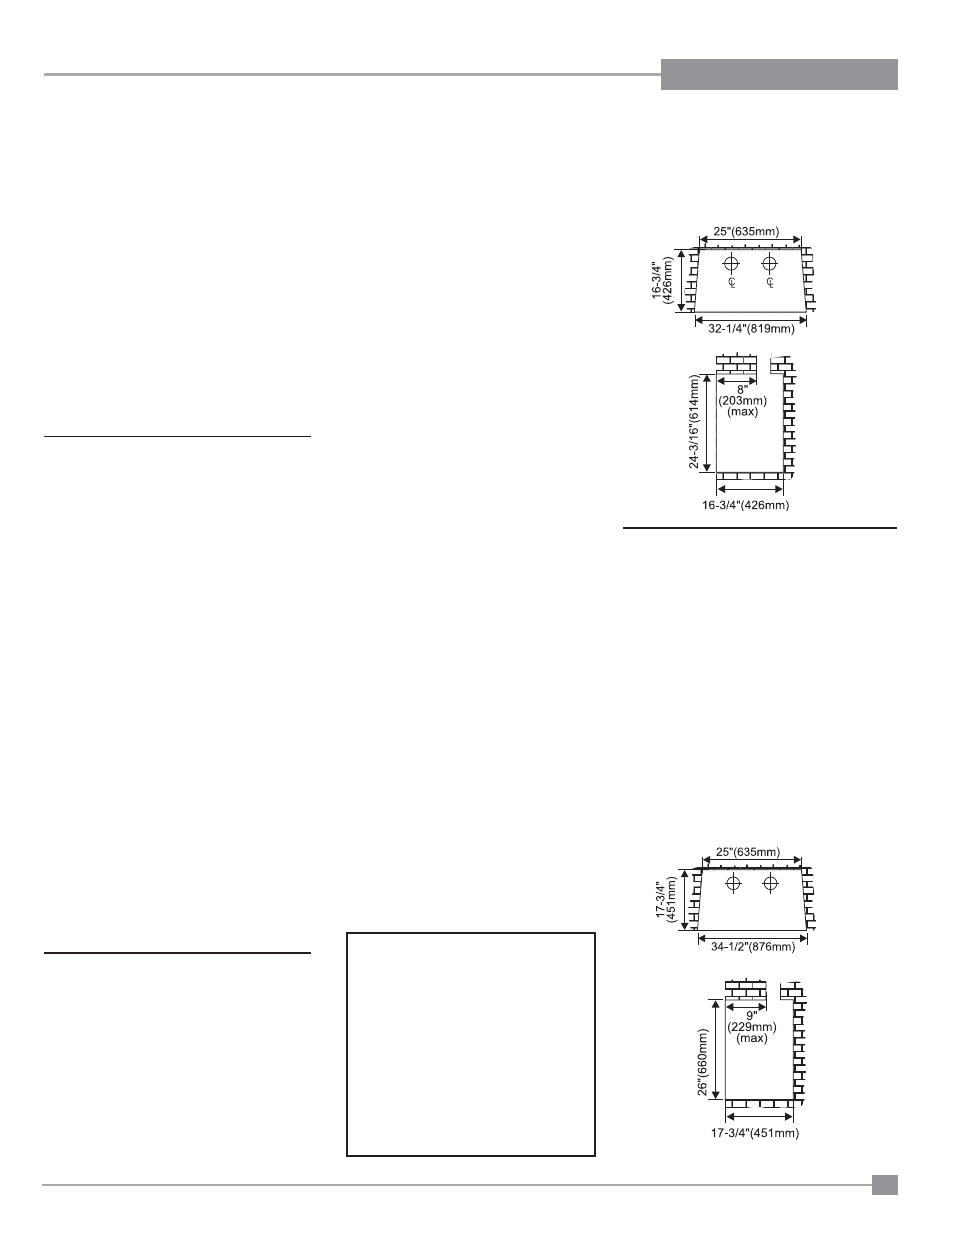
MINIMUM FIREPLACE
OPENING
The minimum fi replace opening for the FPI gas
fi replace insert is shown in the following diagrams:
WARNING:
Electrical Grounding
Instructions
This appliance is equipped with
a three pronged (grounding) plug
for your protection against shock
hazard and should be plugged
directly into a properly grounded
three-prong receptacle. Do not cut
or remove the grounding prong
from this plug.
NOTE: If you are installing the Excalibur
®
, the
minimum fi replace dimensions are as follows:
Width (at front):
34-1/2" (876mm)
Depth: 17-3/4"
(451mm)
Height:
26" (660mm)
7-1/8”
(200mm)
Low profile
MINIMUM FIREPLACE
OPENING EXCALIBUR
®
OPTION
The minimum fi replace opening for the FPI gas
fi replace insert is shown in the following diagrams: