Graff 1/2” AND 3/4” THERMOSTATIC MIXING VALVE User Manual
Page 9
8
c u t t i n g e d g e d e s i g n
Instructions for assembly and use • Montage- und Gebrauchsanweisung • Notice technique montage et utilisation • Инcтрукция по монтажу и обслуживанию • Instrucción de Montaje y Servicio • Manuale di Montaggio e Uso
9
IOG 2194.00
Rev. 2 May 2010
GB D
F RUS E
I
THERMOSTATISCHES MISCHVENTIL 1/2” UND 3/4”
VANNE DE MÉLANGE THERMOSTATIQUE 1/2” ET 3/4” • ТЕРМОСТАТИЧЕСКИЙ СМЕШИВАЮЩИЙ КЛАПАН 1/2” И 3/4”
LA VÁLVULA MEZCLADORA TERMOSTÁTICA 1/2” Y 3/4” • VALVOLA MISCELATRICE TERMOSTATICA 1/2” I 3/4”
1/2” AND 3/4” THERMOSTATIC MIXING VALVE
4.2
R1
Thermostatic valve
Thermostatischer
Mischventil
Vanne de mélange thermostatique
Термостатический
смесительный клапан
Válvula termostática
Valvola miscelatrice termostatica
R2
Temperature limiting
ring
Temperaturbegrenzer
Limiteur de température
Температурный ограничитель
Anillo limitadore temperatura Limitatore di temperatura
T1
Sleeve
Hülse
Douille
Втулка
Casquillo
Boccola
T2
O-ring seal
O-Ringdichtung
Joint torique
Сферическая прокладка (о-ринг)
Sellador de anillo
Guarnizione tipo o-ring
T3
Indicator ring
Hülse mit Anzeiger (Markierung) Douille avec indicateur (marqueur)
Втулка с маркером (обозначением) Anillo indicador
Boccola con indicatore (marcatura)
T4
Teflon slip ring
Teflongleitring
Rondelle de friction en Téflon
Тефлоновое скользящее кольцо
Anillo de corredera de teflon
Anello di usura di teflon
T5
Temperature scale dial Temperaturteilung
Echelle de température
Температурная шкала
Disco de la escala de
tempeturas
Scala di temperatura
T6
Screw with washer
Schraube mit Unterlegscheibe
Vis avec rondelle
Винт с подкладкой
Tornillo con arandela
Vite con rondella
T7
Spline adapter
Adapter der Keilwelle
Adaptateur cranté
Адаптер стержня
Conector de polichaveta
Adattatore della chiavetta
T8
Short screws (2 pieces) Kurze Schrauben (2 Stück)
Vis courtes (2 pièces)
Короткие винты (2 шт.)
Tornillos cortos (2 piezas)
Viti corte (2 pezzi)
GB
D
F
RUS
E
I
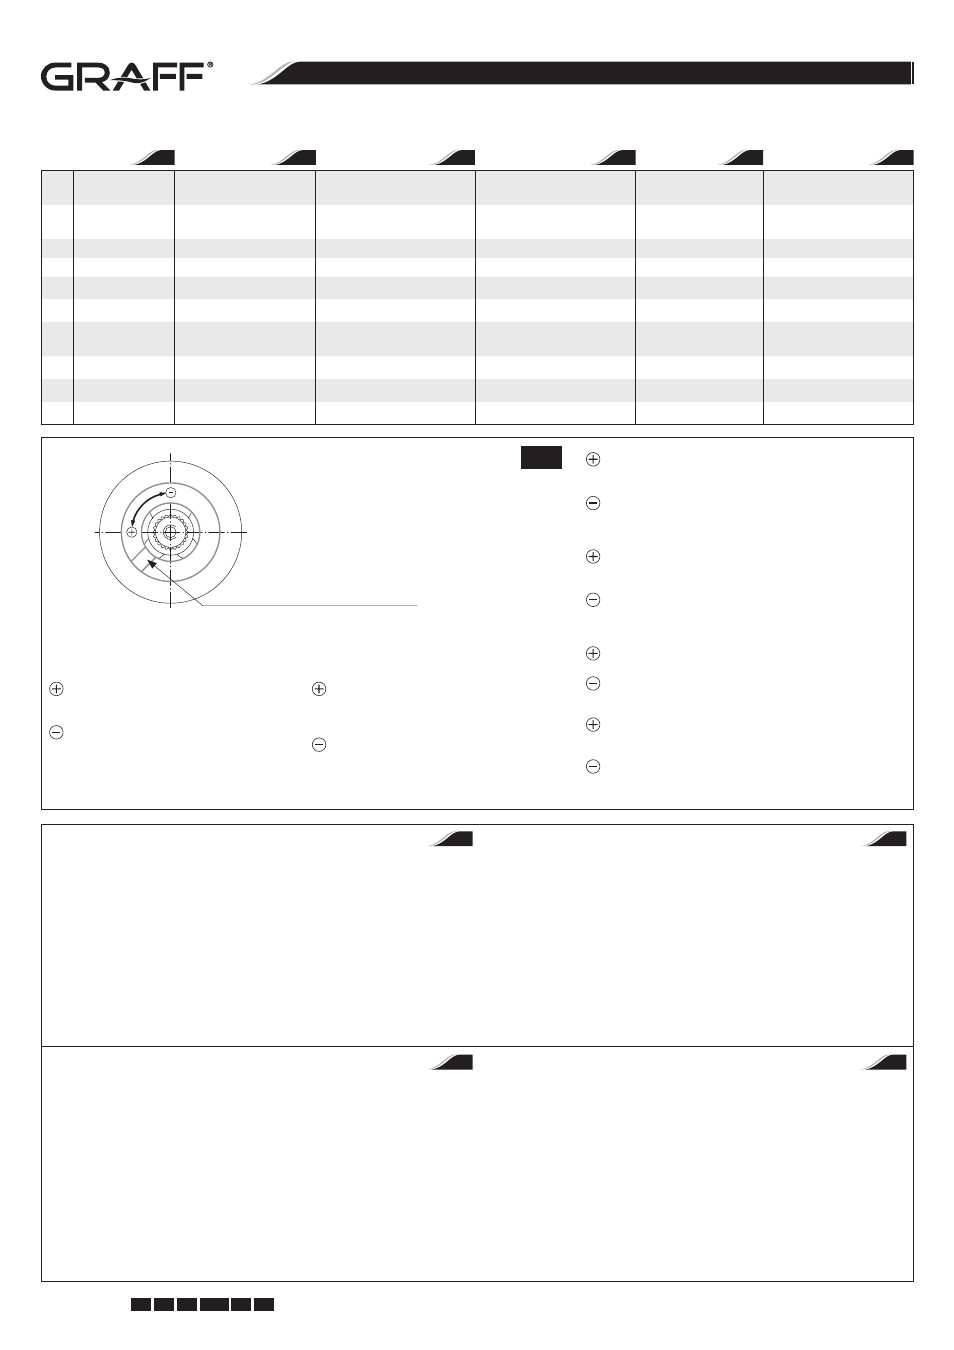
Correct position of the temperature limiting ring
Richtige Einstellung des Temperaturbegrenzers
Réglage correct du limiteur de température
Правильная настройка температурного ограничителя
La posición correcta del anillo limitador de temperatura
Impostazione corretta del limitatore di temperatura
Higher setting of maximum temperature – re-
move the temperature limiting ring from the
stem and rotate the ring counterclockwise.
Lower setting of maximum temperature – re-
move the temperature limiting ring from the
stem and rotate the ring clockwise.
Einstellung der höheren Maximaltemperatur – Tem-
peraturbegrenzer von der Keilwelle abnehmen (den
Dorn, die Spindeln) und den Begrenzer entgegen
der Uhrzeigerrichtung (nach links) drehen.
Einstellung der niedrigeren Maximaltemperatur –
Temperaturbegrenzer von der Keilwelle abnehmen
(den Dorn, die Spindeln) und den Begrenzer im
Sinne der Uhrzeigerrichtung (nach rechts) drehen.
Réglage d’une température maximale plus haute : retirez le limi-
teur de température de l’adaptateur cranté (tige) et tournez le
limiteur dans le sens antihoraire (à gauche)
Réglage d’une température maximale plus basse : retirez le limi-
teur de température de l’adaptateur cranté (tige) et tournez le
limiteur dans le sens horaire (à droite)
Увеличение крайней высокой температуры – снимите тем-
пературный ограничитель со стержня и поверните его в на-
правлении против часовой стрелке (на лево)
Снижение крайней высокой температуры – снимите темпе-
ратурный ограничитель со стержня и поверните его в на-
правлении согласно часовой стрелке (на право)
Temperatura máxima más alta – quite el anillo limitador de tem-
peratures del la espiga y gírelo el anillo hacia la izquierda
Temperatura máxima más baja– quite el anillo limitador de tem-
peratures del la espiga y gírelo el anillo hacia la derecha
Impostazione di temperatura più alta, massima – togli il limita-
tore di temperatura dalla chiavetta (stelo, fuso) e gira il limitato-
re in senso antiorario (a sinistra)
Impostazione di temperatura più bassa, massima – togli il limi-
tatore di temperatura dalla chiavetta (stelo, fuso) e gira il limita-
tore in senso orario (a destra)
THE VALVE OPERATION CHECK
1. Turn on the water again, and rotate the temperature scale dial fully clock-
wise. Then rotate the dial counterclockwise to the 38°C position.
2. Use a thermometer to determine the water temperature, which should be
about 38°C at this position.
3. After determining the water temperature at the 38°C position, turn the dial
counterclockwise to the second position (the maximum temperature limit
stop).
4. Use the thermometer to determine the water temperature at the second
position, which must not exceed 49°C. If the maximum temperature must
be adjusted, repeat the mixing valve calibration steps or see „Maximum
Temperature Limit Adjustment” section.
PRÜFUNG DER WIRKUNGSKORREKTHEIT DES VENTILS
1. Wasser erneut laufen lassen und den Knopf der Temperaturskala bis zum
Anschlag rechts umdrehen. Anschließend den Knopf links umdrehen und
auf Position 38°C einstellen.
2. Mit Thermometer die Temperatur des Auslaufswassers prüfen. Es soll zirka
38° C ind dieser Stellung sein.
3. Nach der Bestimmung der Wassertemperatur in der Stellung 38°, den
Knopf links bis zum Anschlag umdrehen (Maximaltemperaturbegrenzer).
4. Mit Thermometer die Temperatur des Auslaufswassers in der oberen Stel-
lung prüfen. Sie soll nicht 49°C überschreiten. Wenn die Einstellung der
Maximaltemperatur korrigiert werden soll, die Kalibrierung des Ventils
wiederholen oder den Abschnitt „Regelung der Maximaltemperaturbegren-
zung” durchlesen.
VERIFICATION DU FONCTIONNEMENT DE LA VANNE
1. Ouvrez à nouveau l’arrivée d’eau et tournez le sélecteur rotatif de l’échelle
de température à droite jusqu’au contact. Puis, tournez le sélecteur rotatif à
gauche et réglez-le sur la position 38°C.
2. A l’aide d’un thermomètre, vérifiez la température de l’eau à la sortie. Sur
cette position, elle doit être de 38°C environ.
3. Après avoir déterminé la température de l’eau sur la position 38°C, tour-
nez le sélecteur rotatif à gauche jusqu’au contact (limiteur de température
maximale).
4. A l’aide d’un thermomètre, vérifiez la température de l’eau à la sortie sur
la position maximale. Elle ne doit pas dépasser 49°C. S’il est nécessaire de
corriger le réglage de la température maximale, procédez à un nouveau
calibrage de la vanne ou référez-vous à la section « Réglage de la limitation
de la température maximale ».
ПРОВЕРКА ПРАВИЛЬНОЙ РАБОТЫ ПРИБОРА
1. Включите воду и поверните регулятор температуры до упора на право.
Потом поверните его на лево и поставьте на позиции 38°C.
2. Проверьте градусником температуру выходящей воды. Должно быть
ок. 38° C в этой позиции.
3. После определения температуры воды в позиции 38°, поверните во-
роток (регулятор) на лево, до упора (ограничитель максимальной тем-
пературы).
4. Проверьте градусником температуру выходящей воды в верхней по-
зиции. Она не должна превышать 49°C. Если установка максимальной
температуры должна быть откорректирована, повторите калибровку
клапана или прочитайте раздел „Регулировка ограничения максималь-
ной температуры”.
GB
D
RUS
F