Graff SHOWER BASKET User Manual
Page 2
c u t t i n g e d g e d e s i g n
KORB FÜR DIE DUSCHKABINE
PANIER PORTE-SAVON POUR LA CABINE DE DOUCHE • КОРЗИНКА ДЛЯ ДУШЕВОЙ КАБИНЫ
CESTA PARA CABINA DE DUCHA • CESTELLO PER LA CABINA DOCCIA
2
IOG 2373.40
Rev. 1 April 2010
SHOWER BASKET
Instructions for assembly and use • Montage- und Gebrauchsanweisung • Notice technique montage et utilisation • Инcтрукция по монтажу и обслуживанию • Instrucción de Montaje y Servicio • Manuale di Montaggio e Uso
GB D
F RUS E
I
1 Corner basket
/oblong basket
Eckkorb
/Längskorb
Porte-savon d’angle
/Porte-savon allongé
Угловая корзинка
/продолговатая корзинка
Cesta de esquina
/Cesta alargada
Cestello angolare
/Cestello oblungo
2 Cap (4 pcs.)
Blindplatte (4 Stck.)
Bouchon (4 pièces)
Заглушка (4 шт.)
Obturador (4 unid.)
Tappi (4 pezzi)
3 5x0.9 O-ring (4 pcs.)
O-Ring 5x0,9 (4 Stck.)
Joint torique 5x0,9
(4 pièces)
O-ринг 5x0,9 (4 шт.)
Junta tórica 5x0,9
(4 unid.)
O-ring 5x0,9 (4 pezzi)
A Ø6x30 peg (4 pcs.)
Dübel Ø6x30 (4 Stk.)
Cheville Ø6x30
(4 pièces)
Штифт Ø6x30 (4 шт.)
Pasador Ø6x30
(4 unid.)
Tassello Ø6x30
(4 pezzi)
B 3.5x40 screw (4 pcs.)
Schraube 3,5x40 (4 Stk.) Vis 3,5x40 (4 pièces) Винт 3,5x40 (4 шт.)
Tornillo 3,5x40 (4 unid.) Vite 3,5x40 (4 pezzi)
GB
D
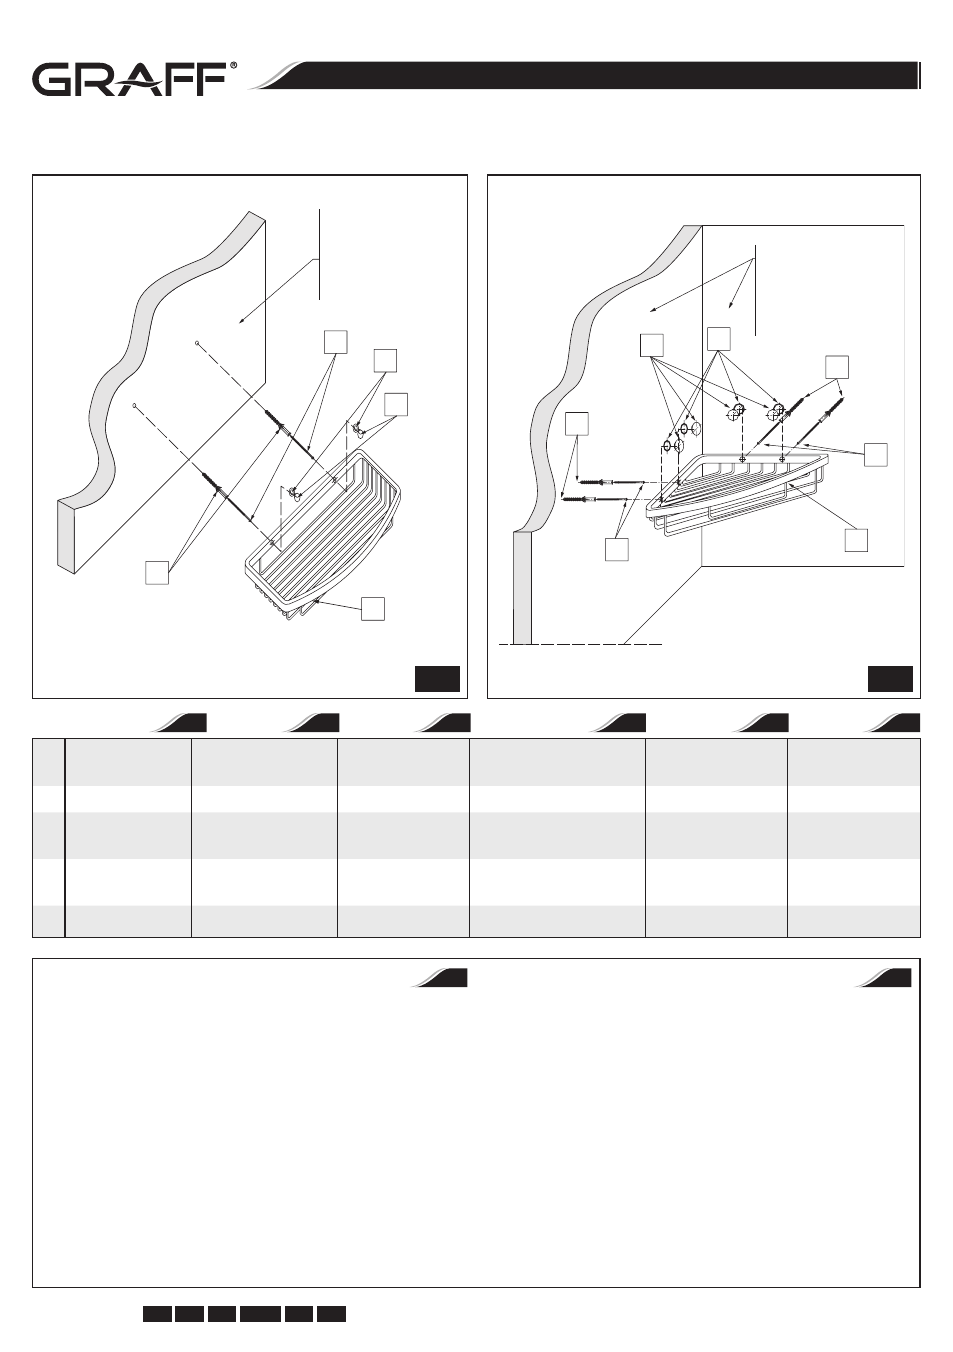
OBLONG BASKET INSTALLATION – see fig. 1
CORNER BASKET INSTALLATION – see fig. 2
1. Taking the user’s needs into account, select an appropriate
place on the wall for the installation of the basket.
2. Mark the locations of 4 holes (according to spacing of open-
ings in the basket).
3. Drill 4 Ø6mm holes in the previously marked places. If in-
stalling the basket on ceramic tiles, drill Ø6mm holes in the
grout join (if possible).
4. Insert a rawlplug (A) into the drilled holes. Position the bas-
ket (1) above the holes in the wall, then insert and screw in
the screws (B). Tighten all screws.
5. Insert O-rings (3) onto caps (2) and the press the caps (2)
into the holes.
MONTAGE DES LÄNGSKORBES – sieh Abb. 1
MONTAGE DES ECKKORBES – sieh Abb. 2
1. Wählen Sie eine entsprechende Stelle an der Wand für die
Korbmontage. Berücksichtigen Sie die Bedürfnisse der Be-
nutzer.
2. Markieren Sie die Stelle für 4 Öffnungen (gemäß Lochab-
stand im Korb).
3. 4 Ø6mm - Löcher an früher markierten Stellen bohren. Bei
der Montage an den Fliesen sind Ø6mm-Öffnungen in der
Fuge zu bohren (falls es möglich ist).
4. In die Löcher die Spreizdübel (A) einsetzen. Den Korb (1)
über die Wandlöcher positionieren und danach die Schrau-
ben (B) anziehen. Alle Schrauben anziehen.
5. Die O-Ringe (3) auf die Verschlussstopfen (2) aufsetzen und
dann die Verschlussstopfen (2) in die Öffnungen hineindrücken.
GB
D
B
3
2
A
1
A
B
A
B
3
2
1
1
2
F
RUS
E
I
Finished wall
Ausbauwand
Panneau de finition
Отделочная стенка
Pared de acabado
Parete di finitura
Finished wall
Ausbauwand
Panneau de finition
Отделочная стенка
Pared de acabado
Parete di finitura