Gamber-Johnson 7160-0536 User Manual
Page 3
required. Gamber-Johnson specifically disclaims any responsibility for the improper use or installation of its products not consistent with the original vehicle manufactures specifications
Product Mounting Disclaimer
Gamber-Johnson is not liable under any theory of contract or tort law for any loss, damage, personal injury, special, incidental or consequential damages for personal injury or other damage
of any nature arising directly or indirectly as a result of the improper installation or use of its products in vehicle or any other application. In order to safely install and use Gamber-Johnson
products full consideration of vehicle occupants, vehicle systems (i.e., the location of fuel lines, brakes lines, electrical, drive train or other systems), air-bags and other safety equipment is
and recommendations, Gamber-Johnson product instruction sheets, or workmanship standards as endorsed through the Gamber-Johnson Certified Installer Program.
If you need assistance or have questions, call Gamber-Johnson at 1-800-456-6868
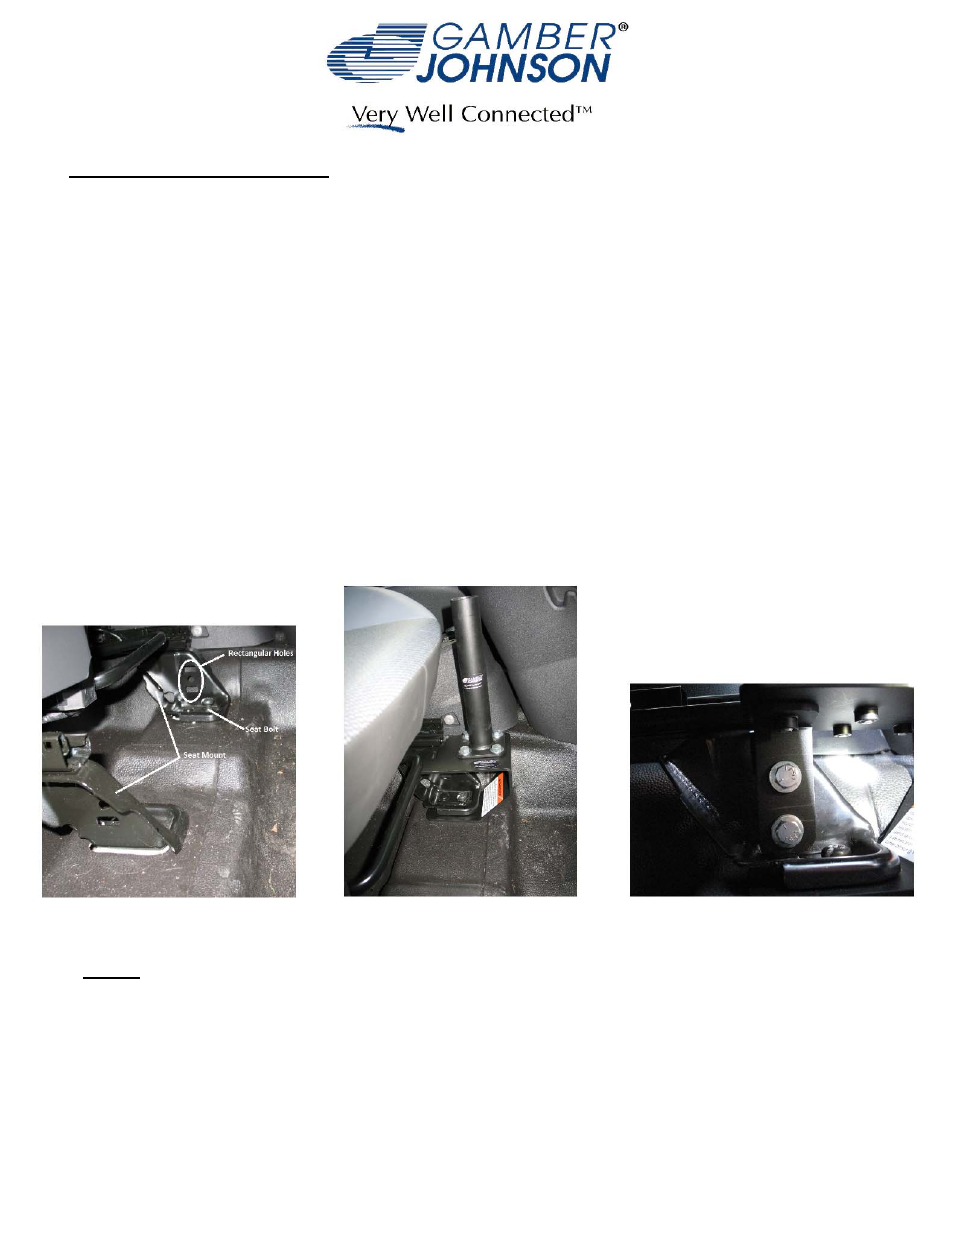
Figure 3
Figure 1
Notes:
Figure 2
INSTALLATION INSTRUCTIONS:
1. Installing the vehicle base might result in reducing the passenger seat travel.
Remove the two front seat bolts with a T-50 bit. See Figure 1.
1.
Slide the base between the seat mounts and the floor. See Figure 2
2.
Put the seat bolts back but do not completely tighten them (this would allow some
3.
flexibility/movement for completing the installation of the base).
With a hex head bolt and washer provided, through the slot in the top of base, attach
4.
the L-bracket to the base. Again do not completely tighten the bolt. See Figure 3.
Now, allign the holes of the L-bracket with the rectangular holes of the seat mount and
5.
the base pems. Bolt the remaining hardware through these holes and tighten them
completely. See Figure 1 and Figure 3.
Tighten the hex head bolt on the top and finally tighten the seat bolts.
6.
The base is now ready to install the lower pole, upper pole and motion attachments
7.
etc. See Figure 2.
Use the remaining hardware to install a pole to the base.
8.
© Copyright 2014 Gamber-Johnson, LLC