Feiss OL4011 User Manual
Assembly i nstructi ons for ol4011, Fig. 1, E) 9/05
(E) 9/05
M U R R A Y F E I S S
© MURRAY FEI SS I MPORT LLC.
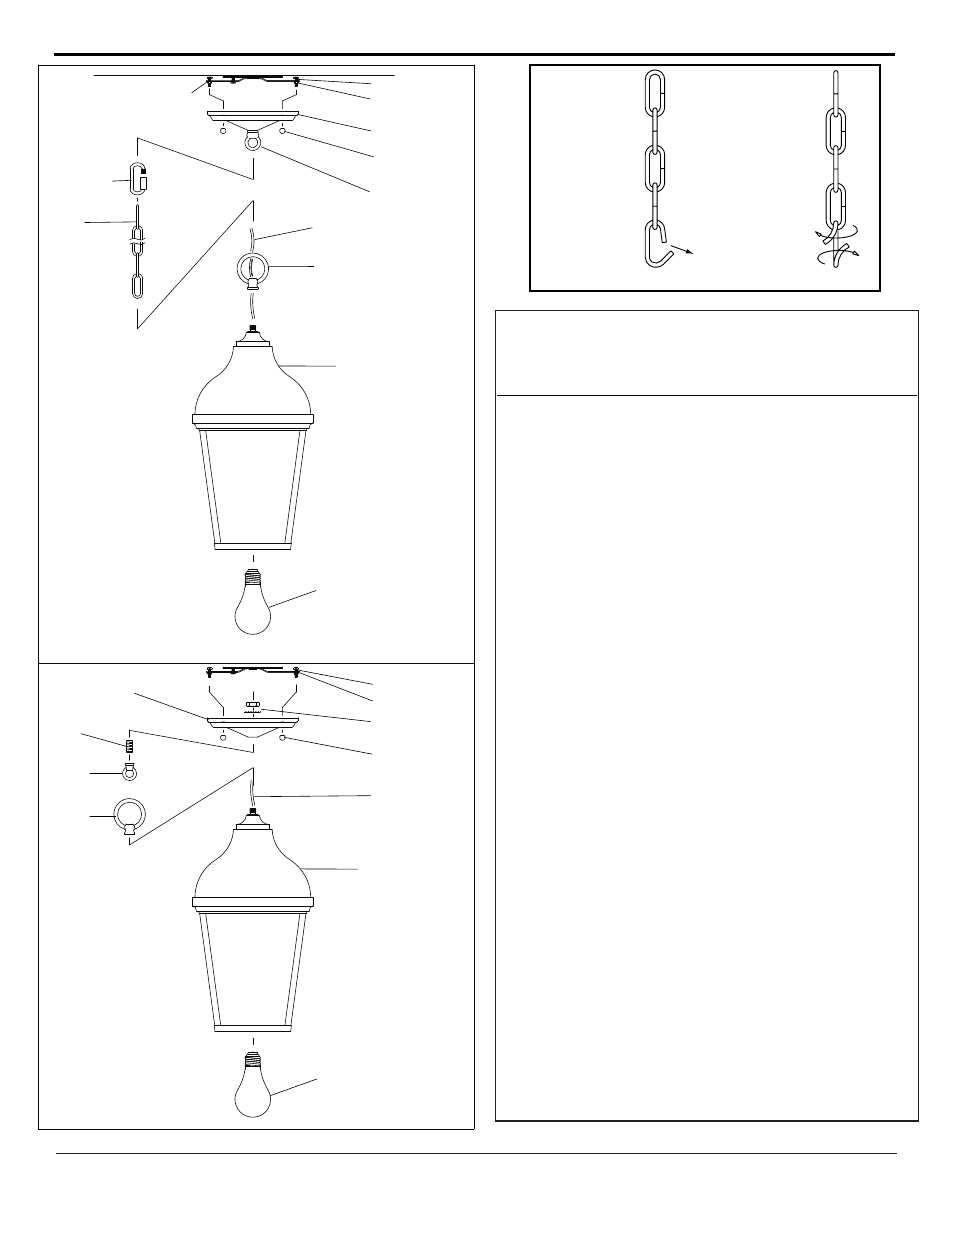
ASSEMBLY I NSTRUCTI ONS FOR OL4011
Machine Screw
Small Hex Nut
Fixture Plate
Fixture Plate
Ball Cap Nut
Canopy Loop
Adjustable
Chain Link
Fig. 1
CHAIN HUNG
INSTALLATION
Fig. 2
FLUSH MOUNT
INSTALLATION
Chain
Mounting Bar
Fixture Wires &
Ground Wire
Fixture Loop
Fixture
Loop
Lantern
Lantern
Bulb
(not included)
Canopy
Threaded Pipe
Canopy
Loop
Fixture Wire &
Ground Wire
Ball Cap Nuts
Hex Nut &
Lock Washer
Mounting Bar
Machine Screw
Bulb
(not included)
IMPORTANT
TURN OFF POWER AT MAIN FUSE OR CIRCUIT
BREAKER BOX BEFORE STARTING
INSTALLATION
Carefully unpack and identify all parts before
beginning assembly. Bulb not included.
1
.
Install light bulb (not included). See relamping label at
socket area for type and maximum allowed wattage.
2
.
This fixture can be mounted onto ceiling either as chain
hung or flush mount:
CHAIN HUNG INSTALLATION- Fig. 1:
A. Take fixture wire (with plastic insulation) and ground
wire and thread through fixture loop. Then install loop
onto threaded pipe located at top of lantern.
B. At this point, determine the desired length of chain
to hang. Remove any unwanted links by following
above Fig 3.
C. Take bottom open link of chain and hook onto fixture
loop. Then close back link.
D. Install the adjustable chain link onto top end of chain
and onto canopy loop. Then secure by closing the
adjustable chain link.
E. Take ground wire and weave thru above chain links,
then thread thru center hole in canopy loop. Repeat with
fixture wire.
FLUSH INSTALLATION- Fig. 2:
A. Remove canopy loop and threaded nipple from
fixure plate by loosing hex nut at top. Set aside flat
washer, lock washer and hex nut.
B. Thread fixture wire (with plastic insulation) and
ground wire through fixture plate, flat washer, lock
washer and hex nut. While removing any slack of wire
in between secure all together by tightening hex nut.
3. Cut excess wires leaving only 6" (15cm) length of
wires above canopy. Split fixture wire into two strands.
Then strip off 3/4" (19mm) of outer plastic insulation.
4. Follow enclosed “Fixture Installation Instructions” for
electrical and fixture installation onto ceiling outlet box.
Correct
Incorrect
Pull ends of
link to open.
We
recommend
use of chain
pliers, which
are designed
for this
purpose. (Not
included)
Twisting ends to
open chain may
cause links to
snap apart.
Do not open
chains this way.
Note: Chain
length should be
determined prior
to installation of
lighting fixture.
It is not
recommended to
adjust chain
height with
fixture attached.
Fig. 1