Feiss F2530 User Manual
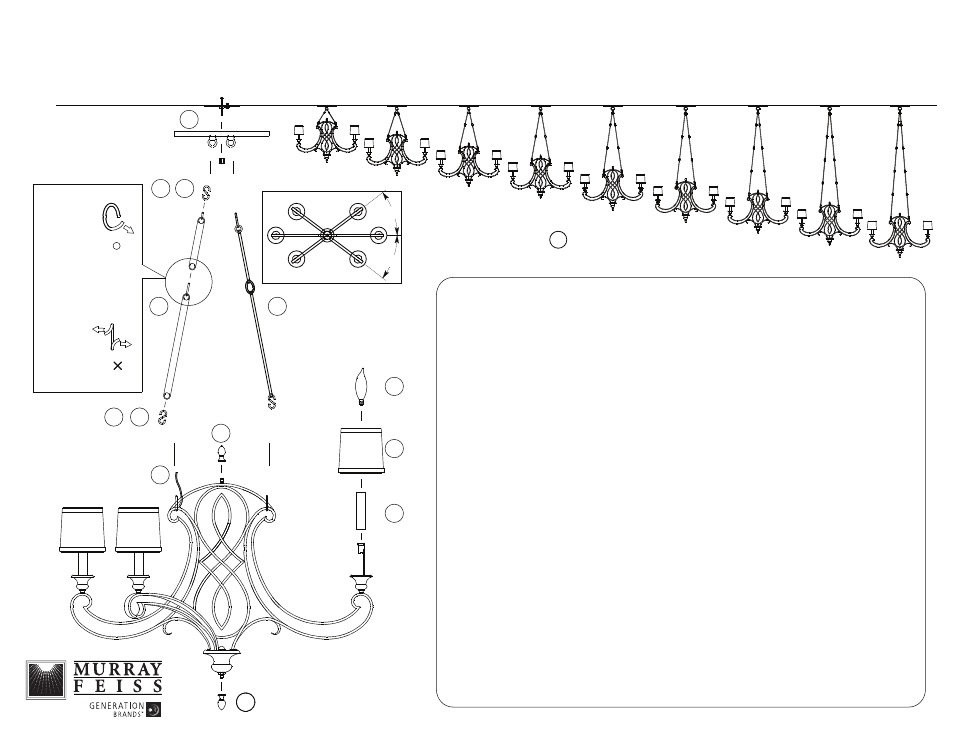
Assembly instructions for, Fig. 1, E) 11/09
IMPORTANT
TURN OFF THE POWER AT THE MAIN FUSE OR CIRCUIT BREAKER BOX BEFORE
STARTING INSTALLATION
Carefully unpack and identify all parts before
assembly. Bulbs not included.
1. Attach suspension arms:
A. Choose desired installation height based on dimensions shown in above diagram. Desired heights
can be achieved using different combination of suspension arms.
B. To combine suspension arms, carefully bend open the oval link and then hook onto other arm.
Then close the link. See Fig. 1 for proper way to open and close the oval link.
Note: Additional suspension arms can be purchased to increase installation height. However do not
add more suspension arms that will leave less than 6" (15 cm) of fixture wires above fixture plate.
C. Take fixture wires and ground wire and thread through suspension arms. Note correct position of
suspension arms from left diagram.
D. Hook an S-hook onto bottom end of suspension arm, then hook another S-hook onto top end of
suspension arm.
E. While pulling fixture wires from above, hook bottom end of suspension arm onto fixture loop.
F. Hook upper end of suspension arm onto canopy loop.
G. Repeat other side.
2. A. Install finial by screwing onto top of fixture.
B. Install another finial by screwing onto bottom of fixture.
3. Follow enclosed supplement installation instructions for electrical and fixture installation onto house
outlet box. If you do not have an outlet box at desired location to attach the fixture then hire a
qualified electrician to create one.
4. Slip candle tube over sockets.
5. Install shade over candle tube.
6. Install light bulb (not included). See relamping label at socket area for type and maximum allowed
wattage.
IMPORTANT: To prevent fixture from hanging tilted, make certain four smaller arms are turned and
located as shown in fig. 2.
Assembly Instructions For
F2530/6
(E) 11/09
31-3/8"
2B
Fig. 1
Pull ends of link to
open. We
recommend
use of chain
pliers, which are
designed for
this purpose.
(Not included)
Do not open
chains this way.
Note: Desired
length should be
determined prior
to installation of
lighting fixture.
It is not
recommended to
adjust height with
fixture attached
Twisting ends to
open chain may
cause links to
snap apart.
2A
1G
1B
1E 1D
1C
3
1F 1D
58-1/4"
4
5
6
51-7/8"
45-1/8"
38-5/8"
71-1/4"
84-1/4"
77-7/8"
64-7/8"
35.5"
35.5"
FIG. 2 TOP VIEW
1A