Measure layout, 9important, Take down – Anchor CENTURY 60 WIDE User Manual
Page 12: 10 final side pole adjustment, Raise center poles
12
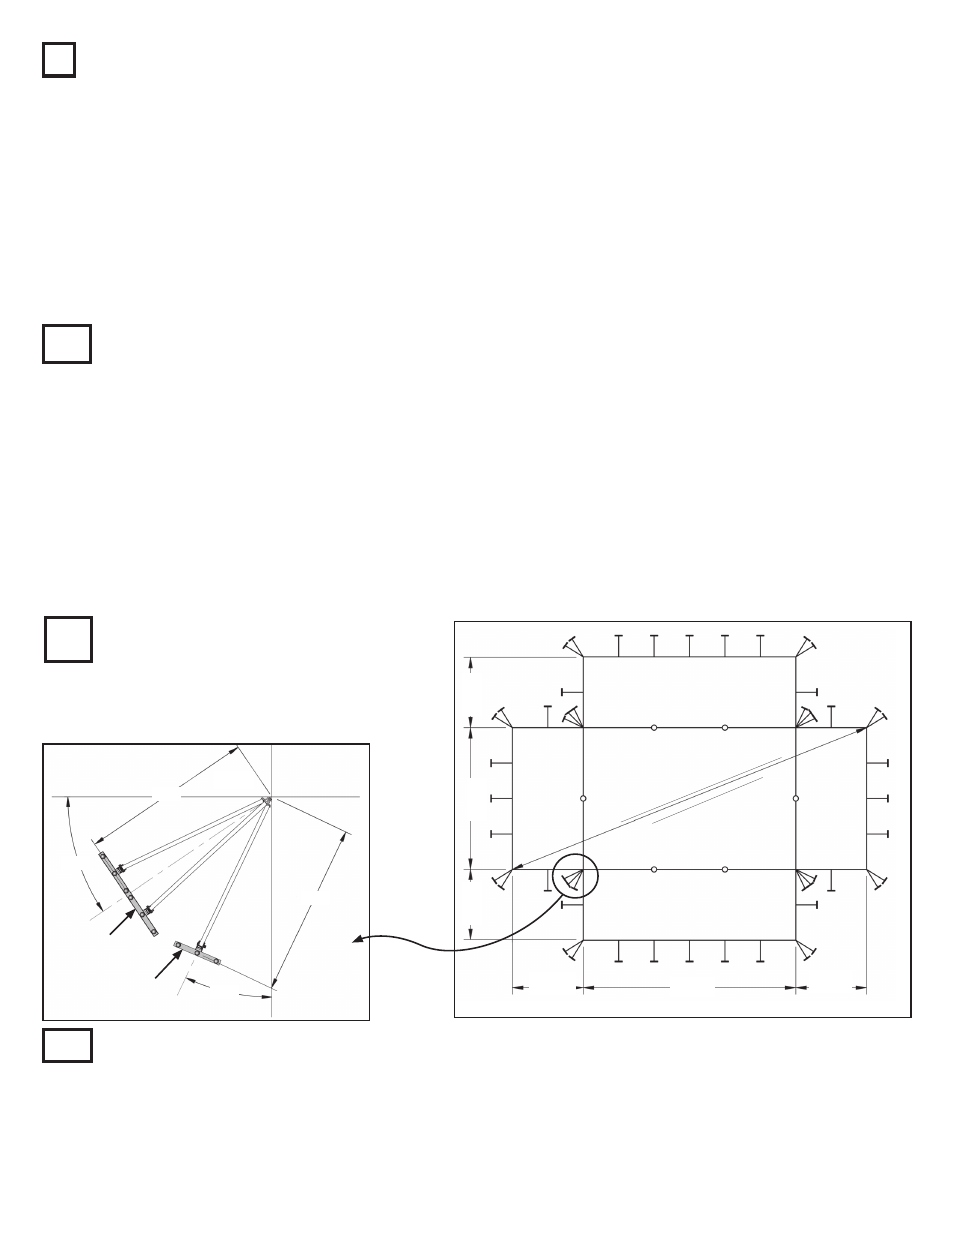
MEASURE LAYOUT
Mark location of stake line, tent line and
center poles.
(See pages 6 thru 8)
1a
SUPPLEMENTAL INSTRUCTIONS FOR TENTS WITH CENTER SECTIONS
USE WITH STEPS 1 THROUGH 8
60’ END
LOOP SIDE
40’ x 60’
CENTER
60’ END
HOLE SIDE
60’-0”
40’
END
LOOP
SIDE
20’-0”
20’-0”
USE DIAGON
AL M
EASU
REMENT
TO SQUARE LAYOUT
40’-0”
40’
END
HOLE
SIDE
34º
40 x 60
Center
END
END
7’-0”
7’-0”
25º
2’ STAKE
BAR
4’ STAKE
BAR
20’-0”
20’-0”
9
IMPORTANT
Check guys periodically for tightness and
maintenance of good condition.
Stakes provided are for average soil conditions.
Sandy soil or asphalt may require additional
staking. Proper installation suitable to site
conditions is the responsibility of the installer.
Store tent in a cool, dry area. Never store while
wet or damp.
TAKE DOWN
USE EXTREME CAUTION REMOVING
ALL POLES
1. Spread ground cover.
2. Loosen tension on all web winches.
3. Slant side poles inward.
4. Remove center and side poles.
5. Reverse installation steps.
10
FINAL SIDE POLE
ADJUSTMENT
With side poles standing vertical and bases
at the marked side pole footprint locations,
ratchet webs to tension the top evenly.
Due to changes in climactic conditions,
periodic inspection and adjustment should
be made.
Protective covers are recommended for all
stakes and stake bars.
7a
RAISE CENTER POLES
Raise center poles on end nearest to wind direction to approximate position (see page 12 for further
instructions). Continue raising the center poles in this manner until the center section is reached. At the
center section, raise the next two poles on the center section at the same time as the center poles on
the last mid section.
*
See asterisks on drawing above. After these poles are raised, continue out to all
sides of center section until all center poles are raised and secure.
*
*
*
*