Led linear wall washer – American Lighting LW36X1-RGB User Manual
Page 3
LED Linear Wall Washer
Safety instructions for LW12X1-RGB, LW24X1-RGB and LW36X1-RGB
RV-1328
Page 3 of 4
CONTROLLER INSTALLATION
Note: Simple effects (such as fixed color, color sequence
and color wash) do not require a controller. Each fixture
is factory-set to ID = 1 as indicated on the lighted screen on the
back of the array. If the ID is left as 1, the unit will begin to advance
through a factory-set color sequence. LW36-CON will produce
syncronous color changing mixes (see below for overview).
For advanced lighting “scenes”, use DMX software*, and LW36-XLR3 (XLR3 adapter cable XLR3); each sold
separately. See page 4 for more info.
1. Determine the location of the controller and plug in the controller. (If your installation uses more than one
controller, please consult factory.) Refer to the controller instructions for user programming instructions.
2. Connect the controller‘s data output cable (mini 3-pin female) directly to the data input cable of the fixture
(mini 3-pin male) or interconnect using 15’ signal cable, (part number LW36-EC15, sold separately), if
needed. See also Figure 2 on previous page.
3. Daisy-chain the remaining fixtures directly or with 15‘ signal cables, as needed.
The LW36-CON will control up to 30 fixtures. Use LW-END to cap off last ”signal out” cable to prevent
signal bounce-back. Indoors, power can be linked via LW36-EX-15, up to10 fixtures maximum. Outdoors,
provide a GFCI weatherproof outlet within 7’ of each fixture location.
For wireless signal connection (no signal cables between fixtures), see following page.
*Specialized DMX software will allow multiple IDs for advanced effect lighting. All fixtures
connected to the LW36-CON controller will automatically syncronize. When using DMX 512
software, refer to that manufacture’s instructions.
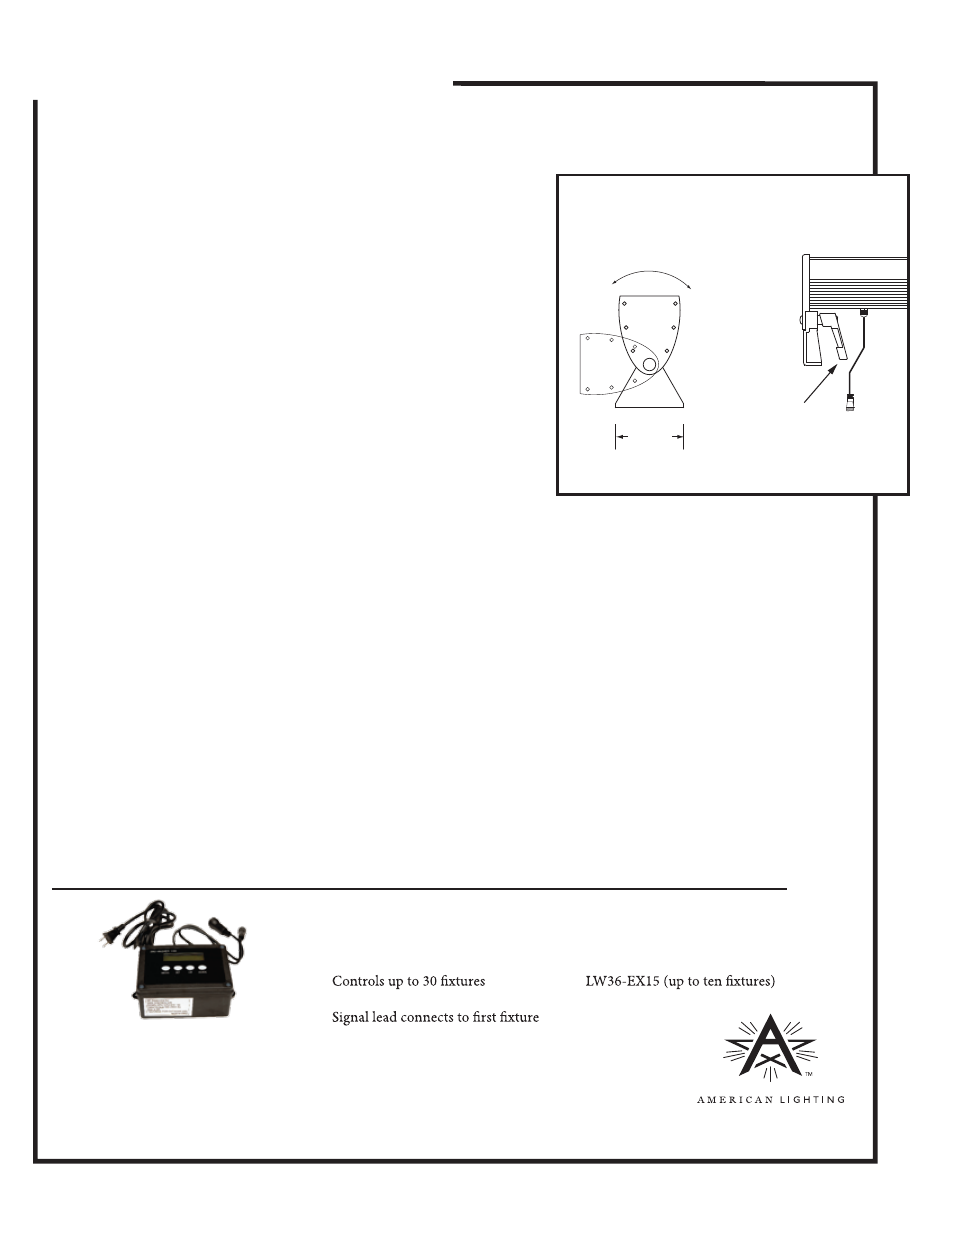
The aiming angle can be adjusted
CONTINUED FROM PAGE 2
0~300˚
2-1/16”
End View
Figure 4
5. Loosen adjustment handles on each end, rotate and hold
the light in the desired position with the LED Wall Washer
facing the surface to be lighted, then re-tighten the
handles to hold the tilt angle. Repeat for any additional
fixtures. See Figure 4.
6. Interconnect fixtures’ signal cables per lighting plan and
connect first fixture’s input cable to controller.
7. Plug fixtures and controller into grounded AC outlets.
Tilt angle
adjustment handle
(one on each end)
Side View
LW36-CON: OVERVIEW
LW36-CON Fade Controller
Features and functions
Compatible items
• Seven preset colors (Red, Green, Yel-
low, Blue, Purple, Cyan and White)
• Multiple pre-programmed color
sequences and fades
•
• Six foot 120V AC power cord
•
via data input cable (LW36-EC15)
• DMX input
• LW36-RGB
• LW36X1-RGB, LW24X1-RGB,
LW36X1-RGB
• LW36-EC15 (up to 3000 feet)
•