Led t8 tube, Continued on next page – American Lighting LT8-4841-1700 User Manual
Page 3
RV-1333
Page 3 of 4
LED T8 Tube
Installation instructions for LT8-4841-1700
©2013 American Lighting
Denver, CO 80231 Made in China
www.americanlighting.com
NON-SHUNTED SOCKET INSTALLATION AND FIXTURE MODIFICATION
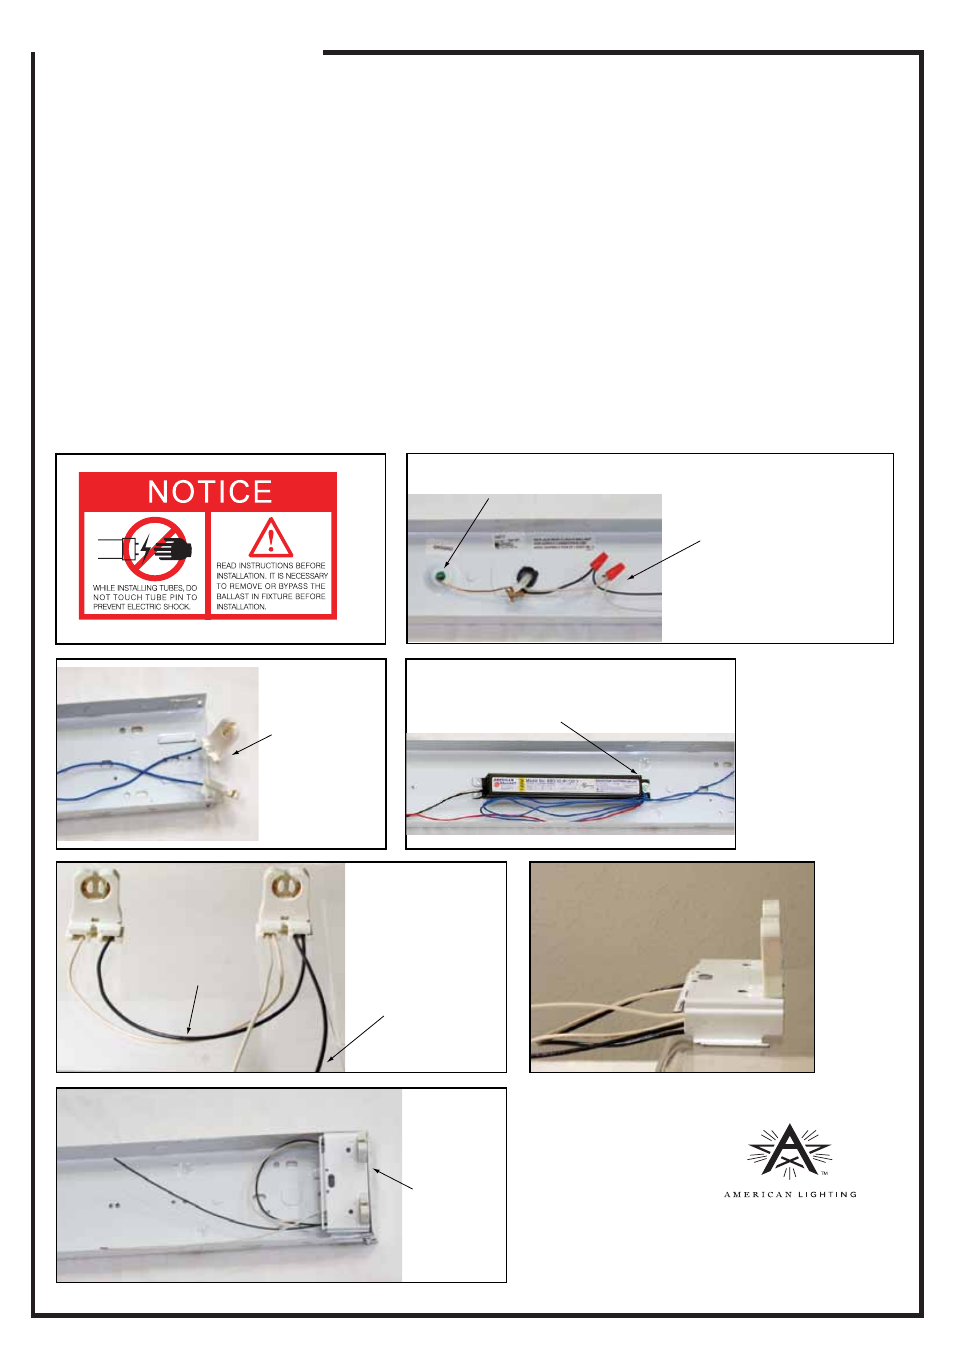
Note: The “live end” of the LED T8 Tube is marked with red sticker and a product label. See Figure 1.
1. Determine which end of the luminaire will receive AC power. This will be the “live end”. The opposite end will be the “dead end”.
2. Be sure power is shut off at source! Remove lens where applicable and remove ballast cover.
3. Attach ground wire (from AC supply) to ground screw or if already attached, confirm the connection is solid. See Figure 2.
4. Disconnect the supply wires (black and white wires). See Figure 2.
5. Remove the end cap of the luminaire’s housing and remove the existing sockets (also known as a “tombstones”) from the live
end for each LED T8 Tube by lifting or unseating them from mounting slots. See Figure 3.
6. Remove the ballast from the fixture. See Figure 4.
7. Cut one black and one white 18-gauge solid copper wire (not included) to approximately 12” length and strip ends to 3/8”.
Cut one more or each color wire, making sure you have enough wire to reach from the end of the luminaire to the supply wires
(approximately 30”).
8. For a two light luminaire, attach 12” black and white wires between sockets and longer lengths to one socket, providing
lead wires to reach supply wires. See Figure 5.
9. Push the new sockets into the mounting slots until they are flush. See Figure 6.
10. Replace the luminaire’s end cap with the new sockets securely mounted to the live end of the luminaire. See Figure 7.
------ continued on next page ------
Figure 1
Figure 3
Figure 2
Attach ground wire
to ground screw.
Be sure power is
disconnected at source.
Disconnect black and
white supply wires.
Figure 5
Figure 6
Figure 4
Remove end cap
of fixture and slide
tombstone sockets
off mounting slots.
Loosen mounting screw(s)
and remove ballast
Use black and
white 18-gauge
solid wire to
connect power
between sockets.
Attach longer
lengths of black and
white wire to
sockets, providing
leads to connect to
supply wires.
Fully seat new sockets
into mounting slots,
pressing in until flush
at back.
Figure 7
Replace end
cap with new
sockets attached
to live end of
fixture.
Live end is marked with red sticker.