Warning, 4 drive belts – Echo 76824 Owners Manual v.1 User Manual
Page 21
PN 18280-00 R121505
19
SERVICE & MAINTENANCE
BEFORE INSPECTING OR SERVICING ANY PART OF THIS MACHINE, SHUT OFF POWER SOURCE,
DISENGAGE THE HYDRAULICS AND MAKE SURE ALL MOVING PARTS HAVE COME TO A COMPLETE STOP.
WARNING
5.4.1 REPLACING DRIVE BELTS
Check the condition of the drive belt annually or after every 25
hours of operation, whichever comes first. If the belt is cracked,
frayed, worn, or stretched, replace it. Replace belt with original
banded type belt only. Do not use single type belts. Follow the
procedure below to replace the drive belt.
Lift engagement arm to disengage drive belt.
Remove the front shield, rear shield and engine tie.
Remove the four bolts securing the hydraulic pump mount
bracket to the chipper base and slide the hydraulic pump out
of the bushing; remove hydraulic belt (Figure 5.6). Do not
reinstall the hydraulic pump at this time.
Loosen the bolts securing the belt kickers to the engine. Do
not remove.
Remove old drive belt and install a new drive belt onto the
pulleys.
Check alignment of the drive belt pulleys using a straight
edge and adjust if needed.
Lower engagement arm.
Adjust the drive belt tension until the belt deflection at the
center of the belt is 7/16" when a 20 lb. load is placed against
the belt (Section 5.4.2).
Raise engagement arm.
Replace hydraulic pump belt or install a new one (if need-
ed).
Reinstall the hydraulic pump. Adjust the hydraulic pump
belt tension by sliding the hydraulic pump in the mounting
slots. Tighten bolts.
Check the alignment of pulleys using a straight edge and
adjust if needed.
Lower the engagement arm to engage the drive belt.
Tighten the bolts securing the belt kickers to the engine.
There should be .028" gap between the drive belt and the
kickers when belt is engaged.
Replace the front shield, rear shield and engine tie.
Lift the engagement arm, start engine and lower engage-
ment arm to test unit. Readjust pulleys and belt tension if
needed.
1.
2.
3.
4.
5.
6.
7.
8.
9.
10.
11.
12.
13.
14.
15.
16.
5.4 DRIVE BELTS
5.4.2 ADJUSTING DRIVE BELTS
Lift the engagement arm to disengage the drive belt.
Remove front shield, rear shield and engine tie.
Lower the engagement arm.
Adjust the eyebolt that anchors the idler spring to adjust belt
tension. Tighten the eyebolt until the belt deflection at the
center of the belt is 7/16" when a 20 lb. load is placed against
the belt (Figure 5.5).
Lift engagement arm.
Replace front shield, rear shield and engine tie.
Start engine, lower engagement arm and test unit. Readjust
pulleys and belt tension if needed.
1.
2.
3.
4.
5.
6.
7.
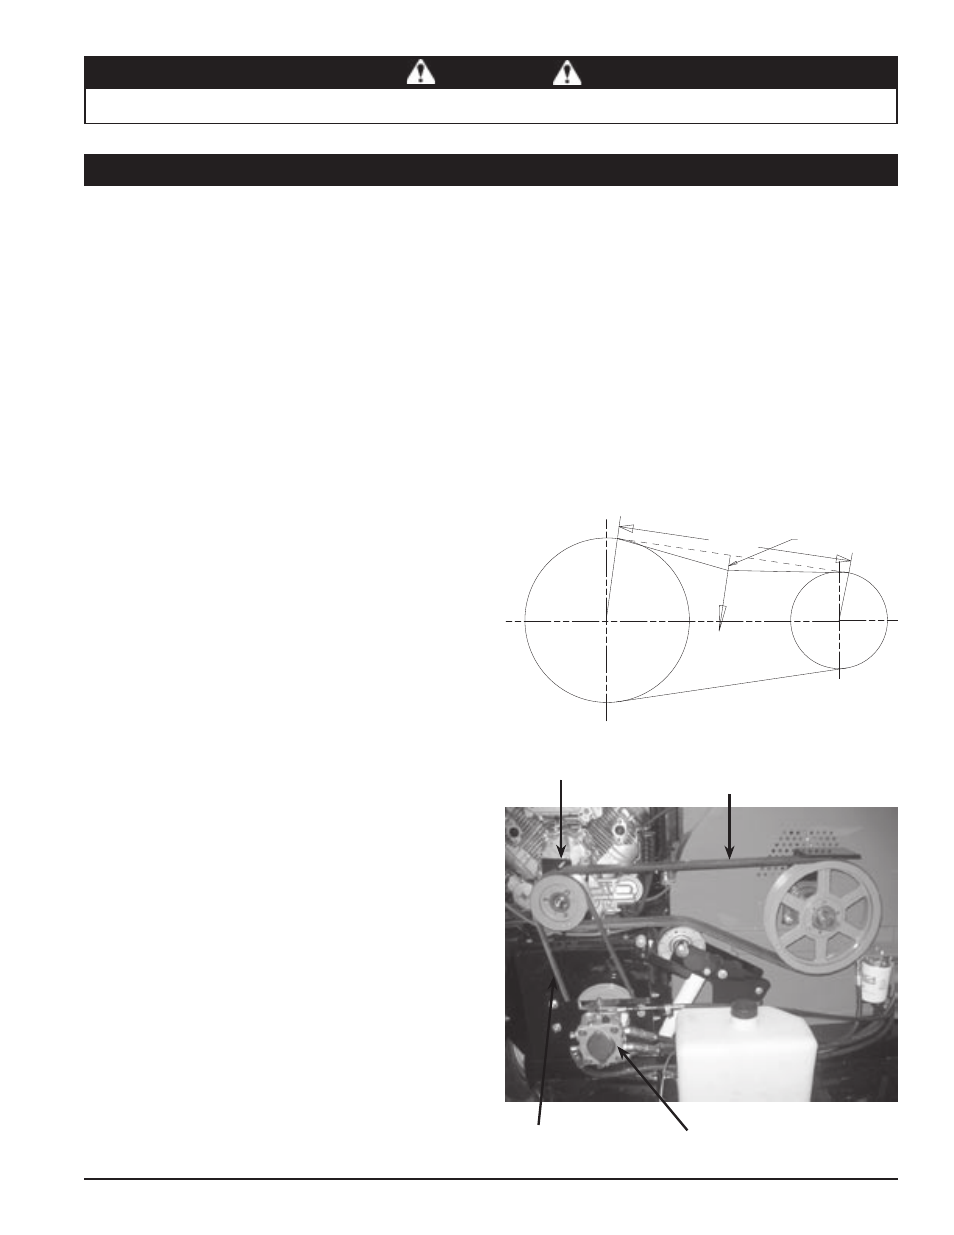
Figure 5.5 - Drive Belt Tension
Span Length
Force
20 lbs
7/16" Deflection
Belt Kicker
Hydraulic Pump
Drive Belt
Hydraulic Belt
Figure 5.6 - Drive Belt