Maintenance, Warning – Aerovent IM-172 User Manual
Page 9
Aerovent IM-172
9
Maintenance
Installation and maintenance are to be performed only by
qualified personnel who are familiar with local codes and
regulations and experienced with this type of equipment.
CAUTION: Sharp edges and screws are a potential injury
hazard. Avoid them.
WARNING
Hazardous moving parts. Unit may contain pro-
tected fan motor which may start automatically
and cause injury. Allow time for reset. Disconnect
power before servicing.
Preventive maintenance is the best way to avoid unnec-
essary expense and inconvenience. Start-up and routine
maintenance should cover the following items:
a. Tighten all setscrews, bolts and wire connections.
b. Check belt tension and sheaves for wear.
c. Lubricate fan bearings (see Tables 3 and 4).
d. Cleaning of unit, propeller and damper (if present).
All motors containing ball bearings are permanently
lubricated from the factory. No additional maintenance
is required.
1. Before performing any maintenance on the fan, be
sure power is turned off and locked in the OFF
position at the service entrance.
2. Ventilators should be carefully checked at least once
a year. For critical or rugged applications, a routine
check every two or three months is suggested.
3. All motors supplied with Aerovent ventilators carry
a one-year limited warranty from date of shipment.
For repairs within the warranty period, the motor
must be taken to the motor manufacturer’s autho-
rized service dealer. Contact your representative for
additional warranty details.
4. A periodic motor check should consist of spinning
the motor shaft with the power off to be sure the
motor turns freely and the bearings run smoothly.
The belt on belt driven units should be removed
from the motor sheave.
5. When removing or installing a belt, do not force the
belt over the sheave. Loosen the motor mount so
that the belt can be easily slipped over the sheave.
6. The belt on belt driven units should be removed and
carefully checked for glazing, cracks, ply separation
or irregular wear. A small irregularity in the contact
surface of the belt will result in noisy operation. If
any of these defects are apparent, the belt should
be replaced. Check the sheaves also for chipping,
dents or rough surfaces which could damage the
belt.
7. The correct belt tension is important. Too tight of
a belt will result in excess bearing pressure on the
motor bearings and shaft pillow blocks and may
also overload the motor. Too loose of a belt will
result in slippage which will quickly “burn” out belts.
A belt should feel “live” when thumped, approxi-
mately
1
⁄
4
" belt deflection (3 to 5 lb.) when subject
to finger pressure at midpoint between sheaves.
8. The belt alignment should also be checked to
be sure the belt is running perpendicularly to the
rotating shafts. Fan and motor shafts must be
parallel. Improper alignment will result in excessive
belt wear.
9. Check sheave setscrews to ensure tightness. Proper
keys must be in keyways.
10. Do not readjust blade pitch or fan RPM. If sheaves
are replaced, use only sheaves of identical size and
type.
11. If unit is to be left idle for an extended period, it
is recommended that belts be removed and stored
in a cool, dry place to avoid premature belt failure.
12. The standard pillow block bearings on belt driven
ventilators are factory lubricated and are provided
with external grease fittings. Annual lubrication is
recommended, or more frequently if needed (see Table 3).
It is recommended to add fresh grease at start-up,
but do not over-grease. Use only 1 or 2 shots of
a recommended lubricant with a hand gun in most
cases (see Table 4). Maximum hand gun rating
40 P.S.I. Rotate bearings during lubrication where
good safety practice permits.
CAUTION: Greases of
different soap bases (lithium, sodium, etc.) may not
be compatible when mixed. Prevent such intermixing
by completely purging the bearing of old greases.
The most frequent causes of bearing failure are not
greasing often enough, using an excessive quantity
of grease or using incompatible greases. Excessive
vibration, especially if the bearing is not rotating, will
also cause bearings to fail. Bearings must also be
protected from water and moisture to avoid internal
corrosion.
13. During the first few months of operation it is rec-
ommended that the bearing setscrews be checked
periodically to ensure that they are tight.
14. The rotating propeller requires particular attention
since materials in the air being handled can build
up on the blades to cause destructive vibration or
weaken the structure of the propeller by corroding
and/or eroding the blade metal. Regular inspection
and corrective action at intervals determined by the
severity of each application are essential to good
service life and safety.
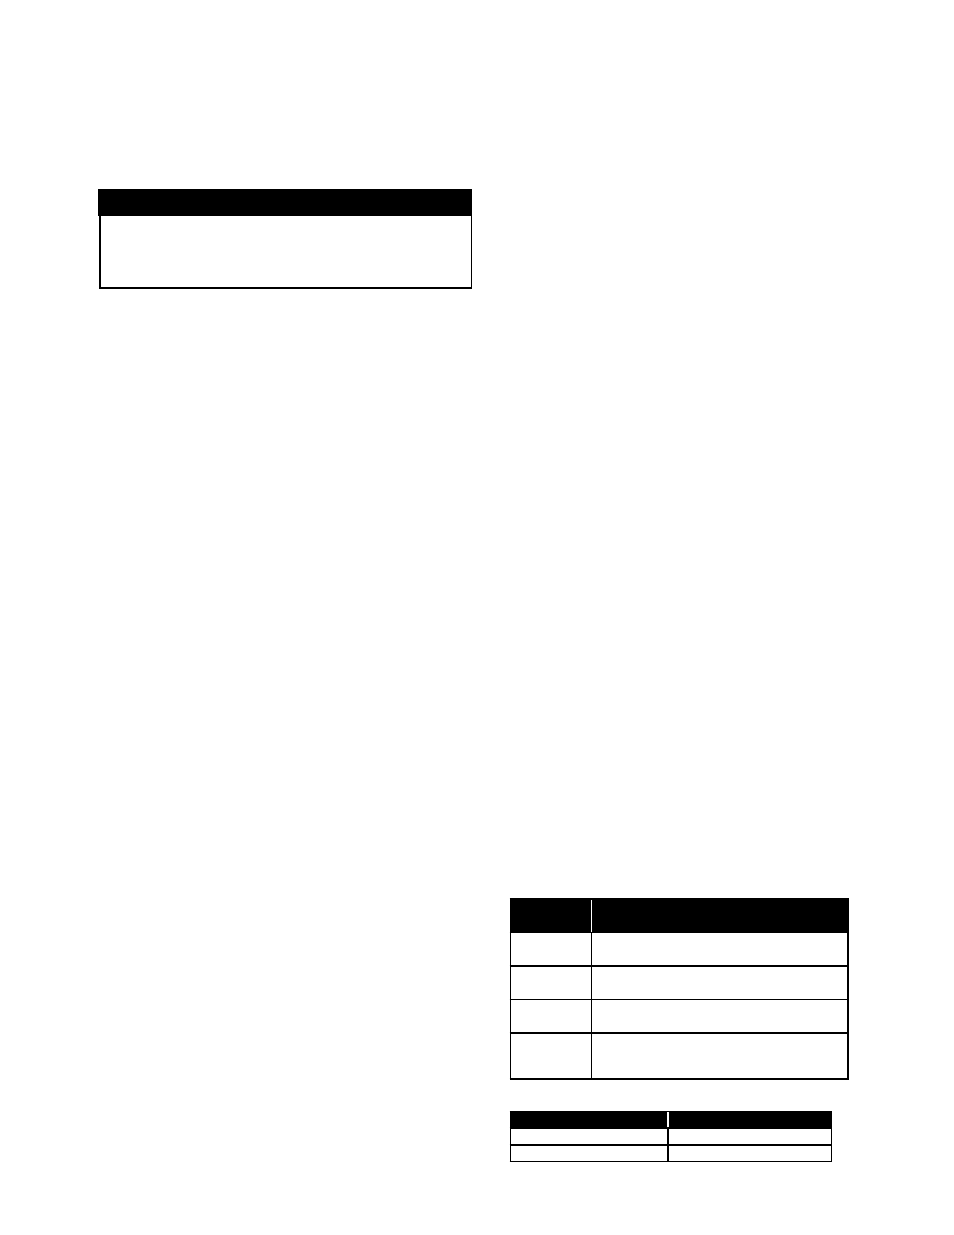
Table 3. Suggested Fan Bearing Greasing Intervals
Table 4. Grease Manufacturers
MANUFACTURER
GREASE (NLGI #2)
Shell
Gadus S2 V100 2
Exxon/Mobil
Ronex MP
INTERVAL
(MONTHS)
TYPE OF SERVICE
12 to 18
Infrequent operation or light duty in
clean atmosphere
6 to 12
8 to 16 hrs./day in clean, relatively dry
atmosphere
3 to 6
12 to 24 hrs./day, heavy duty, or if
moisture is present
1 to 3
Heavy duty in dirty, dusty locations; high
ambient temperatures; moisture laden
atmosphere; vibration