Set up your nokia e62, Welcome to cingular – Nokia E62 User Manual
Page 4
6
7
Set Up Your Nokia E62
Insert the SmartChip and Battery
Welcome to Cingular
Welcome
Thank you for purchasing the Nokia E62 and welcome to the
Cingular network! Your purchase of the Nokia E62 provides
you with the winning combination of a superior mobile email
experience and Cingular’s uncompromised network quality.
Where can I find more information?
You can find more information about your device in the Nokia E62
User Guide found on the Getting Started CD-ROM included in
your sales package. Further detailed information is given in the
separate user guide. Do not use this Getting Started Guide in
place of the complete User Guide which provides important safety
and maintenance information.
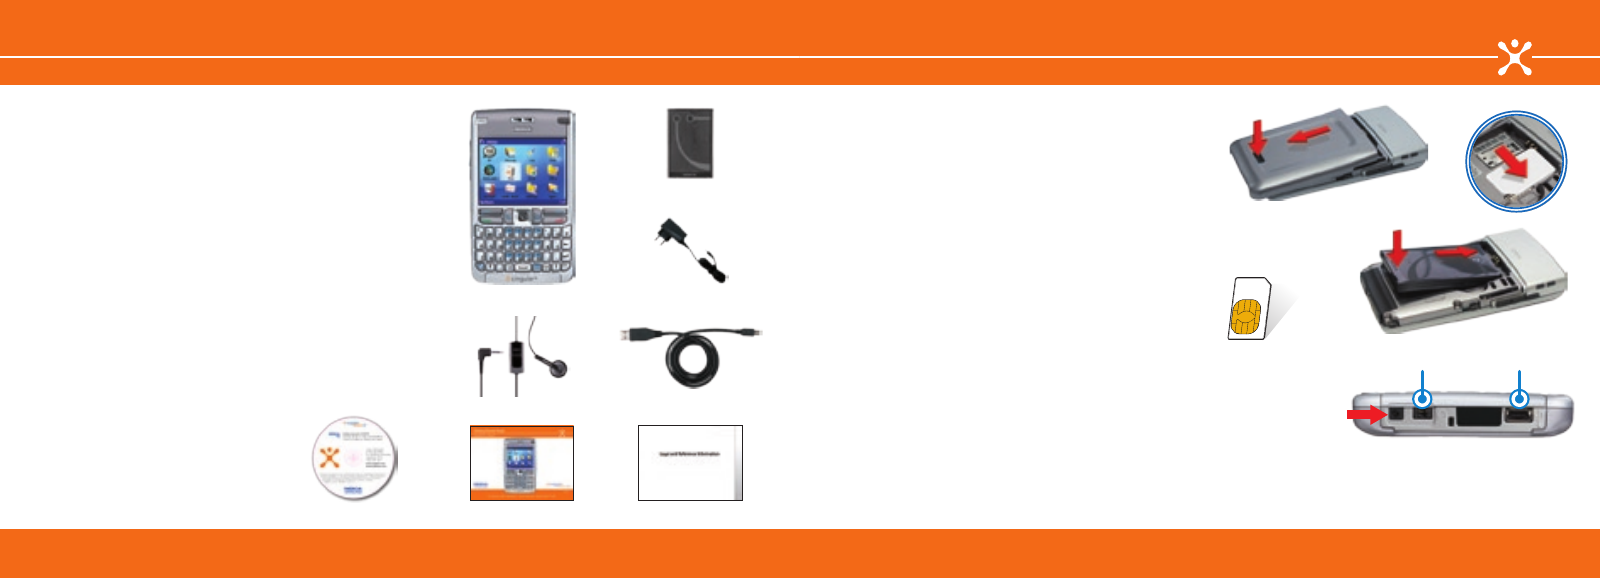
What’s in the box?
Take a moment to look at your Nokia E62 sales package. Make
sure the following components have been included:
Your Nokia E62 uses a convenient SmartChip that holds
information about your Cingular service and stores your contact
information. A SmartChip allows you to switch between phones,
and keep your phone number and phone book with you. That
means you can transfer your Cingular service and store your
contacts to any phone simply by inserting your SmartChip!
Insert the SmartChip
1. Always switch the device off and disconnect the charger
before removing the battery. With the back of the Nokia E62
facing you, hold down the cover release button (fig. 1a), and
slide the battery cover in the direction shown (fig. 1b).
2. If the battery is installed, use the finger grip to lift the
battery from the battery compartment to remove it.
3. Slide the SmartChip into position with the metal contacts
facing down and the beveled edge pointing toward the
bottom of the device (fig. 2).
Insert and charge the battery
1. Insert the battery by aligning the contacts of the battery
with the corresponding connectors on the battery
compartment and gently click the battery into place (fig. 3).
2. Replace the battery cover. Ensure the cover is secure and
locked into place.
3. Plug the Nokia AC battery charger into a standard AC wall
outlet.
4. Connect the charger cable to the bottom of the Nokia E62
(fig. 4).
a.
b.
fig. 2
SmartChip
(with metal contacts)
fig. 1
Nokia E62 device
Battery
DKE-2 USB data cable
AC battery charger
Getting Started Guide
Headset
Getting Started CD-ROM
Safety & warranty info
a.
fig. 3
b.
fig. 4
Charger
connector
Headset jack
USB