Remote control display, Ipod/usb, Av receiver 1. adv mcacc +12 – Pioneer SC-LX73 User Manual
Page 12: Controls and displays 02
Controls and displays
02
12
En
STATUS – Press to check selected receiver settings
(page 77).
PHASE CTRL – Press to switch on/off Phase Control
or Full Band Phase Control (page 60).
CH LEVEL – Press repeatedly to select a channel,
then use
/ to adjust the level (page 112).
THX – Press to select a Home THX listening mode
(page 57).
PQLS – Press to select the PQLS setting (page 71).
AUTO/ALC/DIRECT – Switches between Auto
Surround (page 56), Auto Level Control, Optimum
Surround mode and Stream Direct mode (page 59).
STEREO – Switches between stereo playback and
Front Stage Surround Advance modes (page 58).
STANDARD – Press for Standard decoding and to
switch various modes (
2 Pro Logic, Neo:6, etc.)
(page 56).
ADV SURR – Use to switch between the various
surround modes (page 58).
SIGNAL SEL – Use to select an input signal (page 59).
SLEEP – Use to put the receiver in sleep mode and
select the amount of time before sleep (page 77).
DIMMER – Dims or brightens the display (page 77).
A.ATT – Attenuates (lowers) the level of an analog
input signal to prevent distortion (page 76).
SBch – With this receiver, SBch cannot be used.
MCACC – Press to switch between MCACC presets
(page 59).
HDMI OUT – Switch the HDMI output terminal
(page 77).
11
LIGHT
Press to turn on/off the illumination for the buttons.
1
12 Remote control operation selector switch
Set to
RECEIVER to operate the receiver, TV or SOURCE
to operate the TV or the source device.
When this switch is set to
RECEIVER, the receiver can be
controlled (used to select the white commands). Also use
this switch to set up surround sound.
13 VOL +/–
Use to set the listening volume.
14 MUTE
Mutes the sound or restores the sound if it has been
muted (adjusting the volume also restores the sound).
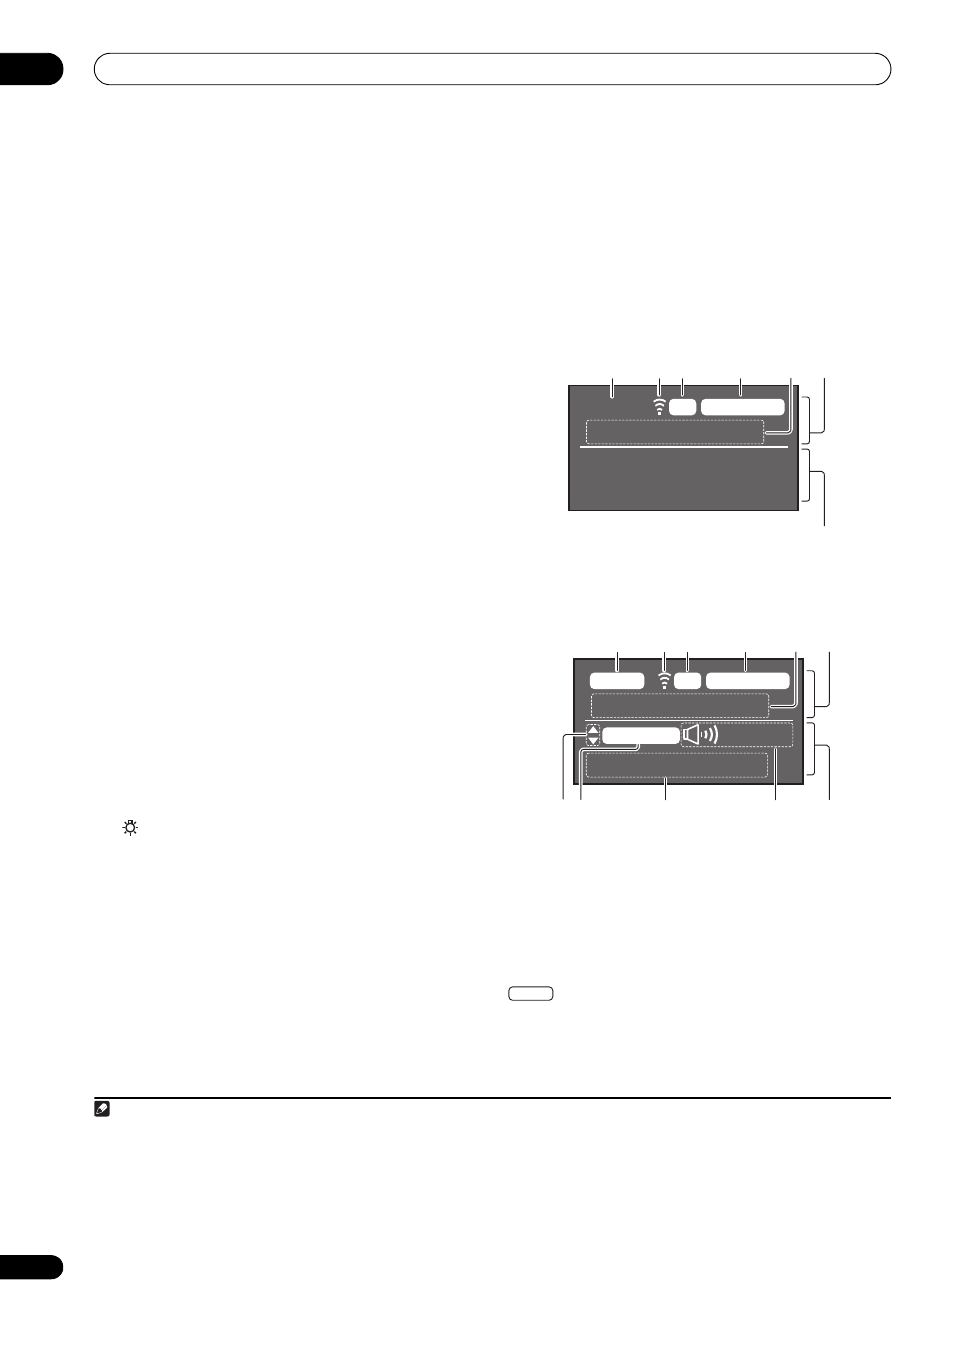
Remote control display
2
Remote control display for infrared signal
transmission (default)
Remote control display for RF two-way
communications
3
1
Remote control operating zone indicator
This indicates which zone the remote control is currently
set to operate. The display indicates the setting of the
MULTI-ZONE operation selector switch.
Only when RF two-way communications:
The box display here indicates the communication status
between this remote control unit and the receiver.
(White box with black letters): Two-way
communications are established and the receiver’s
power is on.
Note
1 Press and hold in the
LIGHT button for 5 seconds to change the illumination mode 1 or 2. When set to LIGHT MODE 2 (default), the
illumination only lights when the remote control
LIGHT button is pressed. When switched to LIGHT MODE 1, the illumination lights whenever
buttons are operated. Setting
LIGHT MODE 1 will shorten the service life of the batteries.
2 The display lights when a remote control operation is performed, then turns off after 20 seconds if no other operation is performed. When in
the Remote Setup mode, the setup is canceled and the display turns off if no operation is performed for 1 minute (page 79).
3 • This is displayed when an RF adapter is connected to the receiver and paired with the remote control. For details, see Using the RF
communications function on page 87.
• Depending on the communications environment, two-way communications may not work well and the remote control display may not reflect
the receiver’s status.
MAIN
SOURCE
IR
iPod/USB
1
2 3
4
5
6
7
MAIN
VIDEO
RCV CTRL
RF
AV RECEIVER
1. Adv MCACC
+12.
0dB
1
2 3
4
5
6
8 9
10
11
12
MAIN